Photos hold a sentimental value and remind us of good times with family and friends. To relieve these happy moments, Windows 10 comes with a default app called Photos that allows users to browse through their saved photos, but it’s not perfect. With time, third-party photo viewing applications have been developed, promising better and more immersive experiences and the ability to manipulate or make tweaks to the photos with greater ease. In this article, we’ll take a look at the 5 best photo viewers for Windows 10.
Features in the Windows Photos App
Before we proceed further, let’s delve in and see what Windows Photos App has to offer.
- Cropping / rotating and resizing of photos
- Application of filters to images
- Adjusting the Color contrast and Light of images
- Red-eye and Spot Fix feature
- An option to Edit photos in paint 3D
- An option to import Photos from an external Hard drive
- Basic slideshow
So, what’s wrong with the Windows 10 Photos App?
The Windows 10 Photos App may provide the features mentioned, but according to most users, these features are very basic and cannot allow one to make any significant tweaks to their images. Furthermore, the Photos app is limited in the file types it can open, for instance, it cannot open RAW file formats like Photoshop files (PSD). Many users have also complained that the Photos App takes too long to load and hogs a great deal of RAM and CPU, making the PC run slower than usual. In view of this, we’ll look at some of the best alternative photo viewing Apps – that will take your Photo viewing and editing experience to a whole new level.
Irfanview
Irfanview is a compact, versatile, fast & easy to use photo viewing and editing software that’s available for both 32-bit and 64-bit Winactdows versions. It supports a myriad of file formats including BMP, DIB, JPG, JPEG, PSD, PDF, GIF, TTF, TXT, ANI, CUR, CLP, DDS, CAM, Mac PICT, QTIF, MP4, WAD, WBMP, RAS, SUN, SFF, and PPM. It’s available as freeware (with a paid license needed if used for commercial purposes) and comes packed with innumerable features that allow users to perform both basic and enhanced image editing features. For enhanced functionality, you can also download plugins that support enhanced features such as video & audio formats and slideshows. Let’s dive in and explore the application’s features in detail.
Features
- Batch Conversion / Renaming
- Sorting and searching files
- Creating Custom Panoramic Images
- Screenshot Capture (See also Windows 10 Screensaver NOT WORKING)
- Cropping / Resizing / Rotating Images
- Adjusting images Color balance / Contrast
- Creating Custom Slide shows
- Applying images effects
- Adding text to image
- Adding borders to images
- Setting images as wallpapers
- Thumbnail image view
Pros
- It’s freeware – Free to download
- Works on both 32-bit and 64-bit systems
- It supports a wide range of file formats – PCX, PNG, JPEG, GIF, BMP, TIFF, CRW, CR2, AVI, MOV, MPEG4, WAV, WMA MP3 and raw formats e.g. PSD
- It can perform batch processing tasks such as batch renaming, conversion, resizing that save on time.
- It comes with a customizable slideshow. In addition, you can create a self-running executable slideshow file which you can later burn on a CD/ DVD
- It comes with JPEG lossless rotation feature which enables rotation of photos without loss in picture quality
- Comes with available free plugins for enhanced features such Video playback OCR (Optical Character Reader)
- It comes with panorama view feature that allows you to join images side by side; vertically or horizontally
Cons
- Its user interface is too minimalist and users have to spend quite some time figuring out where certain features are located.
Let’s take a look at some of the features in detail
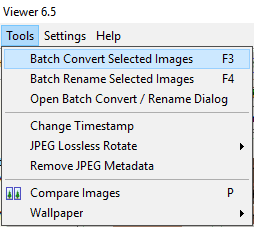
Batch Processing of Images
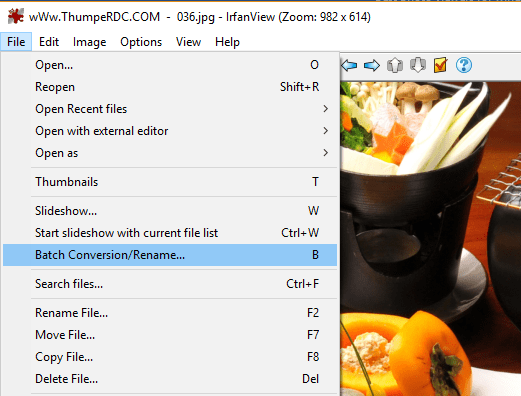
IrfanView remains an excellent choice for making modifications to a ‘batch’ or group of images all at once. It comes with a ‘batch’ module that allows image modification in bulk. To achieve this, click on ‘File’ then ‘Batch Conversion/Rename’.
In a single sweep, Batch processing module can perform many modifications such as
- Cropping and resizing images
- Converting Images to any size formats
- Renaming Images
- Adding text to images

Custom Slideshows
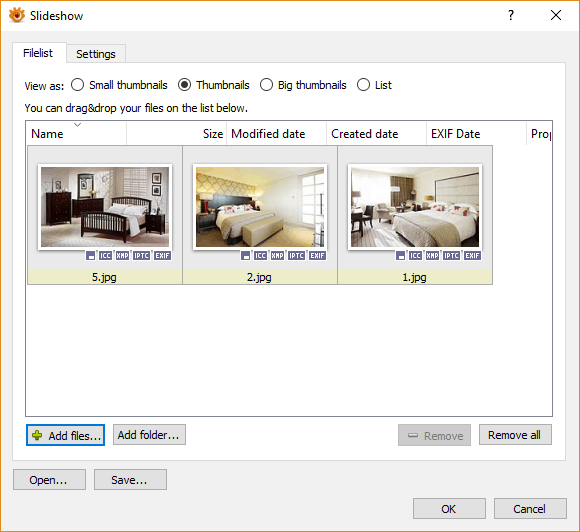
In Irfanview, the slideshow feature is replete with many features that allow you to add your preferred images, modify transition timings, save slideshow as an executable (.exe) and even burn the slideshow to a CD/DVD.
To access Slideshow settings, Hit the ‘W’ key or Click on ‘File’ then select the ‘Slideshow’ option as shown below.
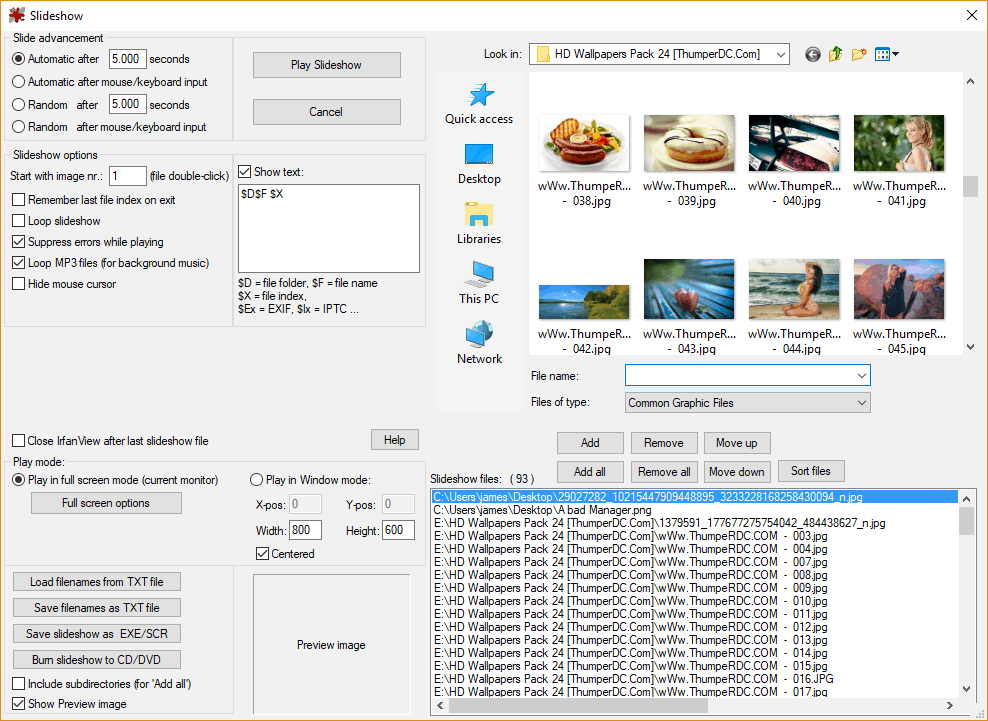
To add Photos to a slideshow, click on the ‘Add‘ button. If you wish to add all images in a folder/directory to the slideshow, click on ‘Add all‘. To remove a photo, hit on the ‘Remove’ button or ‘Remove all‘ to remove all the photos.
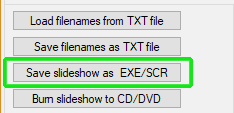
If you wish to save the file as an executable (exe), click on the ‘Save slideshow as EXE/SCR’ option
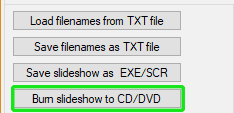
To burn the slideshow to a CD / DVD, Click on the ‘Burn slideshow to CD /DVD’ option. This will launch a Wizard that will guide you in burning the slideshow to the CD/DVD.
Panoramic View
With IrfanView, you can create a stunning side by side display of photos, both vertically and horizontally. To achieve this simply navigate to ‘Image‘ then ‘Create Panorama Image‘. This will pop open a dialogue Window as shown.
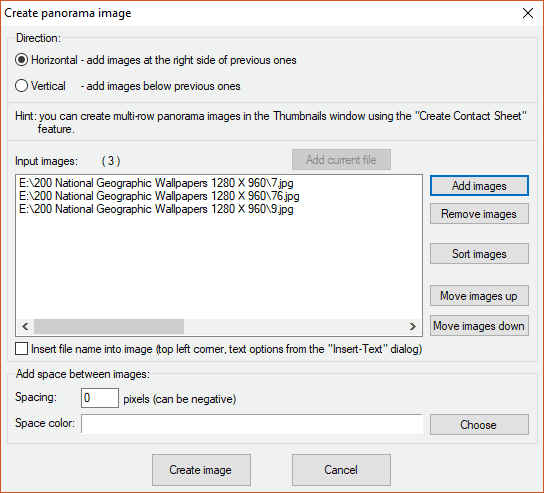
Here, you can add/arrange the images you want to include in the panorama as well as select the Panorama orientation (Vertical or horizontal).

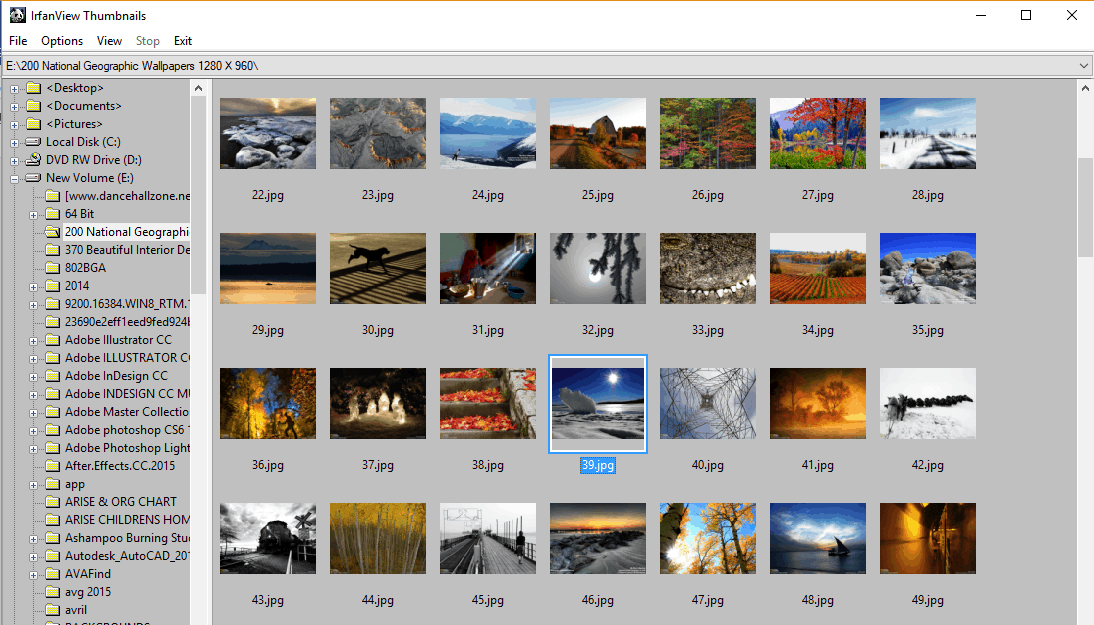
Viewing Thumbnails
IrfanView provides a pleasant way of having a peek at all your images in any folder on your hard drive, USB drive or any storage location. Upon installation, a Thumbnail icon appears on the desktop as shown.
When you click on it, you can view photos at a glance in any directory you wish. In addition, you can perform additional tasks such as renaming your photos, copying or even deleting them. You can also sort them according to type, file size, date among other attributes. To perform these modifications, right click on a thumbnail and select your desired option.
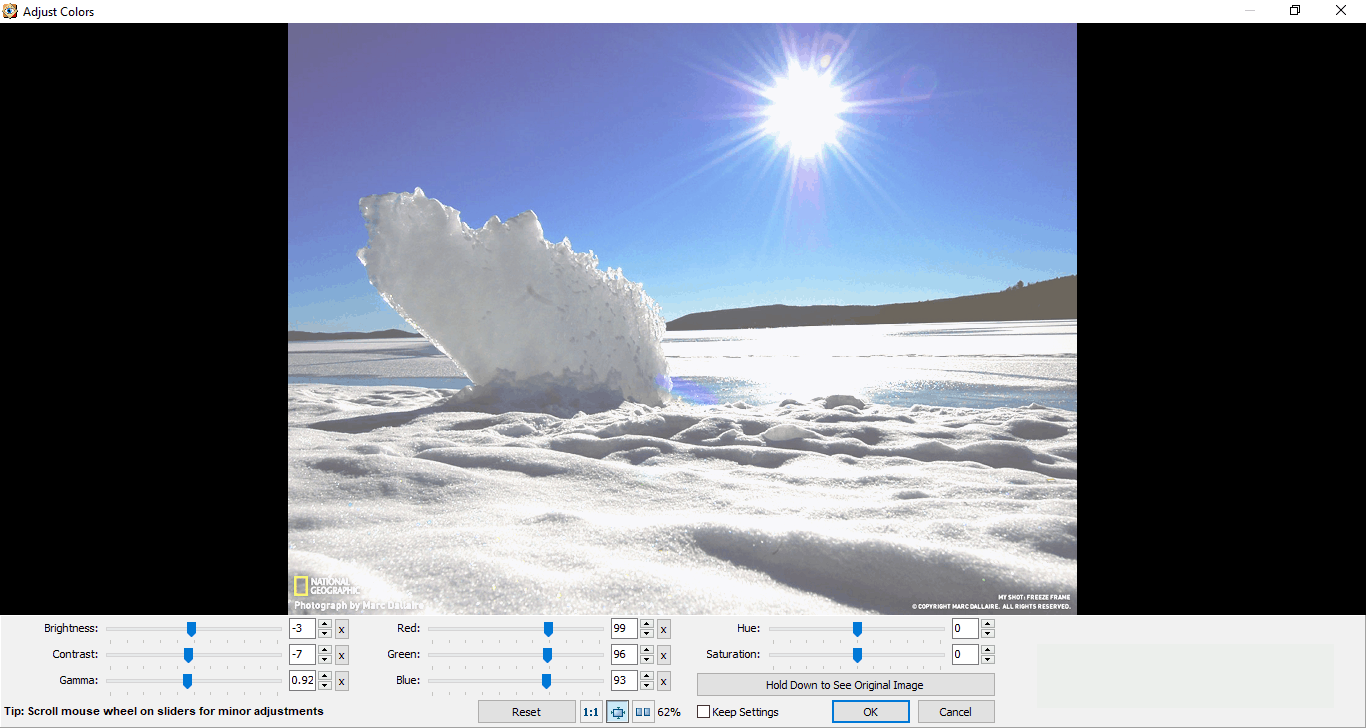
Color adjustments
Irfan View is an excellent tool in adjusting color, contrast, and brightness of an image. To make the desired adjustments, click on ‘Image’ then scroll down and select ‘Color Correction’

Feel free to play around with the contrast, brightness, color balance, saturation and Gamma balance to acquire the desired outcome for your image. Once satisfied with the result, Click on “OK” to effect the changes.

Image Effects

In addition to making color adjustments, you can apply some cool image effects to your images by Clicking on ‘Image’ and selecting ‘Effects’ to launch the Effects palette which comes with a host of effects to choose from as seen below.
To apply the effect, click on ‘Apply to current image’ and then ‘OK’.
Adding Text to an Image
With Irfan view, adding text to an image is quick and easy. You can insert text to the Image by pressing Ctrl + T.
A dialogue window that gives you a text field in which you can type in your text appears.
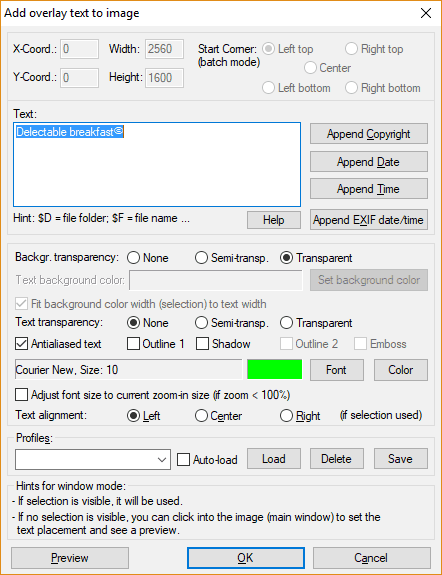
In addition, you can also
- Append Time and Date
- Append Copyright Symbol
- Change Font size & Color
- Define text alignment (Left, Center, Right)
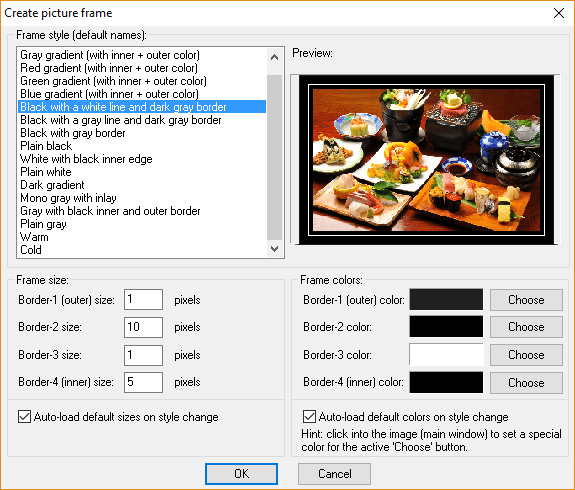
Adding Borders to images
Another enhancement you can add to your images is a nice and cool border/frame around its edges. To achieve this, click on ‘Image’ and select ‘Add border/frame’ option as shown. in the left pane, be sure to find a few frame styles that you can use for your image. In addition, you can also style the frame size and color of the border.
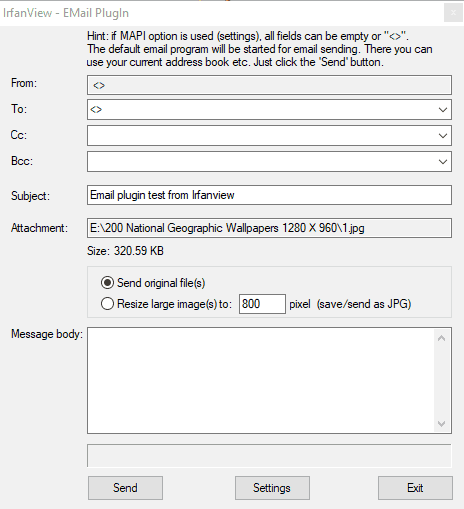
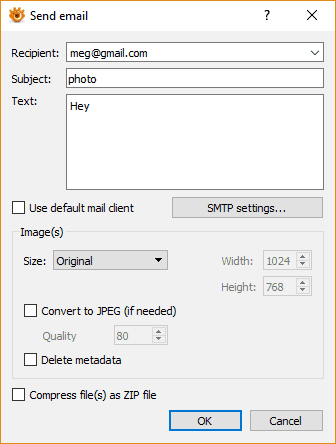
Emailing Photos
Irfanview comes with a plugin that allows one to send an image via email. To send an image in an email from Irfanview, click on ‘Options’ then ‘Send file by Email’. A shortcut to this is Shift + M. This opens a dialogue box that with contains the relevant details such as recipient’s address, Cc, Bcc, and Subject fields.
Setting an Image as a Wallpaper
To set an image as a wallpaper, click on ‘Options’ then Select ‘Set as wallpaper’ this will give you other options which will determine the image’s position such as Centered, Tiled, and Stretched.

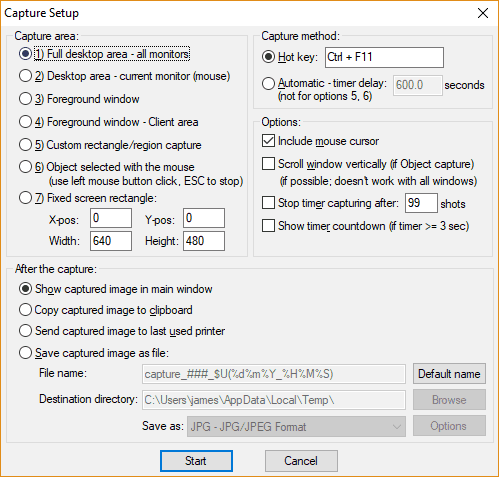
Capturing a Screenshot
To capture the whole screen, or part of the screen, click on ‘Options‘ then select ‘Capture/Screenshot‘. You can also simply press the ‘C’ key to launch the Capture Window which you can use to specify additional parameters with regards to the screen capture.
Resizing / Rotating / Cropping Images
If your image is too large in resolution and would like to scale it down to a smaller resolution, click on the ‘Image’ tab and select “Resize/Resample”
In the pop-up window that appears, you can choose to manually define the dimensions you wish to scale down your image to. Alternatively, you can select from an array of pre-determined resolution sizes on the left pane.
Note that there are 3 metrics for resizing; Pixels, Centimeters, and Inches.
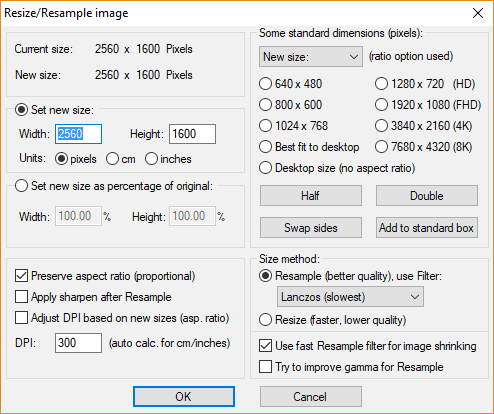
Once satisfied with your selection, Hit “OK”
You can always Undo the changes made by clicking on the ‘Undo’ button located on the Menu bar as shown.
To Crop an image, place the cursor on the image and hold down the left mouse button as you drag it diagonally draw your selection.
NOTE:
As you hover within the selection box, the cursor turns to a magnifying lens icon. When you hold down the right button inside the selection box, the cursor changes into a hand and this allows you to move the selection box to anywhere you want. Releasing the mouse will cause the Selection box to drop.
Now, to crop the image, click on “Edit” and select “Crop selection (cut out)” option. You can then Save the Image by pressing Ctrl + S and once you’ve chosen your destination folder, Click ‘Ok’
Cropped out section
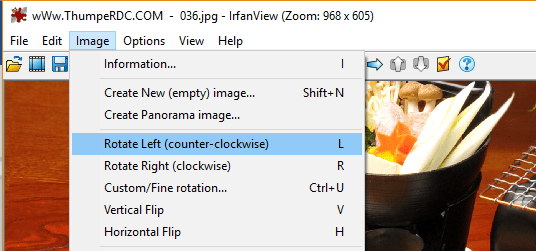
To Rotate an Image, Click on ‘Image’ tab and select the Rotate Options (Rotate Left (Counterclockwise) or Rotate Right (clockwise))
FastStone Image Viewer
FastStone image viewer is a powerful, intuitive and easy to use image viewer that does a whole lot more than just viewing images. It comes replete with nifty tools that allow you to edit your images to your preference. Like Irfanview, It supports quite a large number of graphics formats including JPEG, PNG, GIF, TIFF, BMP, PPM, TGA, PCX, PDF, ICO and RAW file formats such as Sony’s ARW and Canon’s CR2. It’s available for free, both for personal and educational use. It’s compatible with Windows XP, 7, 8, 8.1 and 10. Some of its features include
Features
- Image and Video viewing
- Thumbnail image view
- Importing photos and Videos from external devices
- Rotating, cropping and resizing images
- Clone / Heal tool
- Red eye removal
- Adjusting Colors / Curves / Levels
- Displaying Image Histogram
- Custom slideshows
- Screen capture
- Setting Image as Wallpaper
- Printing and Emailing Images
Pros
- It’s freeware, easy to download and install
- It runs on both 32-bit and 64-bit Windows XP and later versions (Windows Vista ,7,8 & 10)
- Low system requirements for running the application – 256MB RAM & occupies 15MB of Hard disk space.
- It supports a wide range of graphic formats (BMP, JPEG, JPEG 2000, animated GIF, PNG, PCX, PSD, EPS, TIFF, WMF, ICO and TGA) as well as popular digital camera RAW formats (CRW, CR2, NEF, PEF, RAF, MRW, ORF, SRF, SR2, ARW, RW2 and DNG). Furthermore, you can play video formats such as mp4 and mpeg4.
- It comes with an easy to use and effective screen capture tool that you can use to capture sections of your screen for use in tutorials.
- Its JPEG lossless rotate feature also ensures that images retain their crispness when rotated to any direction.
- It has a built-in folder tree that allows one to navigate easily between different directories in the hard drive.
- It comes with a musical slideshow with 150+ transitional effects.
- It comes with other useful and crucial image editing features such as red-eye removal, clone and heal, drop shadow, adjusting colors, levels, and curves which are found in more advanced software editing tools such as Photoshop.
Cons
- The application has limited help and support forums. The only channel for support is via email.
Let’s take a closer look at some of its features.
Thumbnail view of images
Upon launching the application, you are presented with a list of folders or directories on the left pane to choose from to have a preview of your images at a glance as shown below. Beneath the list of directories, a preview pane is provided to have a better view of the image. You can zoom in and out using the Zoom tools located on the toolbar as well as pan the image by holding down the left cursor and dragging it around. Download it here.
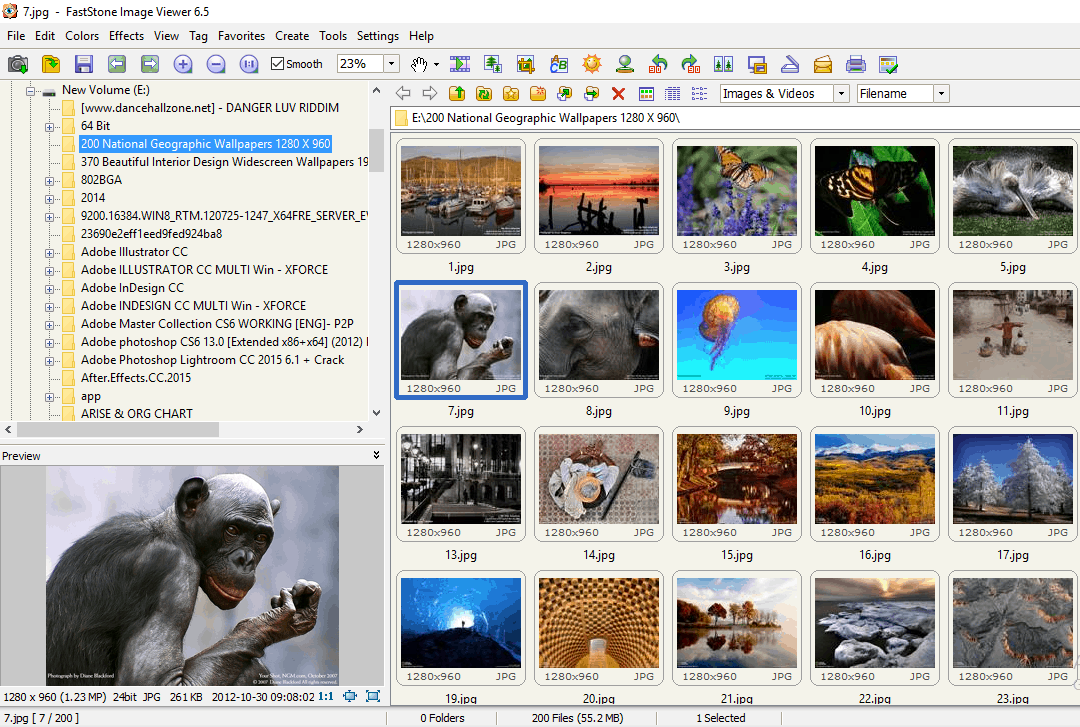
Importing Photos and videos / Acquire Images from a scanner
FastStone photo viewer gives you an option to import your photos and videos from external devices such as digital cameras, cell phones, USB drives to mention a few. To achieve this, click on ‘File’ then select ‘Import’ photos and videos’.
This opens a dialogue box that allows you to choose the drive you’re importing the photos from and the destination folder. After defining the import location and destination folder, click on ‘Import’

To scan images directly from a scanner, click on ‘Acquire Images from a Scanner‘
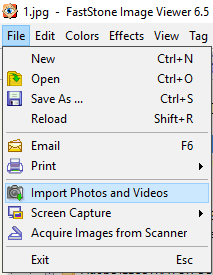
Rotating / Cropping and Resizing images
The photo viewer gives you the freedom to rotate, crop and resize your images to your preference.
To rotate an image to any orientation, Click on ‘Edit’ then scroll down and select ‘Rotate’. A couple of rotation options will be available as shown.
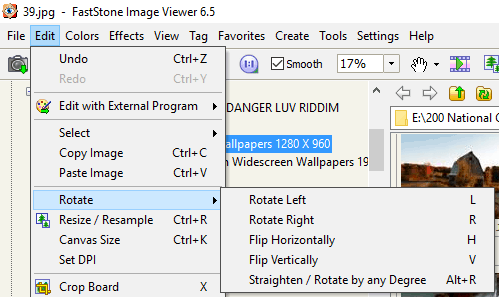
To crop an image, select the ‘Crop’ option. This opens a crop board. To crop an image, press and hold down the left mouse key and select the area you wish to crop out as shown and hit on ‘Crop’.
To resize your image, Select the Resize / Resample option and from the Window that appears, define the dimensions to resize your image as shown.

Clone and Heal / Red Eye removal
The clone and Healing tool is also present in the application giving you the ability to replace content from one part of the image to another as shown.
The red-eye removal tool helps you get rid of the red-eye effect caused by the flash of a camera in an area of low light concentration e.g at night. To accomplish this, click on ‘Edit‘ then ‘Red Eye removal‘. select the Red-eye area and click on ‘Remove red eye button’.

Final result

Adjust Colors / Levels /Curves/Unsharp Mask
You can make further adjustments to the color your images and perform advanced image editing techniques that you would find in a professional photo editing software such Photoshop, for example, Reducing Noise, Sharpening /Blurring images, Adjusting Curves, Levels, and Colors.
You still find other Color options such as Sepia, Grayscale and Negative.
Adjusting Curves

Batch operations
You can also perform batch operations such as converting images to a certain file format and renaming them.
Custom Slideshows
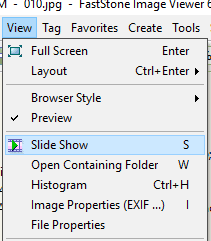
You can initiate a slideshow for your images and videos by clicking on the ‘View’ tab then ‘Slideshow’. Alternatively, you can simply hit the ‘S’ key. A dialogue pops up that allows you to define additional attributes such as seconds per slide, random order, autoplay etc.

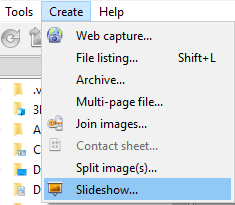
You can also build your slideshow by clicking on ‘Create’ then selecting ‘Slideshow builder’. Click on ‘Add files’ or ‘Add Folder’ to add your images and finally hit on ‘Create’ to save the slideshow.
Setting Image as Wallpaper
To set your image as a Desktop wallpaper, click on ‘Tools’ then scroll down and select ‘Wallpaper’. A few options will appear to help you select your preference.

Other features include
- Emailing Images
- Printing Images
- Copy and Pasting images
- Side by Side image comparison
- Screen capture
XnViewMP
XnView MP is not only an image viewer but an image organizer and general-purpose file manager. It is provided as freeware for private, educational purposes and non-profit uses. It’s a multilingual tool and supports more than 500 file formats, both audio and video. Some of these files include JPG, PNG, TIFF, ICO, PDF, GIFs to mention a few. In addition, it supports graphics vectors such as PSD, EPS, and SVG and supports Photoshop plugins such as Hay’s filters. Xnview is cross-platform and supports MacOS, Linux, and Windows, both 32-bit and 64-bit. It can perform basic editing tasks such as rotating, cropping, copying, pasting printing and resizing of images and other advanced tasks such as:
Features list
- Search and Sorting Images
- Importing and exporting images
- Screen capture / Setting image as Wallpaper
- Batch renaming and converting images
- Resizing / cropping / rotating images
- Rating and color labeling images
- Joining images
- Support for video playing
- Red-eye removal
- Thumbnail Image view
- Send images via email and FTP
- JPEG lossless transformations – rotation / flipping
- Custom slideshows
Pros
- The application supports an incredibly big number of supported file formats – 500+ file formats – from the common JPEG, PNG files to the rare file types like tim /tim2 for Sony PlayStation / PlayStation 2 TIM file.
- It supports batch conversion of files from one format to the other.
- It scores big on the organization of files and folders
- It has a built-in folder tree that allows one to navigate easily between different directories in the hard drive.
- In addition, it comes with other basic image editing features such as crop, rotate, adjusting colors, brightness, and many others.
Cons
- It’s only free for personal or educational uses and nonprofit organizations, but a premium license is required for professional uses.
Now let’s delve at some of the features
Batch Processing
Some of the batch processing tasks that you can perform using this application include Image Cropping, renaming, rotation, resizing, appending a watermark to mention a few. To achieve this, Hit ‘Tools’and scroll to either ‘batch convert‘ or ‘batch rename’.
Screen Capture
XnView MP comes with a screen capture feature that gives you similar functionalities to the Windows snipping tool. You can take a screenshot of the entire Desktop, Active Window, or a selection of your choice. Click on ‘Tools’ and then select ‘capture’. In the dialogue box that pop-up, select your desired preferences and hit ‘Ok’ to begin the screen capture.

Web Capture Feature
The web capture feature allows one to take a snapshot of a webpage. To achieve this, click on ‘Tools’ and navigate to ‘Web Capture’. The snap captured is in a responsive mobile-phone format.

Slideshow creation
You can create custom slideshows by Clicking on ‘Create’ and clicking on ‘Slideshow’ as shown.
To add images, click on ‘Add files’ in the pop-up dialog that appears and click ‘Ok’.
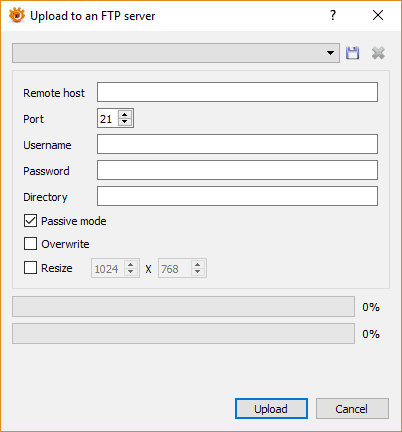
Uploading Images to the web / FTP server / Sending by mail
You can email images using your already configured Outlook profile by clicking on ‘Tools’ then ‘Send by Email’. You’ll be required to specify the recipient’s address, body text and specify SMTP settings by hitting on the ‘SMTP’ button.
To upload to an FTP server, click on the ‘Send by FTP’ option and specify the hostname and authentication credentials.
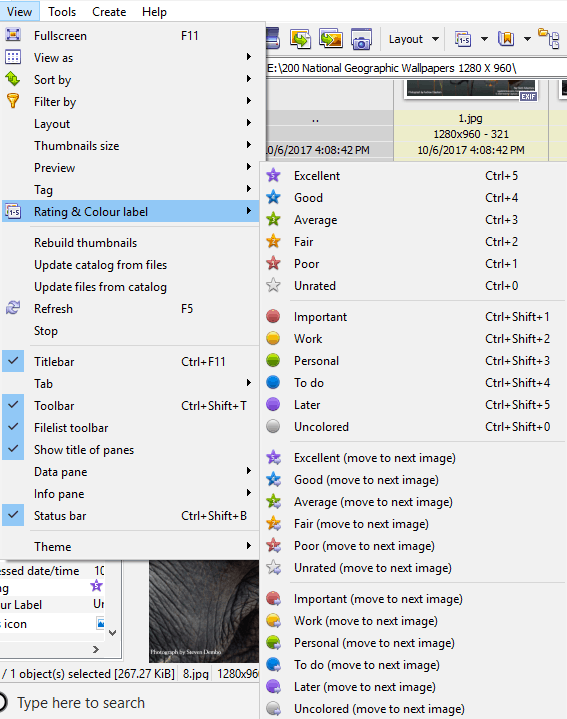
Rating Images and appending Labels
You can organize your photos or catalog them according to a rating of your preference. To achieve this, click on ‘View‘ then ‘Rating & Color label‘
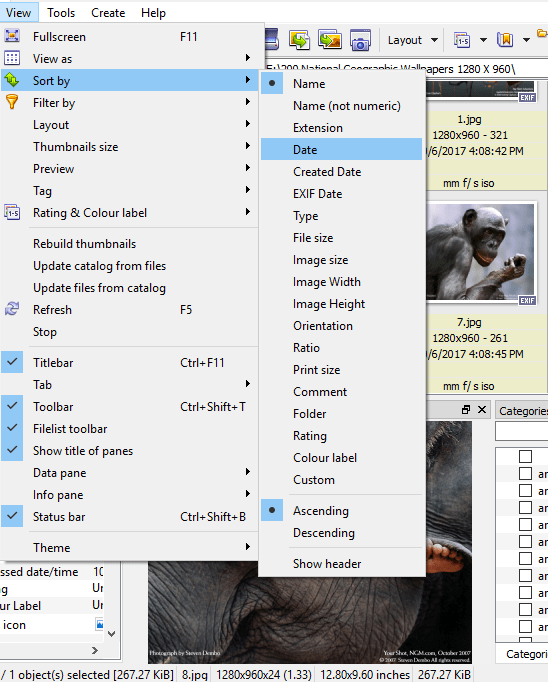
Sorting and filtering Images
Images can be sorted according to Type, Date, Size, Ascending and Descending order. You can also filter images based on the ratings that you have ascribed earlier on.
Picasa 3 Photo Viewer
Picasa Photo viewer was developed by Google Inc. and gives its users a stunningly sleek and intuitive user interface that automatically organizes all your photos and videos into elegant albums according to date. This implies that less time will be wasted trying to search for your photos and videos. In addition, Picasa photo viewer is compatible with a myriad of photo formats including JPEG, GIF, PNG, BMP, PSD and is also compatible with several digital cameras. Let’s take a look at some of its key features
Features list
- Batch processing of images
- Custom Slideshows
- Support for playing video files
- Making Photo Collages
- and emailing images
- Making a short movie from a collection of photos with an audio track background
Pros
- It’s available as free software
- It’s easy to install and download.
- Very good in organizing images into folders /directories
- It has a very friendly user interface.
Cons
- Its Support was discontinued by Google in favor of Google Photos
Organization of Images
Picasa intuitively imports and organizes your images, icons, thumbnails, and videos into albums according to date. During the installation process, one is prompted to select the location where to search the images from.

These are then grouped according to date and placed in their separate albums as shown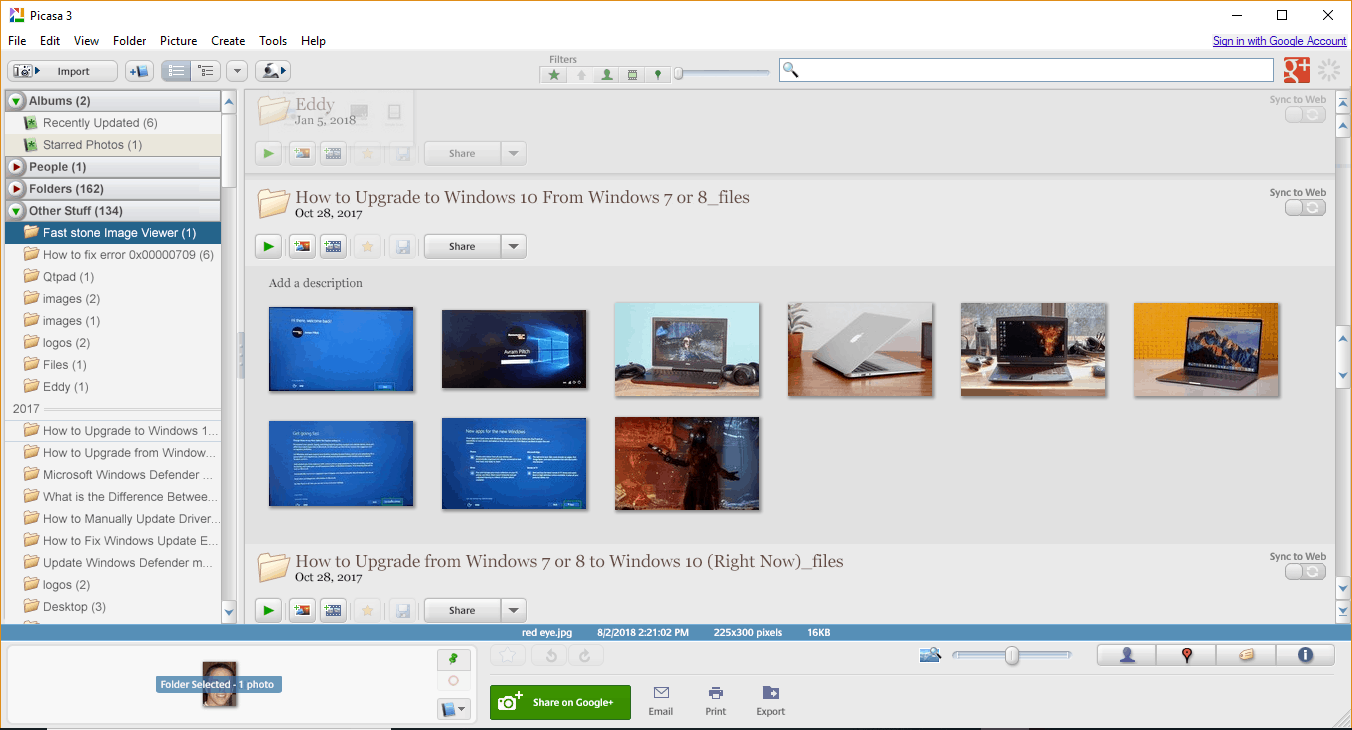
Batch editing of photos
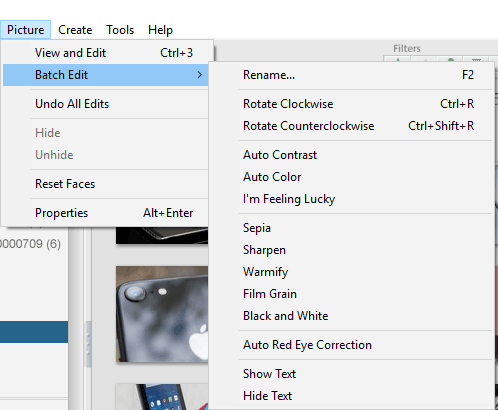
To edit a bulk of photos in Picasa 3, click on ‘Pictures‘ then select the ‘Batch Edit‘ option. There are innumerable options that you can choose from as shown below.
when editing a single Photo, click on ‘Picture’ then ‘View and Edit’. This will give you more optional features such as
- Cropping
- Red-eye removal
- Auto Contrast
- Straighten

Making a Photo collage from a selection of Photos
You can make an amazing Photo collage using Picasa viewer by first highlighting the photos you want to make a collage out of. Next, Click on ‘Create‘ the select ‘Picture Collage‘. By default, the photos will be displayed in a grid layout.
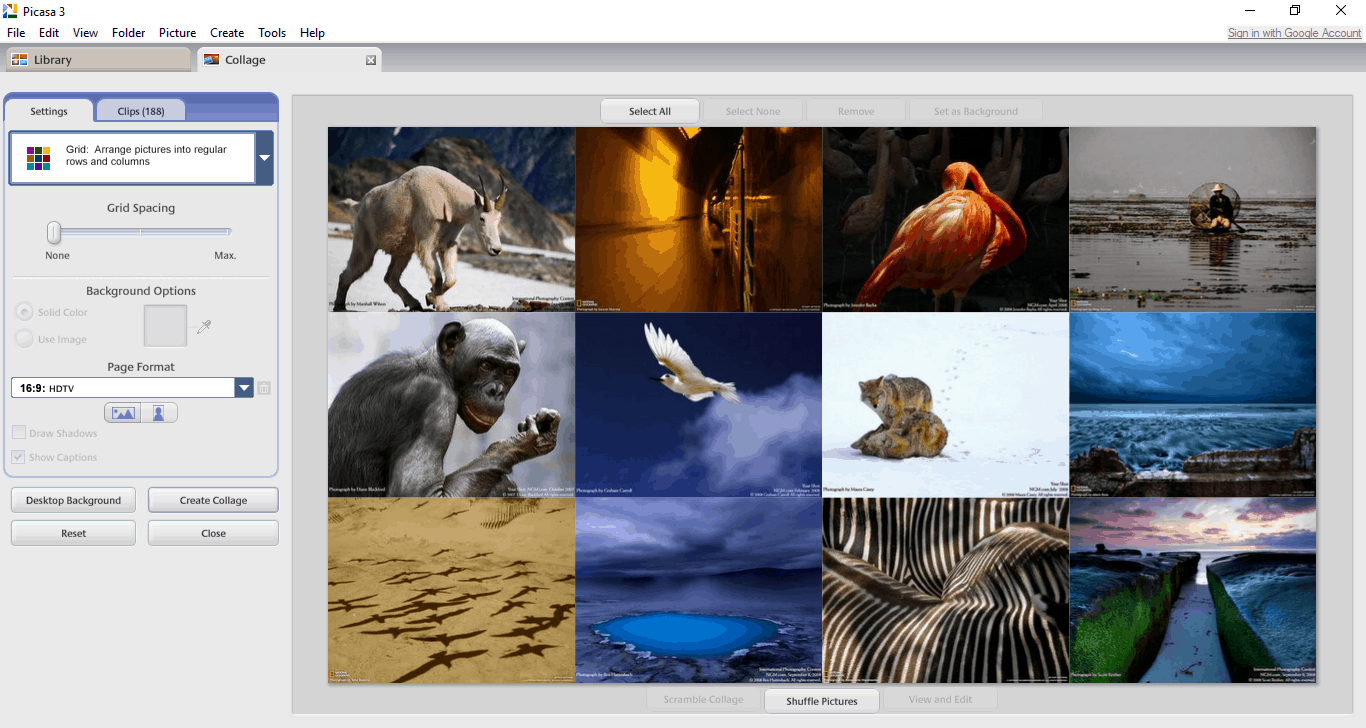
For more options, click on the drop-down menu to reveal more collage layouts.
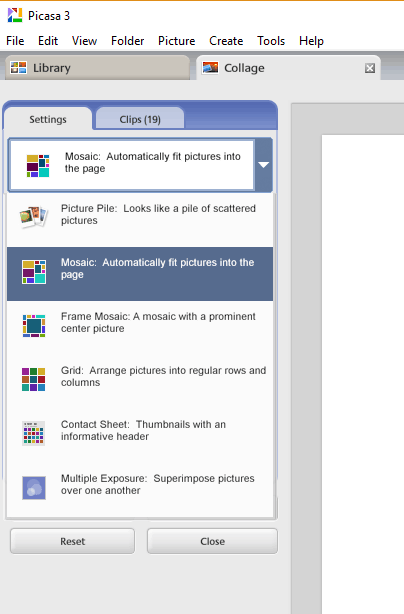
Below is an example of a Frame Mosaic Collage Layout
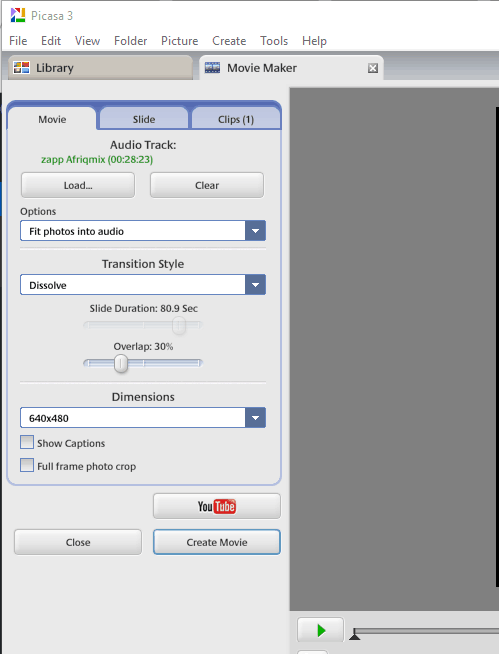
Making a movie from a selection of Photos
You can make a short clip from a list of selected photos as shown. First highlight the photos you want to use and later Click on ‘Create‘, then select ‘Movie‘ option. In the dialogue box that appears select the audio track to accompany the photos and define other settings such as transition style and dimensions. Once satisfied with your selection, click on ‘Create Movie‘.
Slideshow
You can set up a slideshow for photos in a folder by clicking on that folder and later clicking on ‘Folder’tab and selecting ‘View Slideshow‘.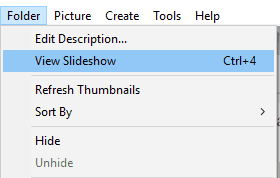
Other features included in Picasa include
- Geo tagging of Photos
- Printing Photos (See also How to Clear the Printing Queue in Windows 10)
- Sending Photos via Email and Uploading them to an FTP server
- Configure Screensaver
Nomacs
Nomacs is a free and open source, a cross-platform Image viewer that’s compatible with Windows, Linux and MacOS and licensed under the GNU General Public License v3. You can use it to view images in various file formats including JPEG, PNG, TIFF, BMP, as well as RAW file formats such as Photoshop PSD.
 You can perform basic tasks such as zooming in & out, image rotation, resizing, sorting images, and cropping. Features that stand out in this software include
Features List
- Cropping / Rotating / Resizing Images
- Color Adjustments (brightness, contrast, saturation, exposure, hue, gamma)
- Display Image metadata
- Automatic saving of screenshots
- Thumbnail Image view
- Sending Images over LAN connection
- Setting Wallpaper
- Custom slideshows
Pros
- The application launches very fast
- It’s a cross-platform application – runs on Windows, Mac OS and Linux.
- Runs both on 32-bit and 64-bit systems.
- Opens very large images easily compared to its competitors.
- It has a scroll-able thumbnail view.
- It has a built-in folder tree that allows one to navigate easily between different directories in the hard drive.
- Several instances can be synchronized over the LAN network.
Cons
- Inconsistent zooming in and out of the mouse wheel. The mouse wheel does not proportionally zoom in and out with consistent steps / percentages to get a multiple zooming level.
- Furthermore, there are not custom levels for zooming either.
Viewing Image metadata
Image Metadata refers to text details about the image. This information includes Aperture value, exposure time, ISO and focal length. To reveal an image’s metadata, click on ‘Panels’ then select ‘Metadata’.

A shortcut to this would be pressing the ‘M‘ key.

Viewing Thumbnails
You can have a peek at the images in your selected folder in thumbnail view. To achieve this, click on ‘Panels’ then select ‘Thumbnails’.
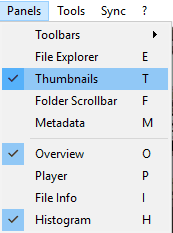
You can also bring up the Thumbnails interface by hitting the ‘T’ key.

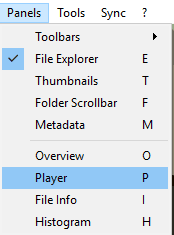
Auto Image scroll
You can set Nomacs to auto-scroll photos in your selected folder by clicking on ‘Panels’ then select ‘Player’ as shown.
ACDSee Free
If you’re looking for a free photo viewer that always knows how to zoom into your image without making it seem blurry, then you should definitely try ACDSee Free. It’s also available in a few pro versions that can do all that more than just view photos, but if you plan on using it only for photo viewing and nothing more, the free version is more than enough.
We love the free version because it allows you to view all of the most common formats fast without any loss of quality. It obviously supports JPEG and BMP, but it also supports RAW files, GIF, PNG, TGA, TIFF, WBMP, PCX, PIC, WMF, and EMF. That’s quite impressive given the fact that it’s a third-party program that charges you no money and that works so well.
Oh, and one more major advantage is that the program was discontinued in 2013, so the version that you can currently download still runs on Windows XP, Windows 7, and Windows 8 if you still have an older PC. This is great for our budget readers out there, and we salute you as well!
Should You Upgrade to Pro?
Seeing that the free version lacks a thumbnail browser, you might be bummed out if you’re still using an older operating system. However, seeing that this is the only defect, we see no reason you should upgrade to one of the Pro versions unless you want to use more advanced features with an interface that’s far more user-friendly than that of Photoshop and other similar applications.
With that said, should you choose ACDSee or other photo manipulation programs? We think you should profit from the free trial of every program listed here and give them all a shot. After that, you should be able to figure out which one is better suited for your needs and wants.
Suggested Read: Shrink Partition Windows 10
Final Thoughts
There are still many Photo viewers out there that you can download and use to view your photos but for our money these are the best ones. Some of the others include FreshView , Imagine and Phototheca 2. Thank you for reading!
Every day, we encounter different problems on our computers and other devices that require immediate response so that our work won’t be put on hold. From typical system errors and installation of various devices to simple information about technical terms, our website offers most of your computer-related questions, especially for Windows 10. Check us out now and you may find helpful tutorials. Or you may directly ask about How To Change Your Windows 10 Username.