Welcome to another guide! In this one, I’ll show you how to disable Windows Defender. But here are a few things you might need to know before you continue reading this guide…
If you already know about Windows Defender, just click here to jump to the different methods that we have.
If you have a Windows 10 Pro, Enterprise or Education version, this is the best method for you.
If you’re looking for some alternatives to Windows Defender, simply click here.
Quick Jump
- What’s Windows Defender?
- Is it safe to disable Windows Defender?
- Time to Disable Windows Defender
- Method 1: Disable it from Windows Defender Security Center
- Method 2: Use Registry Editor to disable it
- Method 3: Disable it in Local Group Policy Editor
What’s Windows Defender?
In just a few words: Windows Defender is a security program integrated into Windows 10. It scans your computer files periodically, works as a firewall as well and lately, they added some ransomware protection after a large volume of such attacks happened in 2018. Click here for our more detailed look on Windows Defender and whether it’s enough as a security measure.
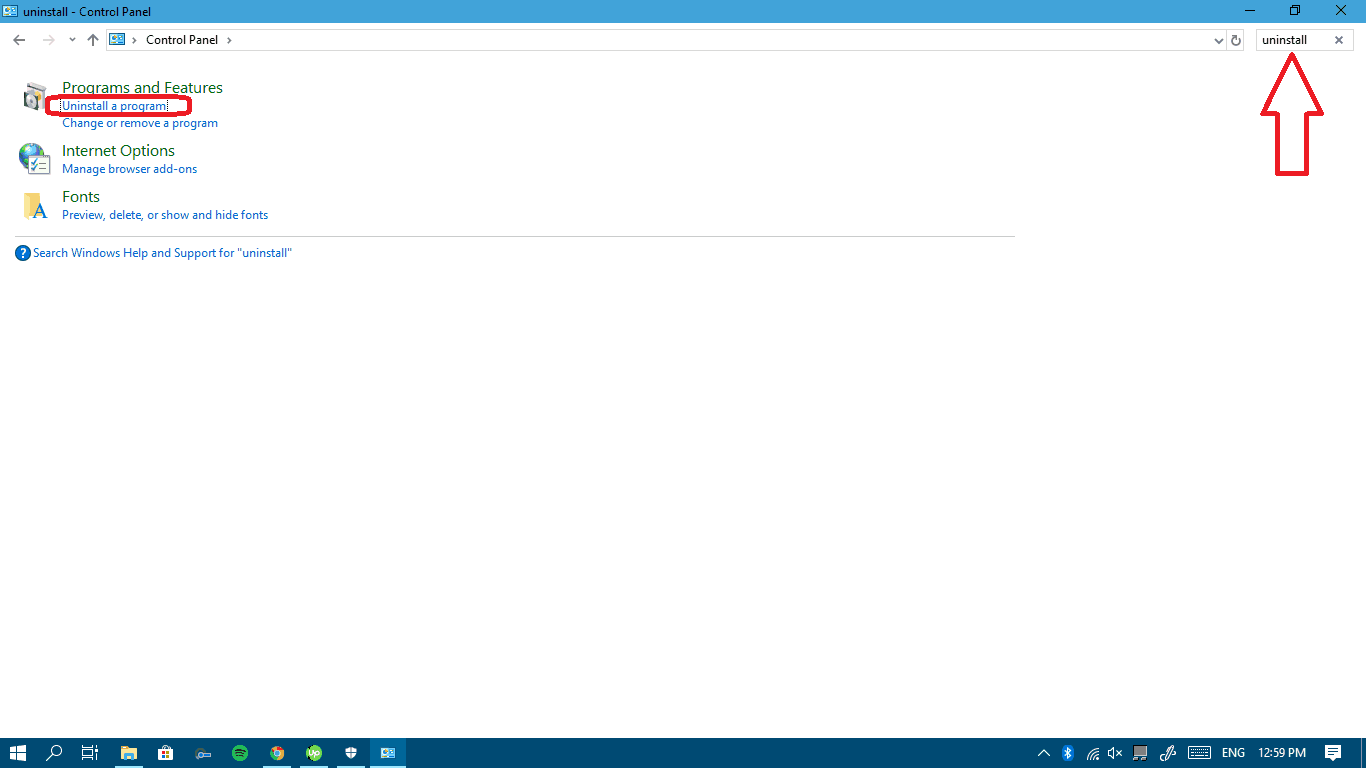
Note that Windows Defender is automatically disabled if you already have a third-party antivirus or firewall, so if you do decide to stick with Windows Defender you must either disable your antivirus or completely uninstall it from the Uninstall a Program page in your control panel.
Here’s how to uninstall your anti-virus:
- In your control panel, search for uninstall and then choose Uninstall a program.

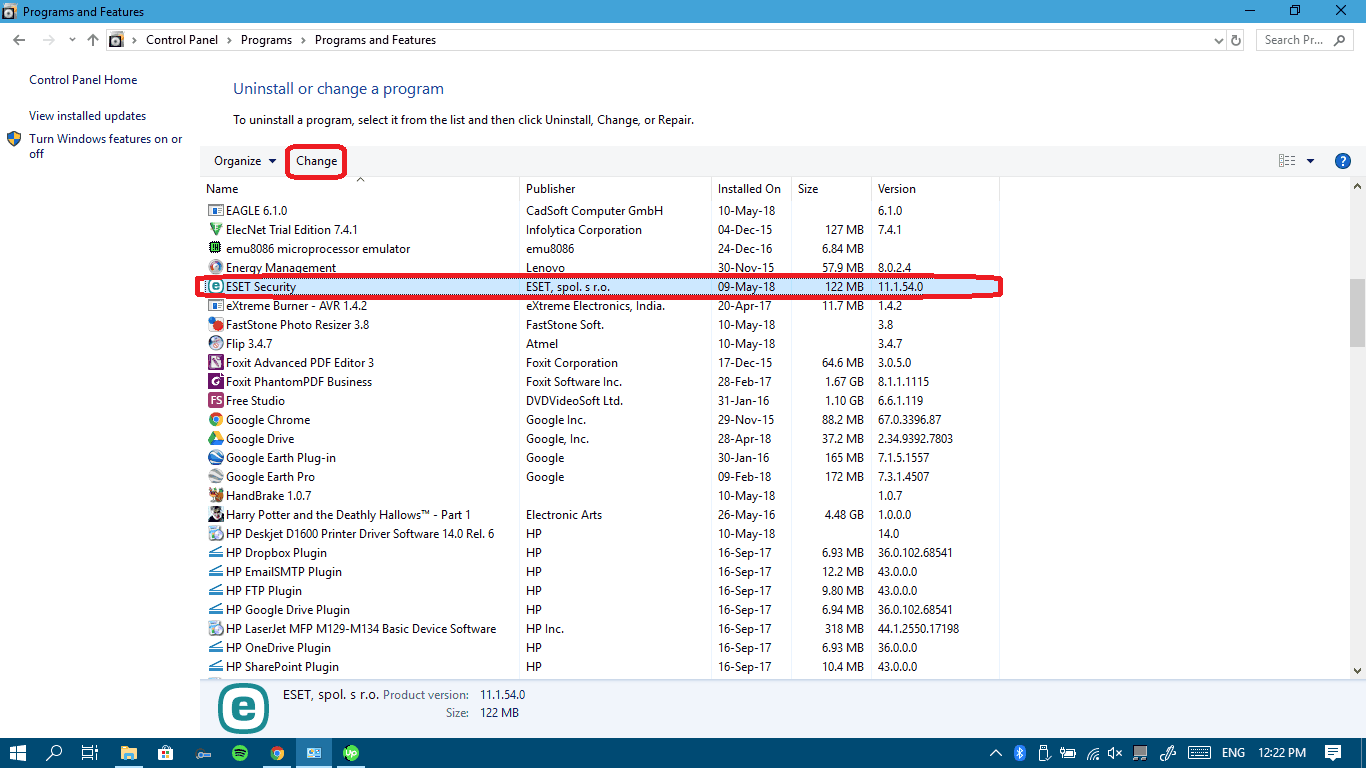
- Pick your installed Antivirus from the list and then click Change or Uninstall (mine is ESET Smart Security).
- Follow the uninstallation process depending on your antivirus.
- Restart your computer so that your Antivirus leaves no trace.
Is it safe to disable Windows Defender?
Well, if you don’t have any other third-party security apps installed on your computer, then it’s TOO RISKY to disable the last defensive line you have on your computer. Windows Defender’s importance has even increased after the Ransomware attacks the world has been exposed to during 2018 because Microsoft updated it to fix all the vulnerabilities found.
If you do have some other security software installed on your computer then you’re somewhat safe to disable Windows Defender. These are my list of recommended Antivirus programs that can replace Windows defender and even work better than it (these are the one I’ve used so far and had good experience with, there are many others for sure):
- ESET Smart Security (Antivirus + Internet Security)
- ESET NOD32 (If you need a lower price and basic Internet Security)
- AVAST Antivirus (Best Free Antivirus if you’re not willing to pay for it)
- BitDefender Antivirus
- Norton Antivirus
- Kaspersky Antivirus
- AVG Antivirus
Now, here are a few methods to disable your Windows Defender. Method III is applicable if you only have Windows 10 Pro, Enterprise or Education editions. Then if you have Windows 10 home, you must stick to the first two methods only.
Time to Disable Windows Defender
Method I: Disable it from Windows Defender Security Center
This is the typical way to disable Windows defender … it’s pretty easy and requires no special computer skills.
Note that this method is temporary, which means it disables your Windows Defender for a short time before it turns back on automatically. Sometimes this might be useful and safe as well because it doesn’t keep your computer unsecured for a long time in case you forget to turn it back on yourself. But if you want to completely disable it, just jump to Method II. For now, let’s see how the temporary method works:
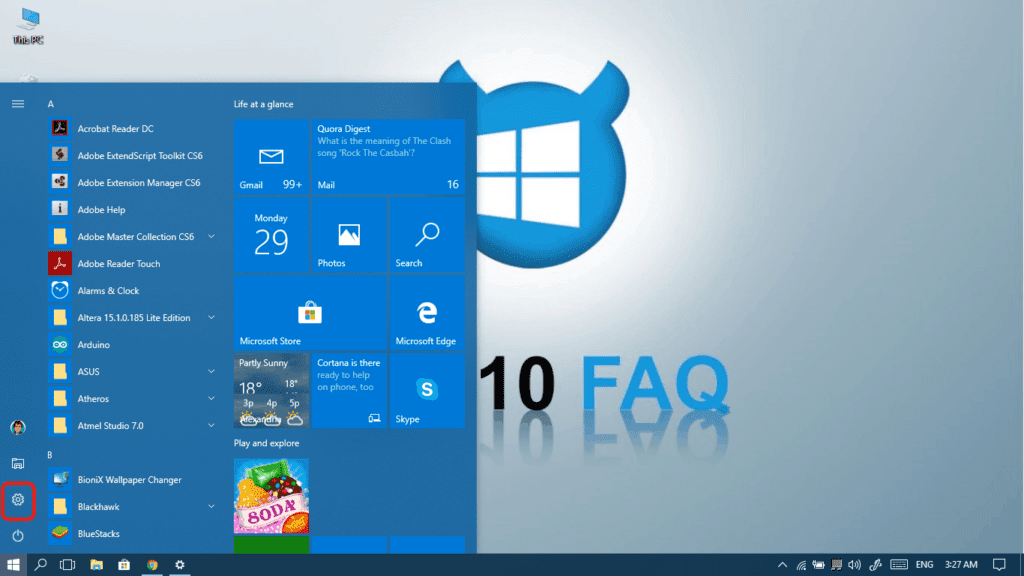
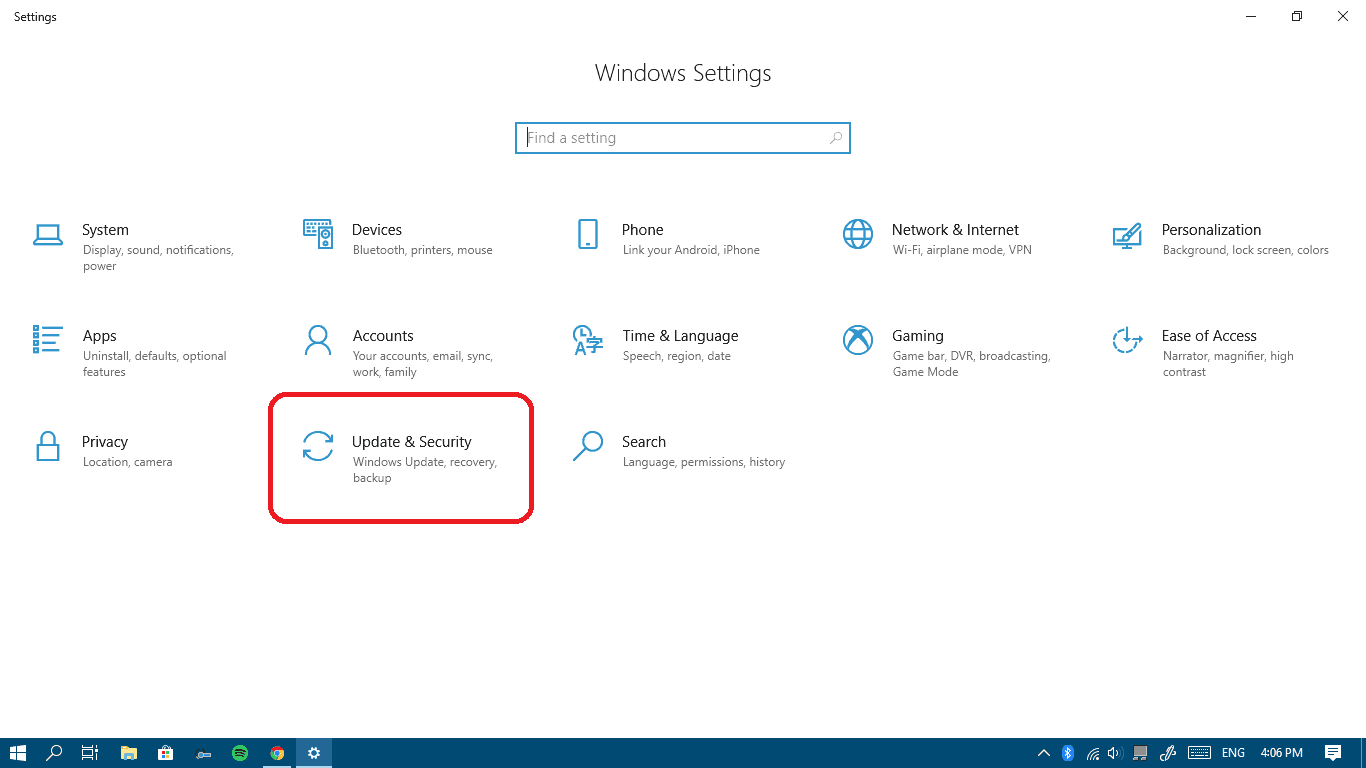
- Open your Settings from your start menu.
- Choose Update & Security.
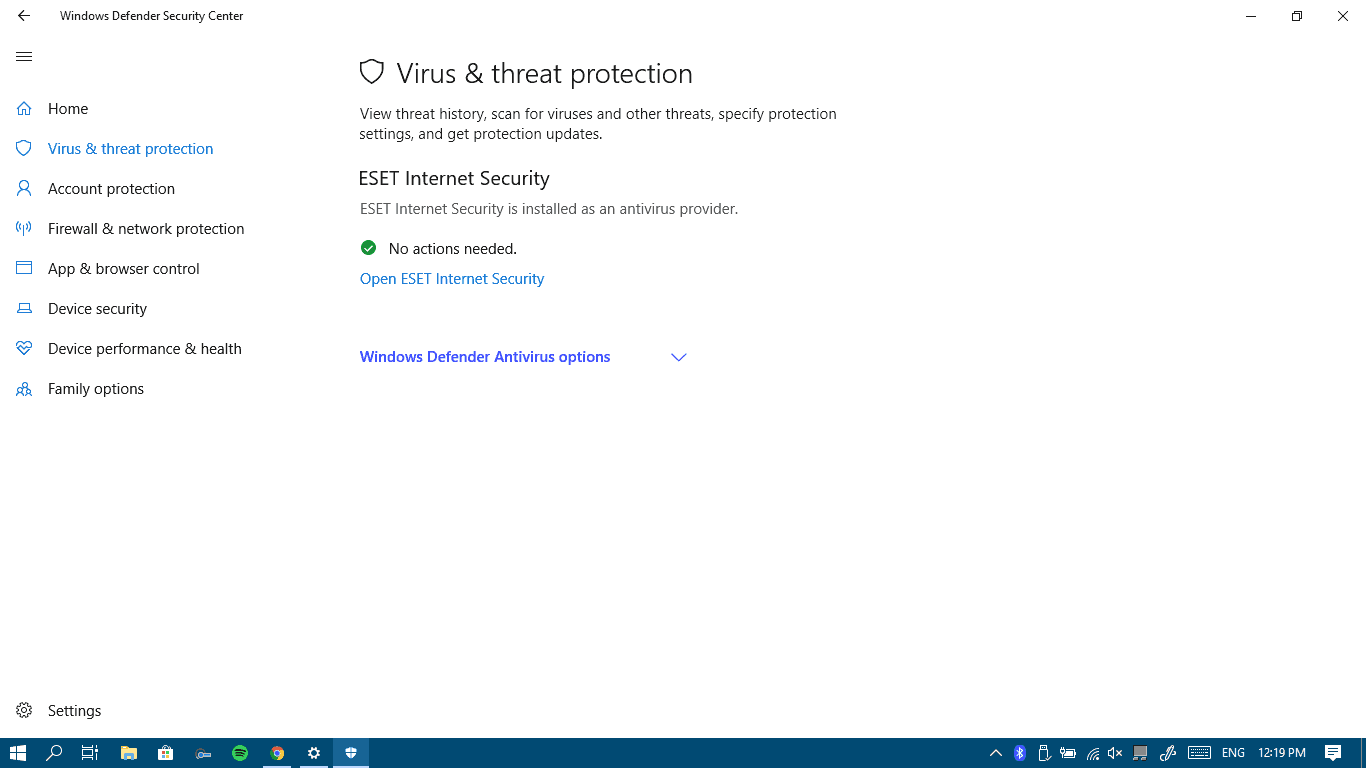
- Select Windows Security from the left pane and then click on the Open Windows Defender Security Center button.
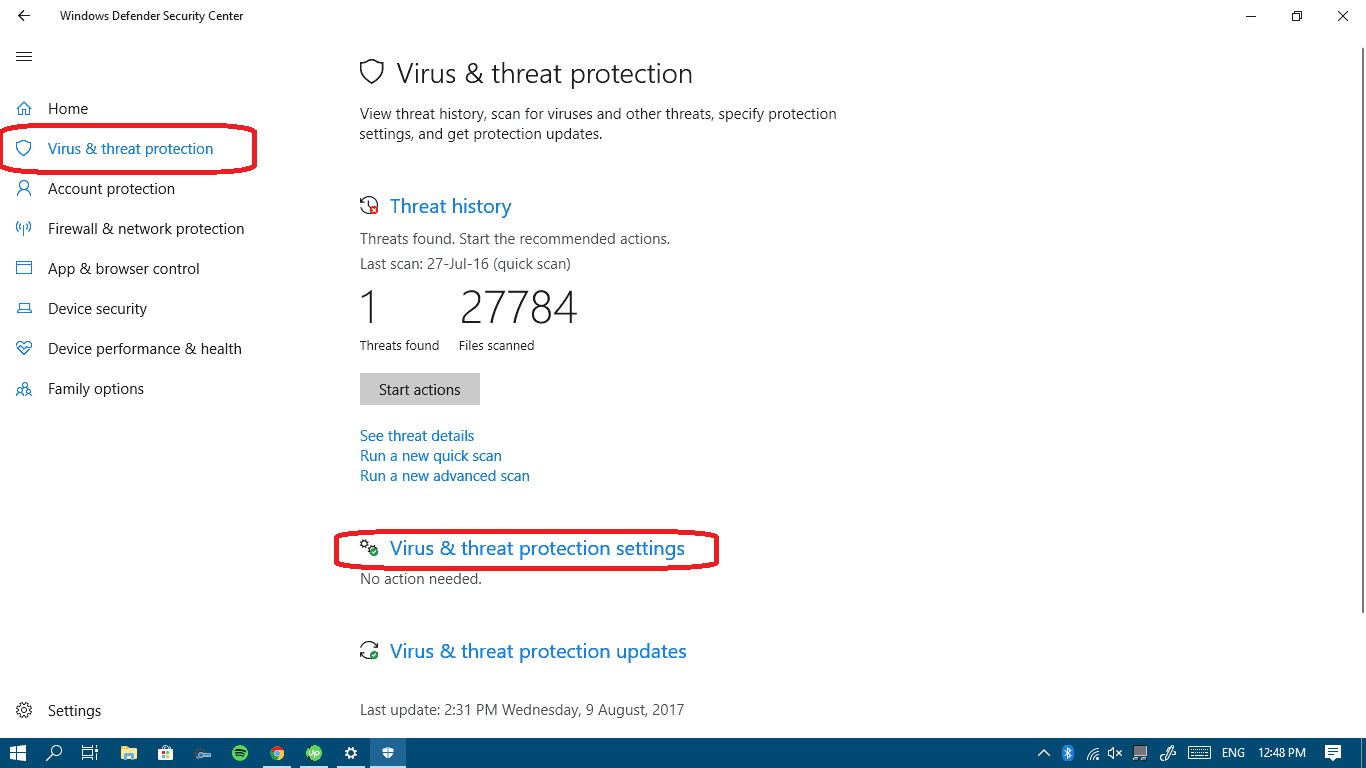
- In the new opened Window, select Virus & threat protection from the left pane and then click on Virus & threat protection settings.
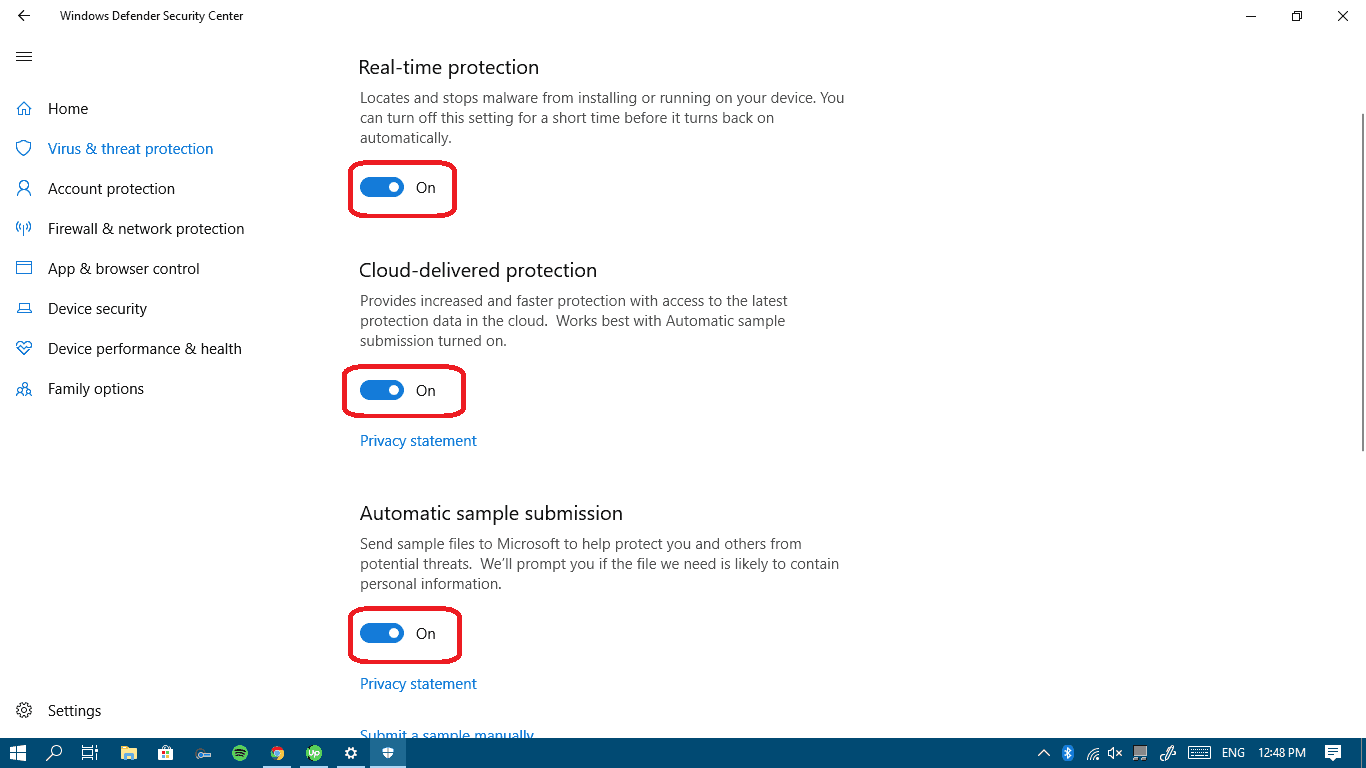
- If you want to completely disable Windows Defender, then turn off these three features:
- Real Time protection
- Cloud-delivered protection
- Automatic sample submission
- In the previous step, you can always disable the component you don’t want and leave the other ones.

That’s it. Next up is the permanent method.
Method II: Use Registry Editor to disable it
Disabling Windows Defender using this method can last forever, it won’t be turned on automatically like in the previous method, that’s why it’s highly recommended that you turn it back on manually when you’re done with the reason you disabled it for. Also be very careful following this method because ruining your Registry Editor can make your whole system CRASH. It’s a good idea to backup your registry before making any changes. So eyes wide open, let’s do it!
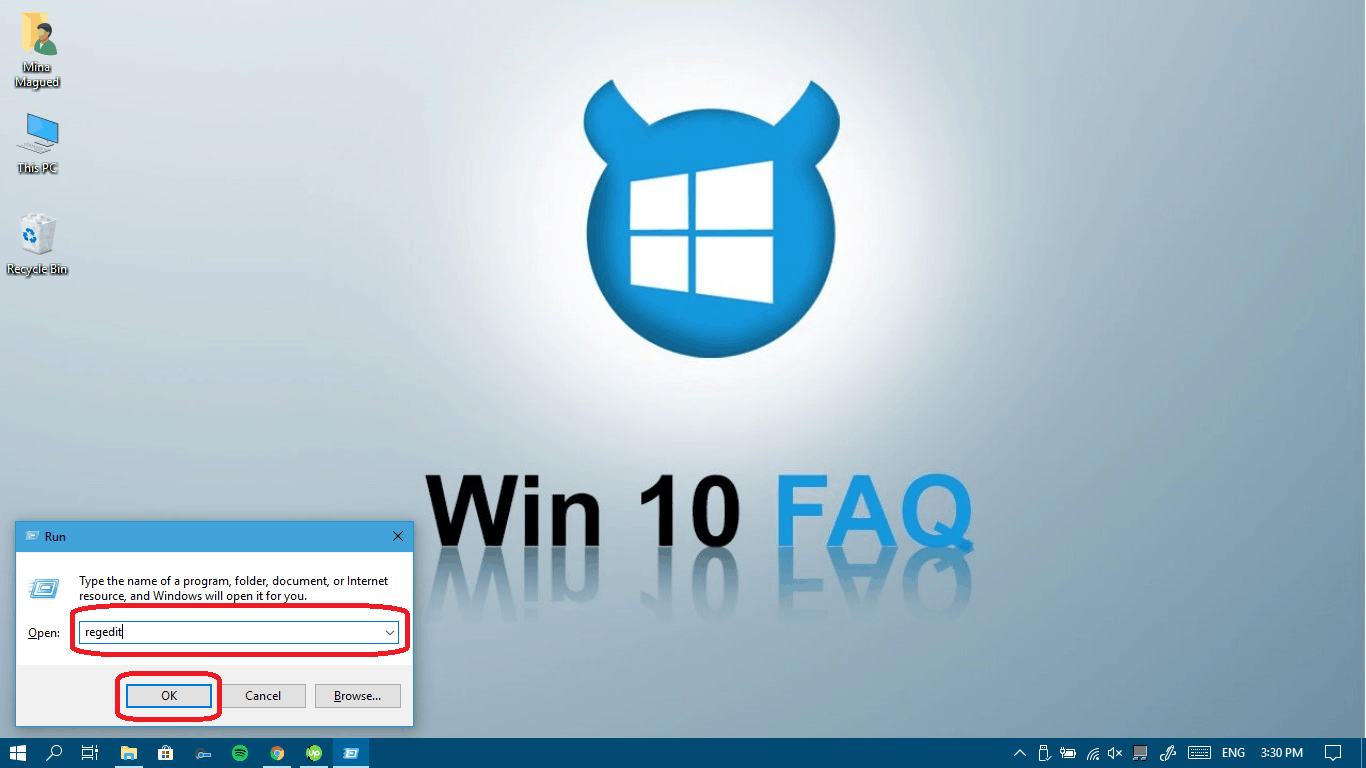
- Press your Windows logo Key + R to launch your Run app and then type regedit and click Ok.
- Click Yes to give it permission.
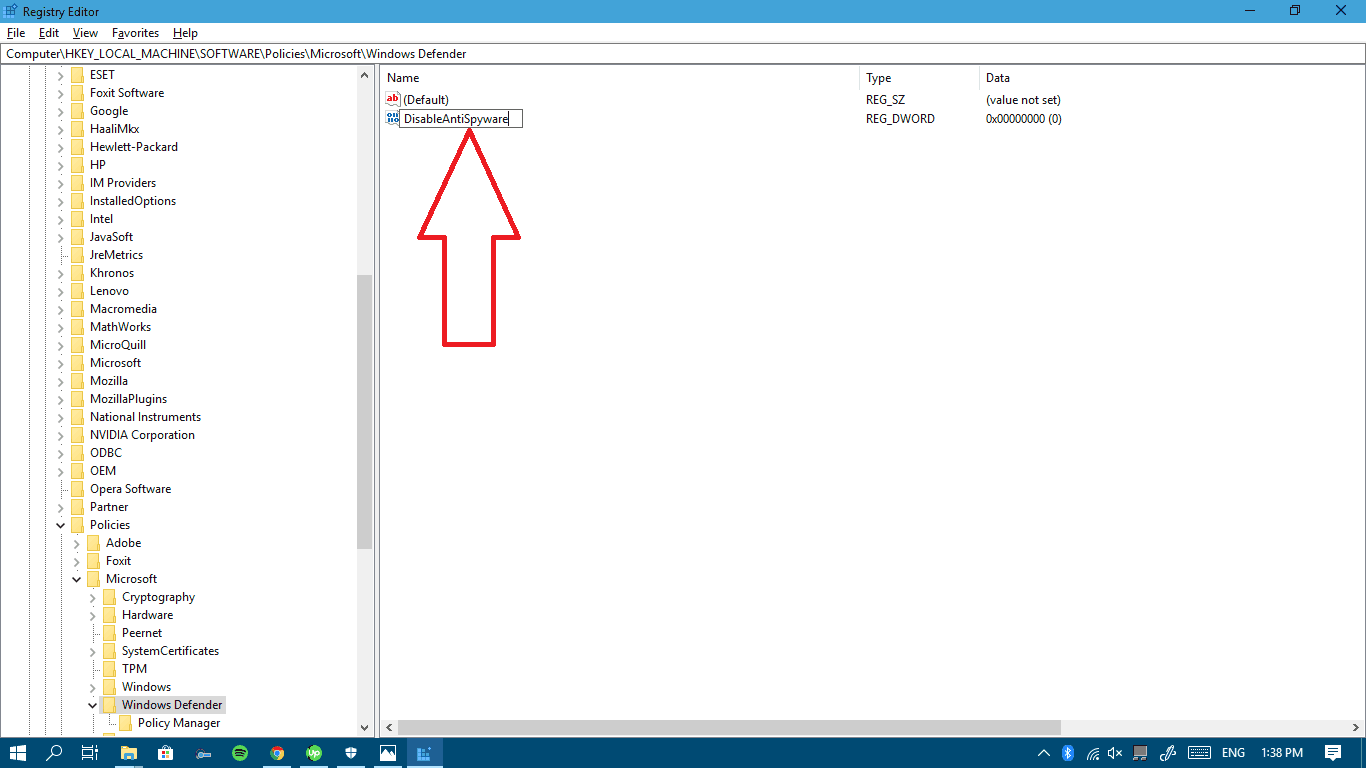
- Paste this path into the text field and press Enter to reach it it: HKEY_LOCAL_MACHINE\SOFTWARE\Policies\Microsoft\Windows Defender
- By default, you won’t find a DWORD called DisableAntiSpyware, so we will have to create it ourselves by right-clicking in any blank area and then choose New > DWORD (32-bit) Value.
- Rename it DisableAntiSpyware and then press Enter to save the new name.
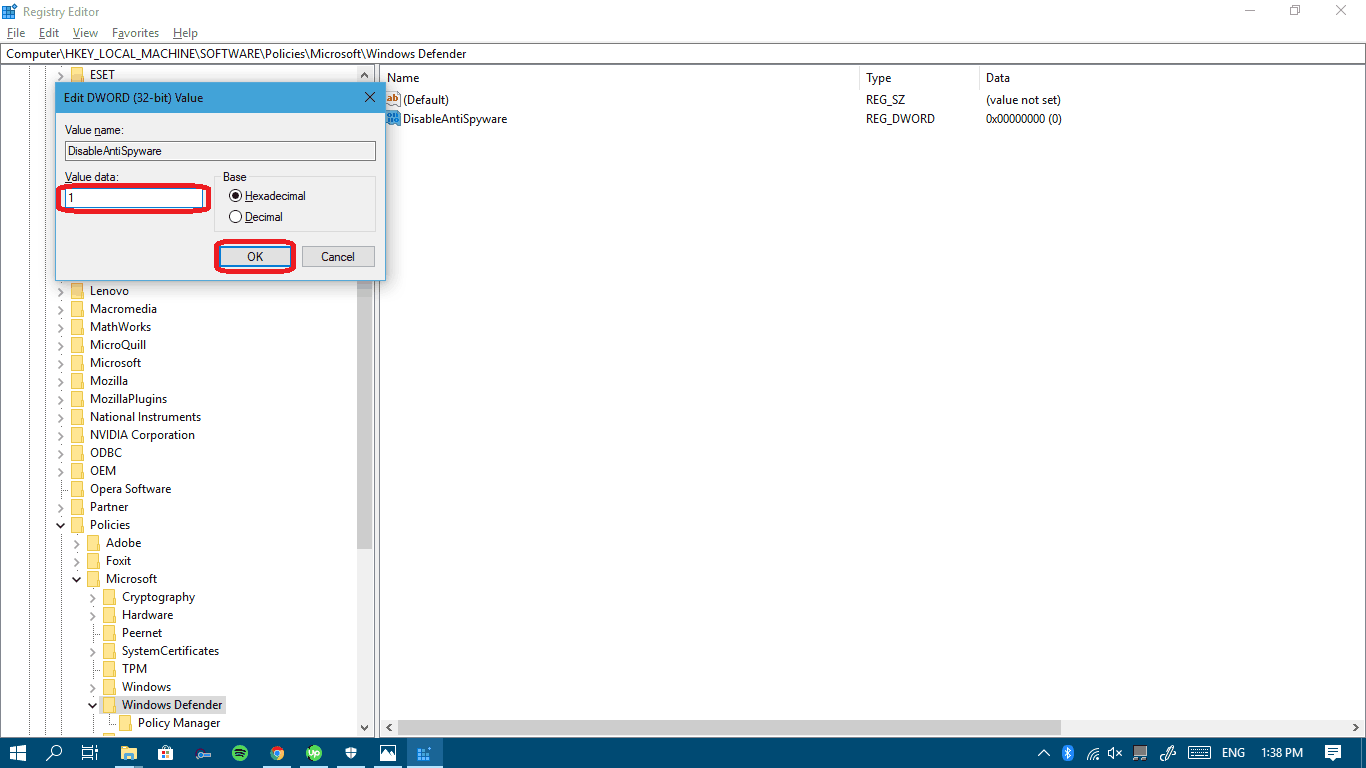
- Now you have to double click on the new DWORD you created and change its value to 1 and then click Ok.
- Now it’s time to restart your computer for the changes to take effect.


Once restarted, your Windows Defender will be completely dead just like this: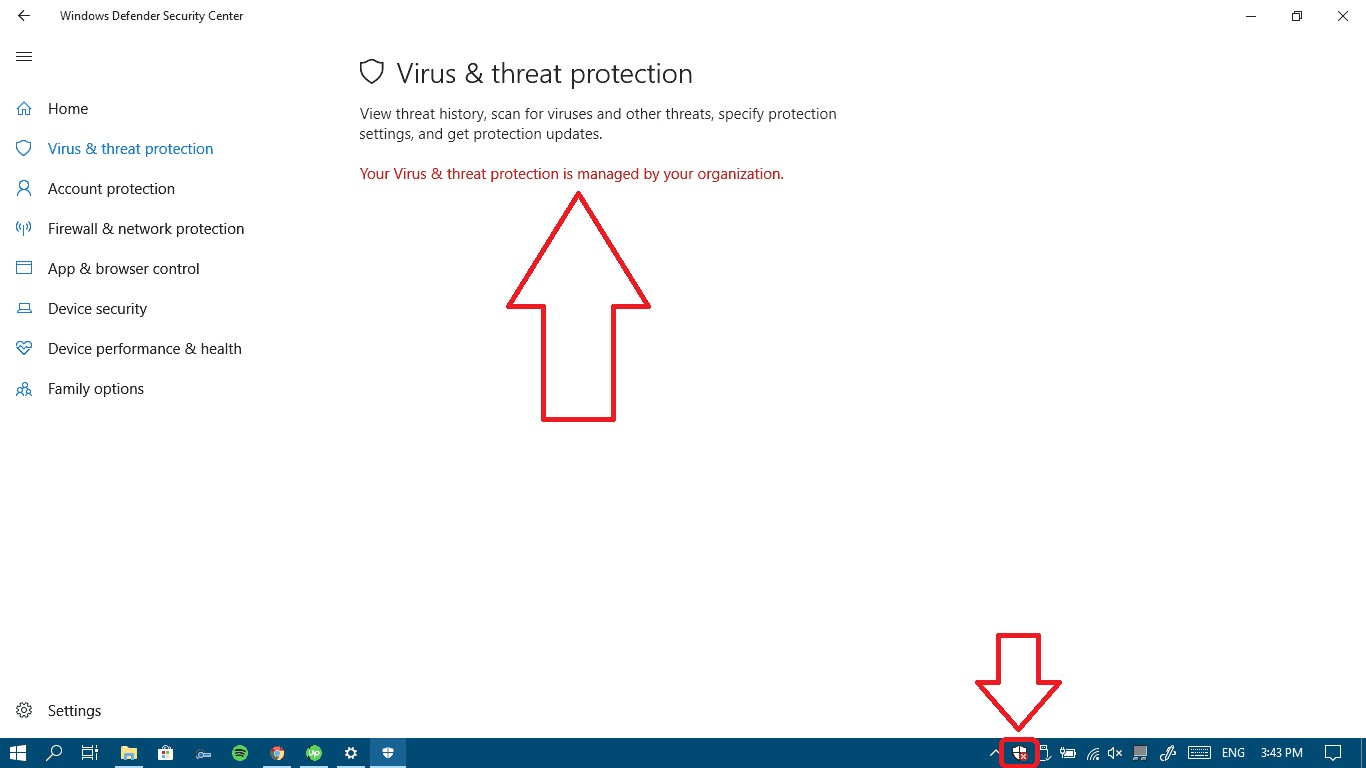
Again, it’s recommended that you turn Windows Defender back on once you’re finished doing whatever you do while it’s disabled. Whenever you want to revert the setting back, just follow the same steps and change back the DWORD value to 0 instead of 1 (step 6).
Method III: Disable it in Local Group Policy Editor
As we said in the beginning, this method is for Windows 10 Pro, Enterprise and Education versions only… so if you’re using Windows 10 home edition, you won’t have such an option. That’s it, now let’s go for this one:
- Press your Windows logo Key + R to launch your Run app and then type gpedit.msc and click Ok.
- Go for this path: Computer Configuration > Administrative Templates > Windows Components > Windows Defender and double-click on Turn off Windows Defender in order to change its settings.
- Choose Enabled click Apply then Ok.
- Close everything and restart your computer so that the changes can take effect.

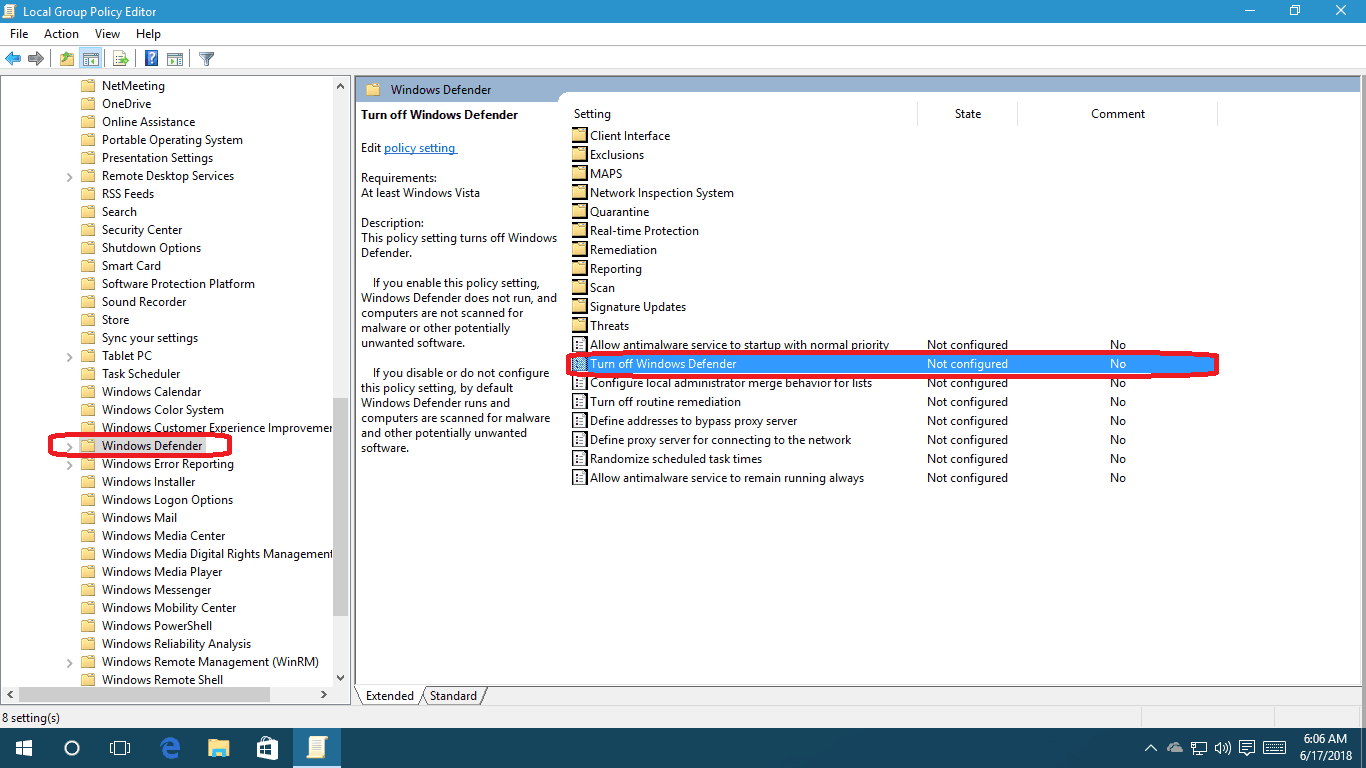
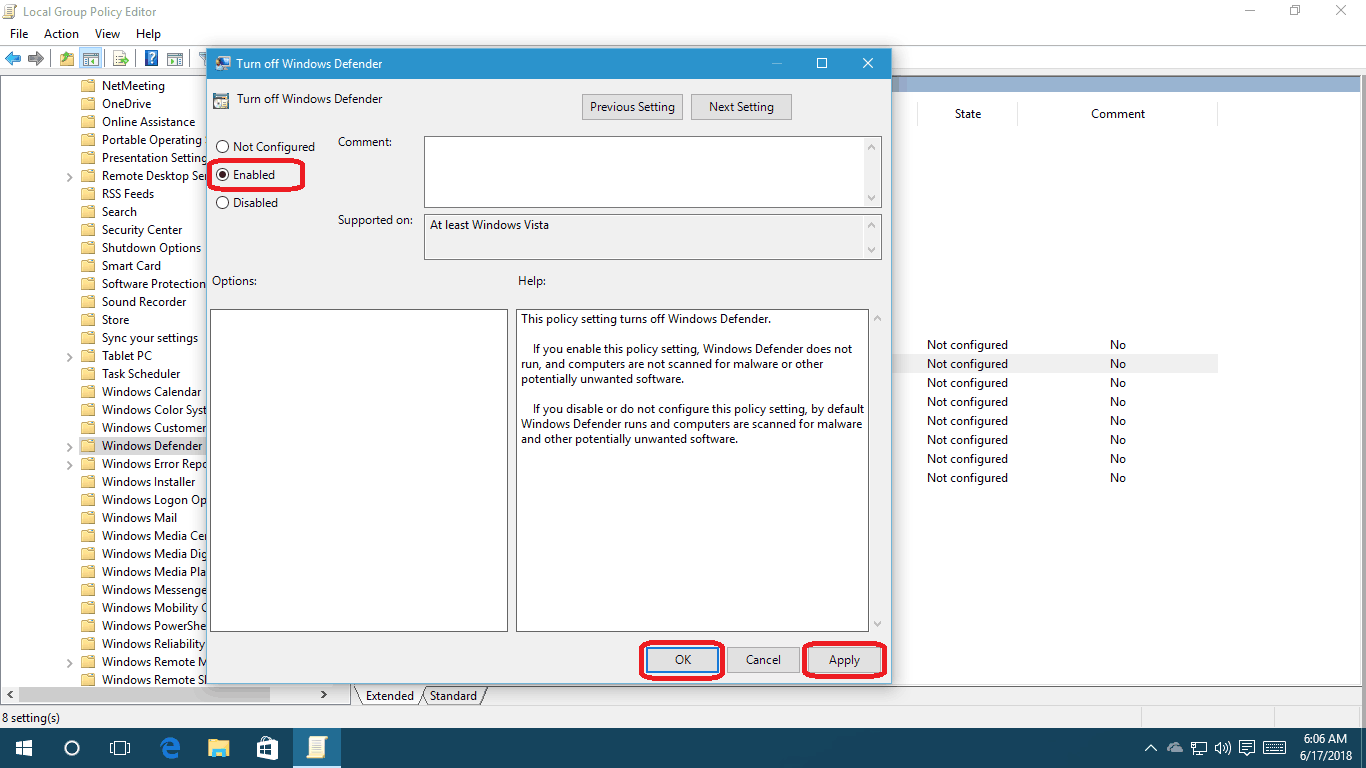
Once restarted, your Windows Defender will be dead as shown: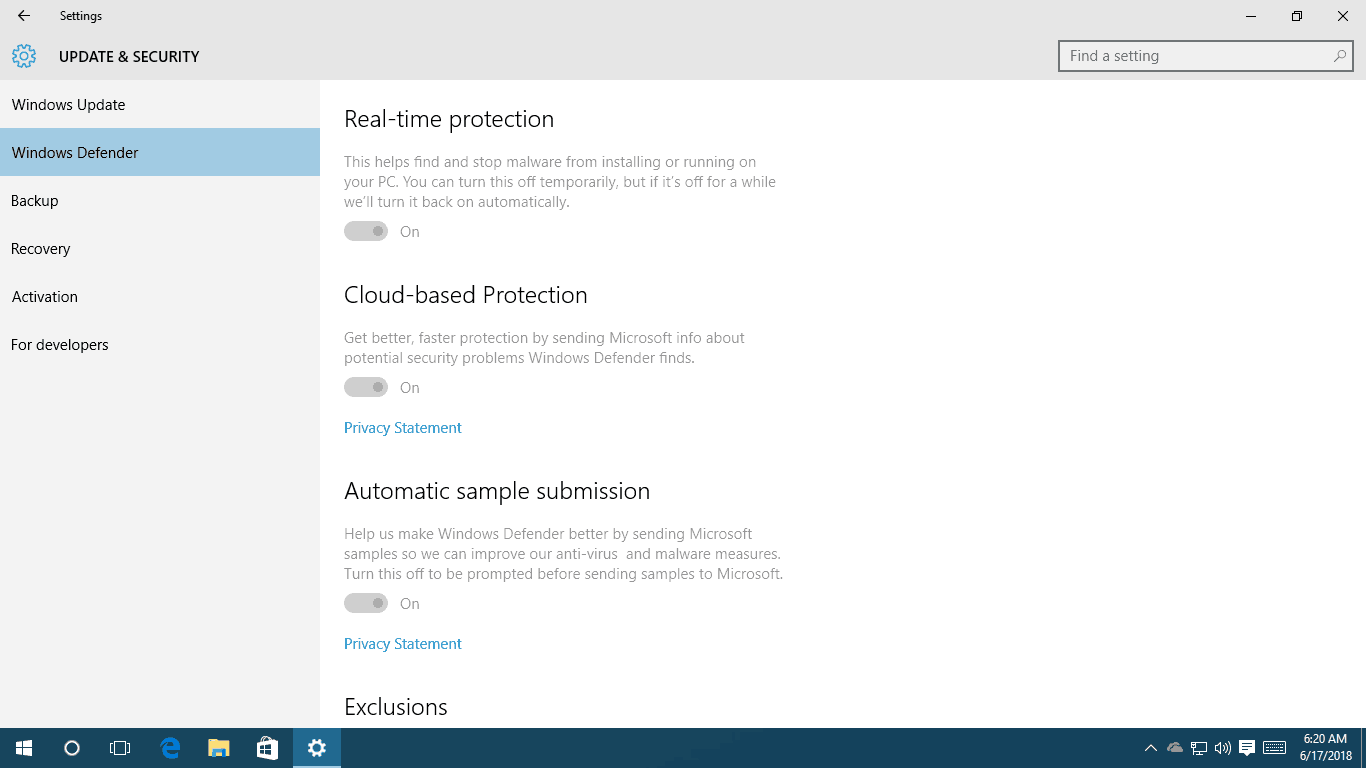
Don’t Forget This!
Finally, it’s always highly recommended that you turn it back on when you only want to temporarily disable Windows Defender for whatever reasons. Just follow the previous steps but choose Disabled instead of Enabled in step 3.
Frequently Asked Questions
Is disabling Windows Defender bad for your computer?
Well, simply disabling Windows Defender isn’t a bad thing necessarily. The bad part is if you disable it without a replacement. For example, we recommend a program such as Malwarebytes to protect yourself from malware or an Antivirus Program alternative to keep you safe from spyware, viruses, and all sorts of other mischevious digital entities.
Is Windows Defender good enough?
Windows Defender offers some decent cybersecurity protection, but it’s nowhere near as good as most premium antivirus software. However, if you’re just looking for basic cybersecurity protection, then Microsoft’s Windows Defender is fine. But do note that you need to be somewhat versed in the wonders of internet browsing and general computing. Because Windows Defender isn’t all that great when it comes to malware, spyware, or ransomware for that matter. Be really careful when browsing the web!
How do I permanently disable the Windows 10 and Windows 11 firewall?
We don’t recommend disabling your firewall completely unless you have an alternative solution set in place, just like with Windows Defender. But, if for good reason, you want to disable your Windows Firewall, here’s what you need to do:
- Open the Control Panel.
- Click on “System and Security” option.
- Then on the “Windows Defender Firewall” option.
- Now on “Windows Defender Firewall” option.
- Next click on “Turn Windows Defender Firewall on or off”.
- Finally, check (select) the “Turn off Windows Defender Firewall (not recommended)” option of both the public and private network settings.
How can I tell if Windows Defender is on?
This is actually really simple, as all you need to do is look to the right of your taskbar. In your System tray click on the ^ to expand the running programs. If you see the shield your Windows Defender is running and active.
Final Thoughts
We hope you find our proven methods of how to “Disable Windows Defender” useful. If you run into any issues such as unable to disable or not sure how you can turn off Windows Defender, do let us know in the comment section below.
Thanks for providing the proper and accurate process to uninstall Windows defender and removing it permanently from the computer. It is not simple to remove it completely normally, by this was it can be done. There are many interruptions produced by this antivirus on Windows, so it needs to be removed.
Hello, I’m glad I could help you, I really like it disabled myself but I’m having a third party security program, make sure to have one to remain safe. Have a great day!
Hello, there is an error in your procedure. You wrote regedit while local group policy editor is what your really want. Better use gpedit.msc. Thank you for the post.
Thank you so much Daniel, I missed it.
Thank you MINA! I got an error while activating the windows product key and the only solution avaivable was to install windows 8.1 or previous then activate it and install windows 10 again, I wasn’t going to do that. So I just wanted to use a crack for the licence but then the windows defender (before using the crack) started to act strange, It won’t let me open the windows defender panel in order to disable it, the service didn’t appear neither so i couldn’t stop it even though it was working, i tried then to add to the Regedit the DisableAntiSpyware register value and then it stoped working and I was able to succesfully use the crack. It’s so frustrating to have a legal licence and be unable to use it, but now i can work properly, thank you very much!