Welcome to Win10FAQ. In this guide, we will discuss this error message: ms-settings: display this file does not have a program associated with it for performing this action. Please install a program or, if one is already installed, create an association in the Default Programs control panel.
For this guide I’ve used a virtual machine (sort of a computer inside the computer, if you’re unfamiliar with the term), I ruined some specific folders on it so that I would get this error, and once I had the error I’ve tried every solution that I could find online. Some of them didn’t work – like these two:
- Reset Windows Store Cache
- Run DIAG_SETTINGS FIX
And the ones that did work are presented to you here.
What is The MS-Settings: Display Error?
In general, this error pops up for some Windows users when they try to open Display settings or the personalize option from the right-click menu on the desktop. As the error message sort of says, this happens when an action is not associated with a program, or when it’s associated with a program that Windows can no longer access. In this case, the program that can’t be accessed is one of the basic Windows components: the Settings application.
In order to prove that Settings is the problematic program, try to launch the Settings app from your start menu: if you’re currently experiencing this error the program will fail to launch. Therefore, our target in this guide will be fixing the Settings app because once fixed, everything will work like a charm. Here are two methods to fix it:
Method I: this is an easy method but it’s not always as efficient as desired.
I recommend that you give the first method a shot and if it doesn’t work, the second one will certainly do the job. So, let’s start!
Method I: Perform a System Scan
Since the Settings app is a part of you system, a component of you Windows, then it’s useful to run a system file check first, it will check for errors in system files and try to fix it. This method is a easy method as I said before but it won’t always do the trick, anyway let’s give it a shot:
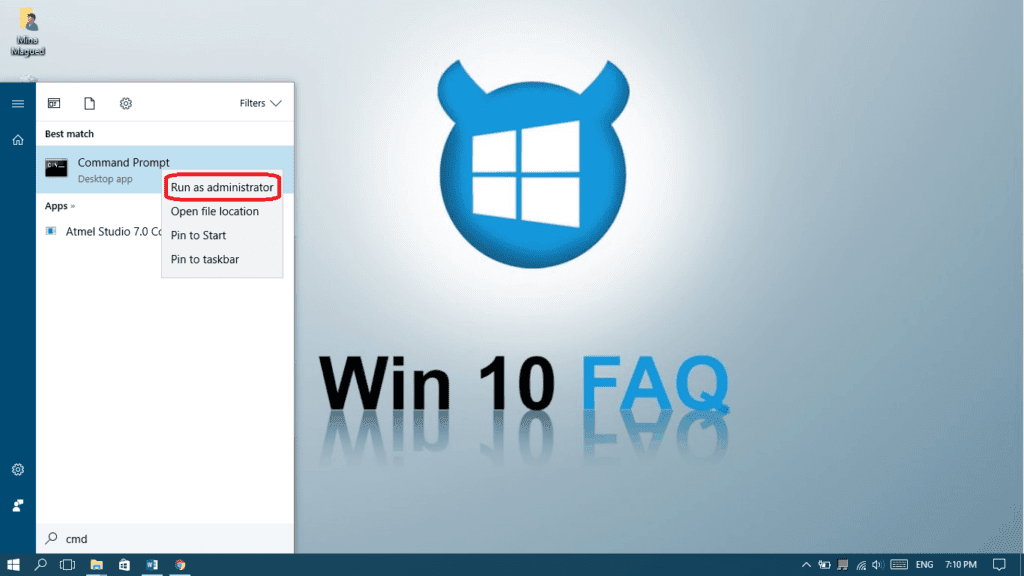
- Type “cmd” in your start menu, right-click on Command Prompt and choose Run as administrator.

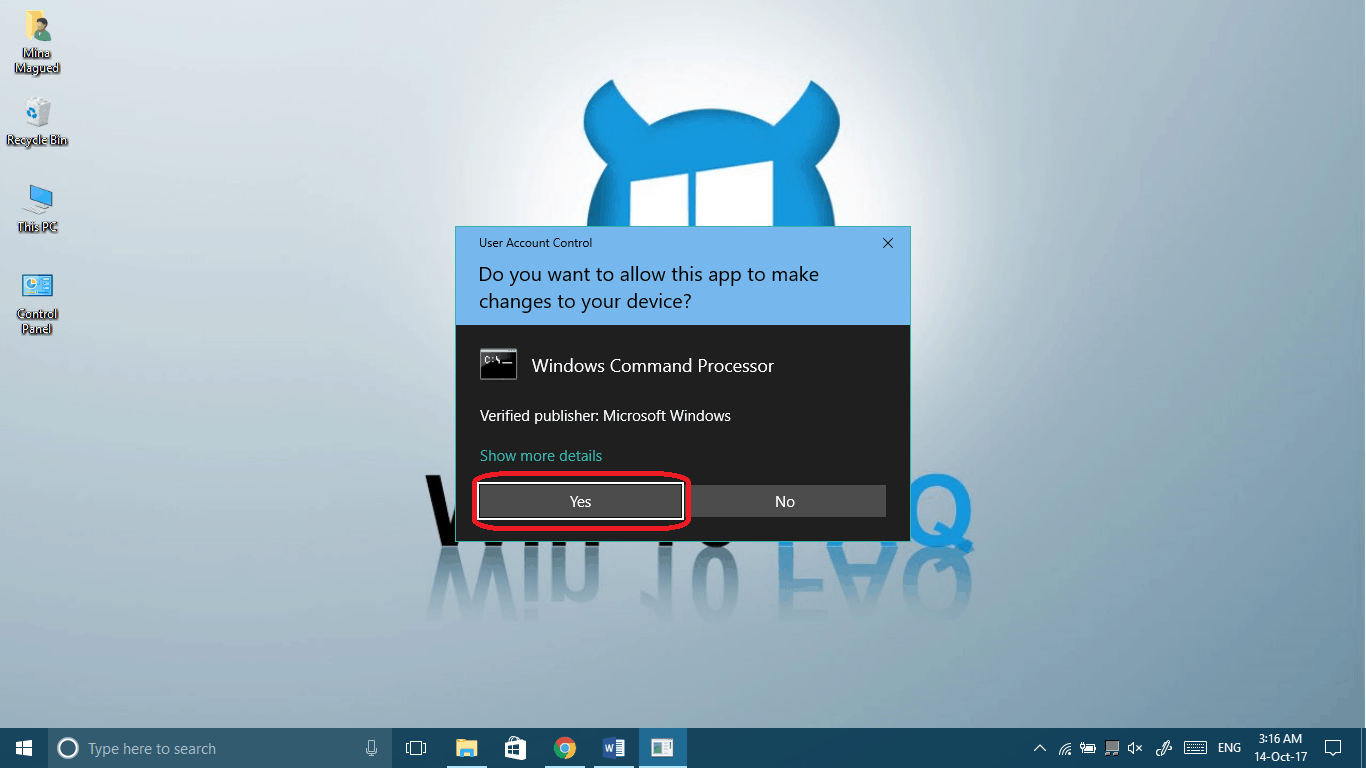
- Click Yes to give it permission.
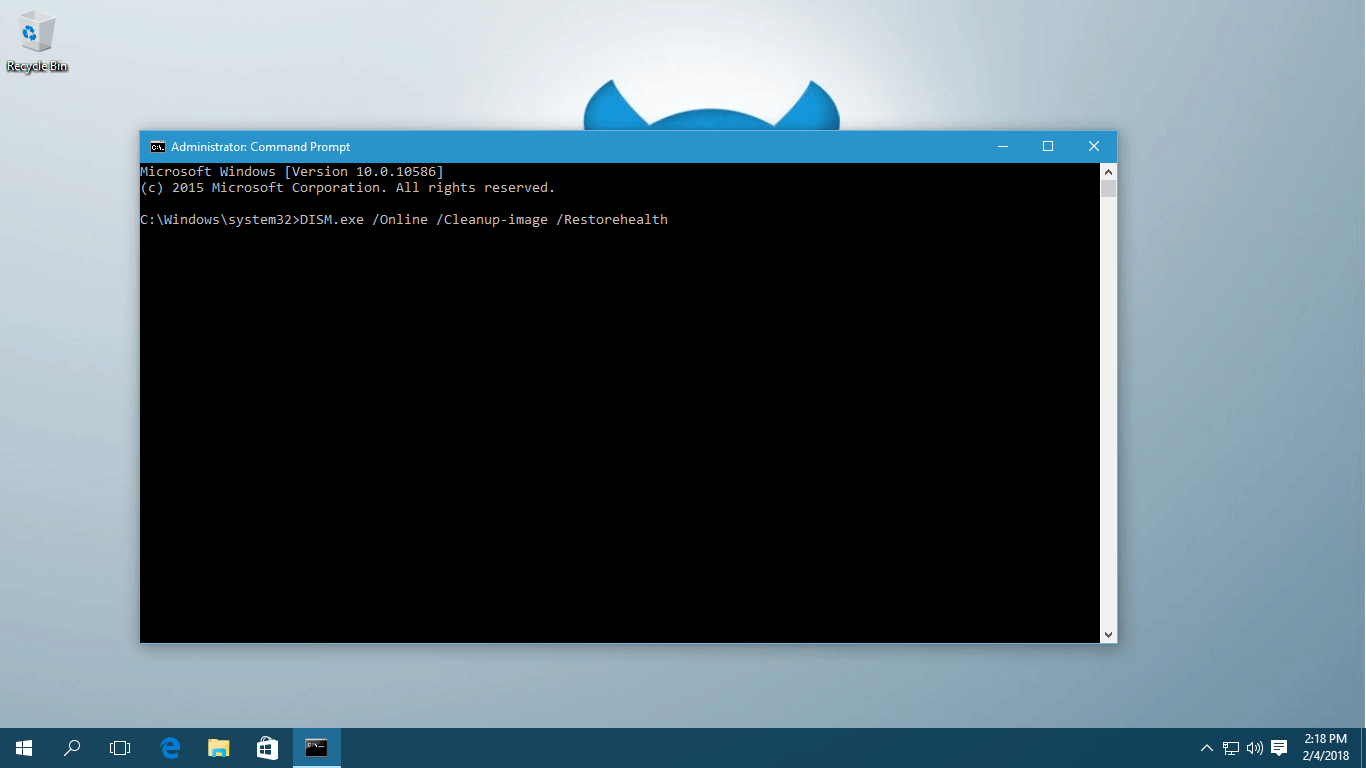
- Type the following command and then press Enter:
DISM.exe /Online /Cleanup-image /Restorehealth
(note the spaces before each “/”).
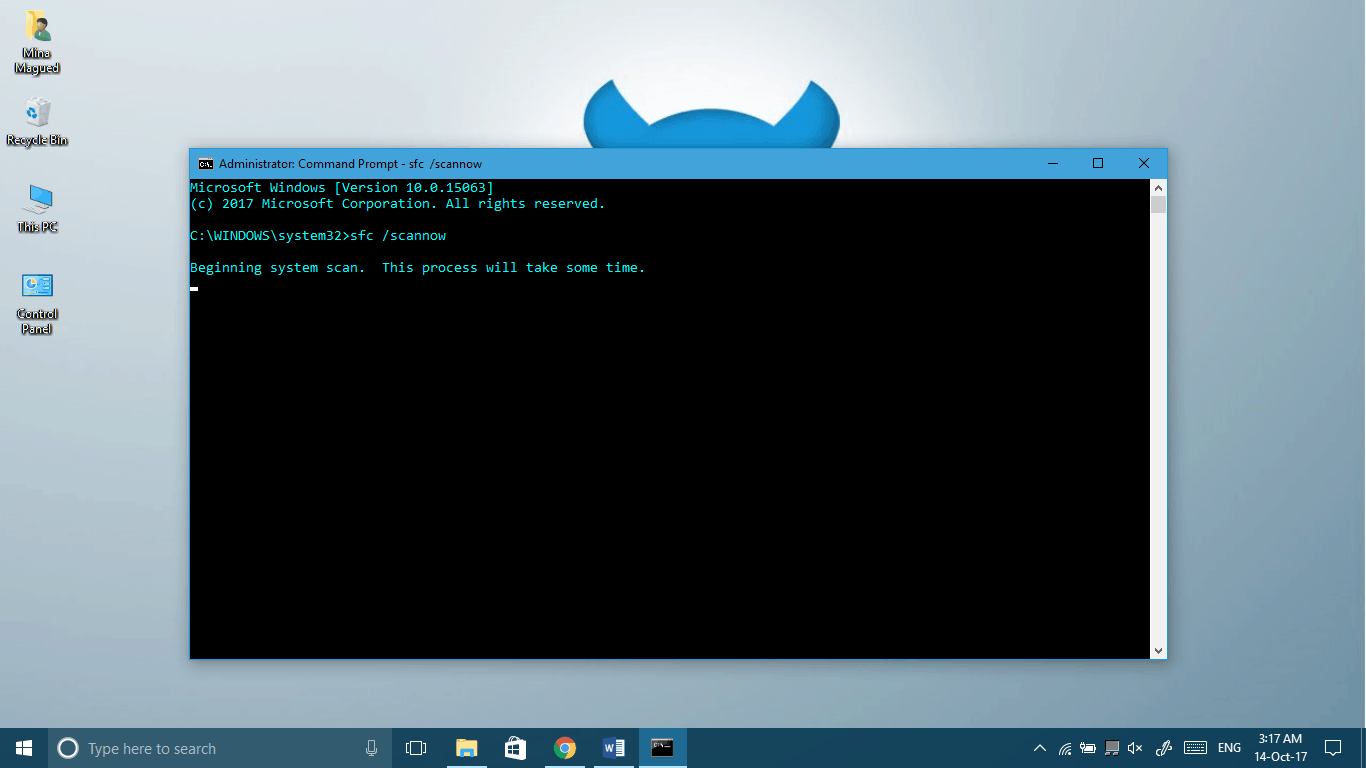
- Type the following command then press Enter:
sfc /scannow
(make sure you put a space between “sfc” and “/scannow”)
- The last step may take a long time, but once it’s done, restart your computer and try to get to personalize or display settings and see if it works. If it doesn’t, then method II is the one for you. You could also be asking about Windows 10 Notifications Not Working.
Method II: Replace the Corrupted Settings Application Folder
The Settings app, like any other installed app, has a directory folder. We are going to use some trick to replace this corrupted folder with a working one. You can do this by replacing this folder:
C:\Windows\ImmersiveControlPanel
But how should we replace it? We have two solutions:
- If you have another Computer/laptop that’s running the same Windows 10 version, you can copy the folder from it using a USB drive for example and paste it in the directory and choose to replace the existing one. I don’t recommend this solution because if the versions are similar, maybe some errors can occur.
- Now this is the one I recommend. If you create a new local user on your computer, you’ll get a fresh new version of all the system files. We can then copy the ImmersiveControlPanel folder from this user, go back to the old user where our problem lies and replace the folder in that one. Pretty cool right? Let’s do this!
Step I: Create a New User
- Press your Windows logo Key + R to launch your Run app and then type lusrmgr.msc then press Enter or click Ok. This will launch the Local users and groups manager.
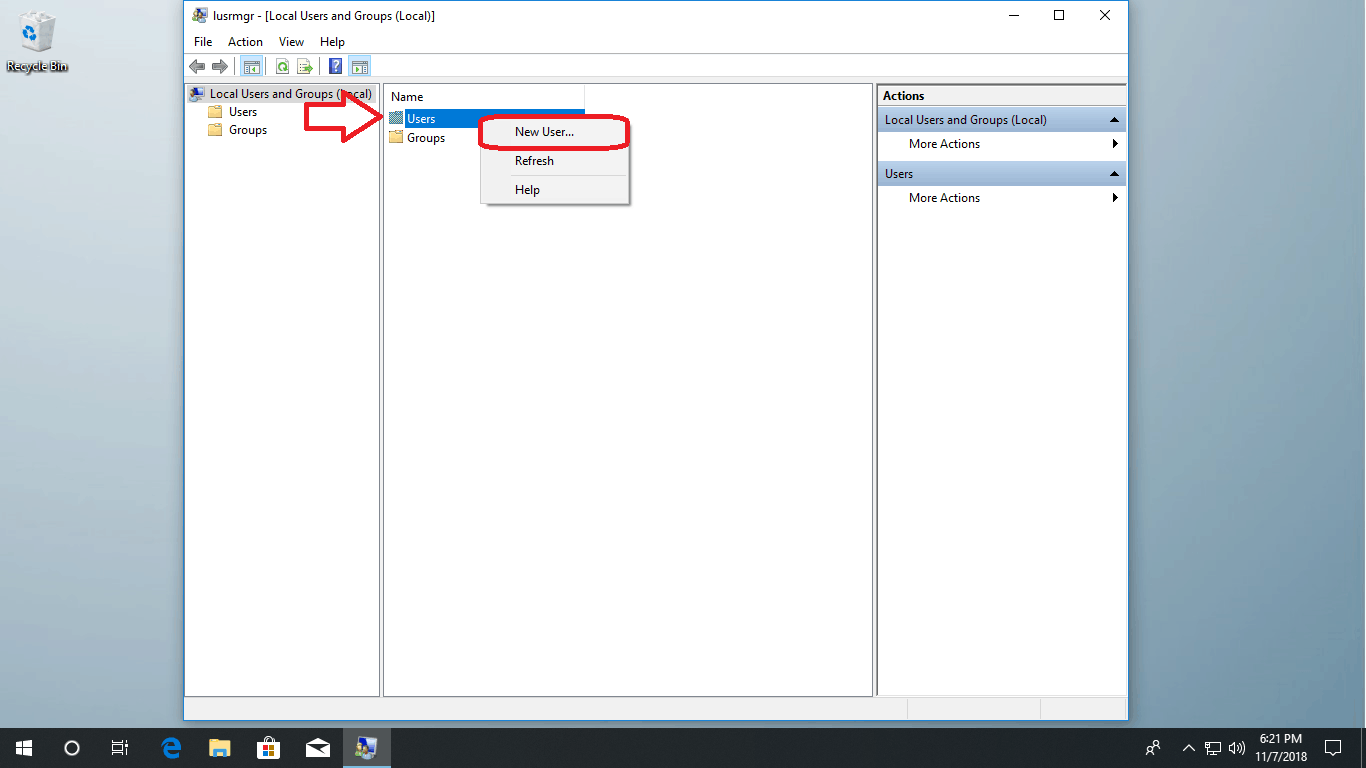
- Right-click on the Users folder in the centered windows and choose New User…
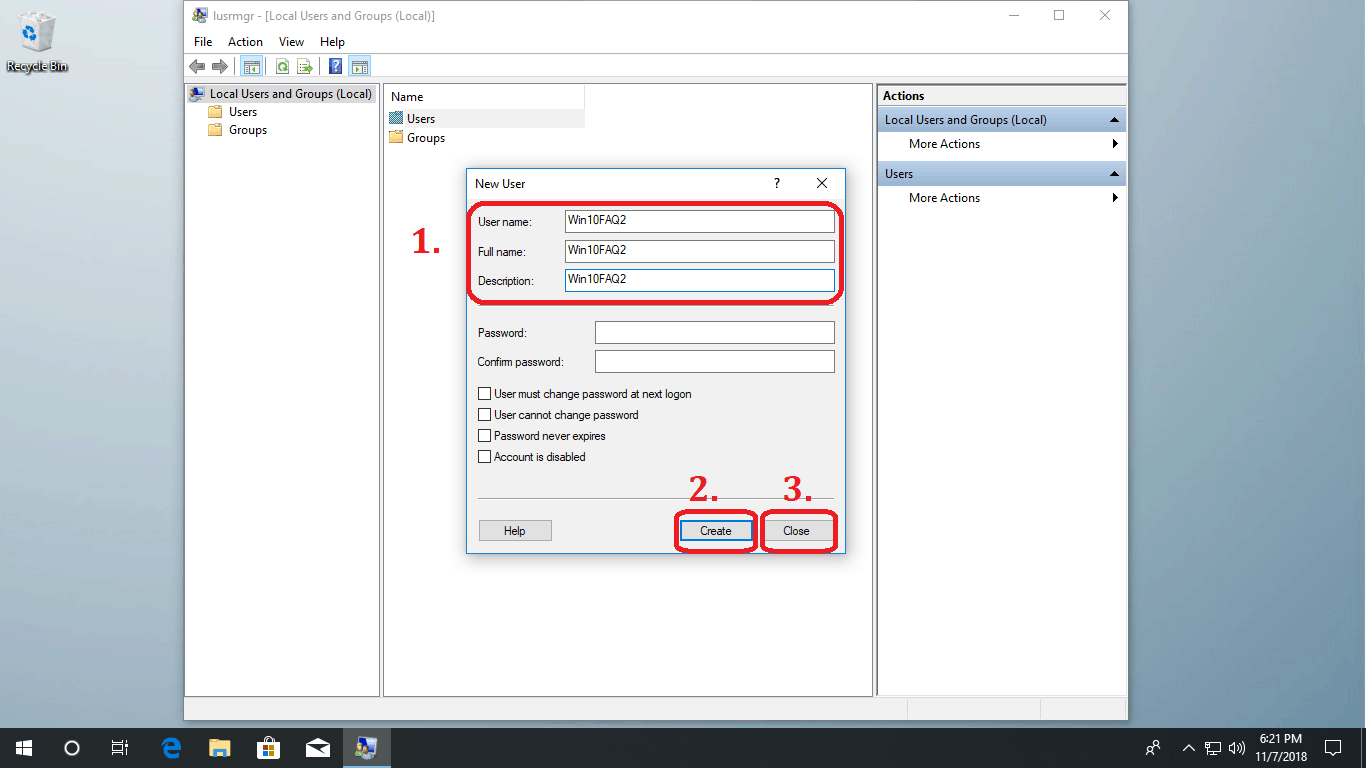
- Now, type any username to represent the new user that we are creating. Same for Full name and description, this is a temporary user anyway and we will delete it afterwards. Click Create once done and then Close.
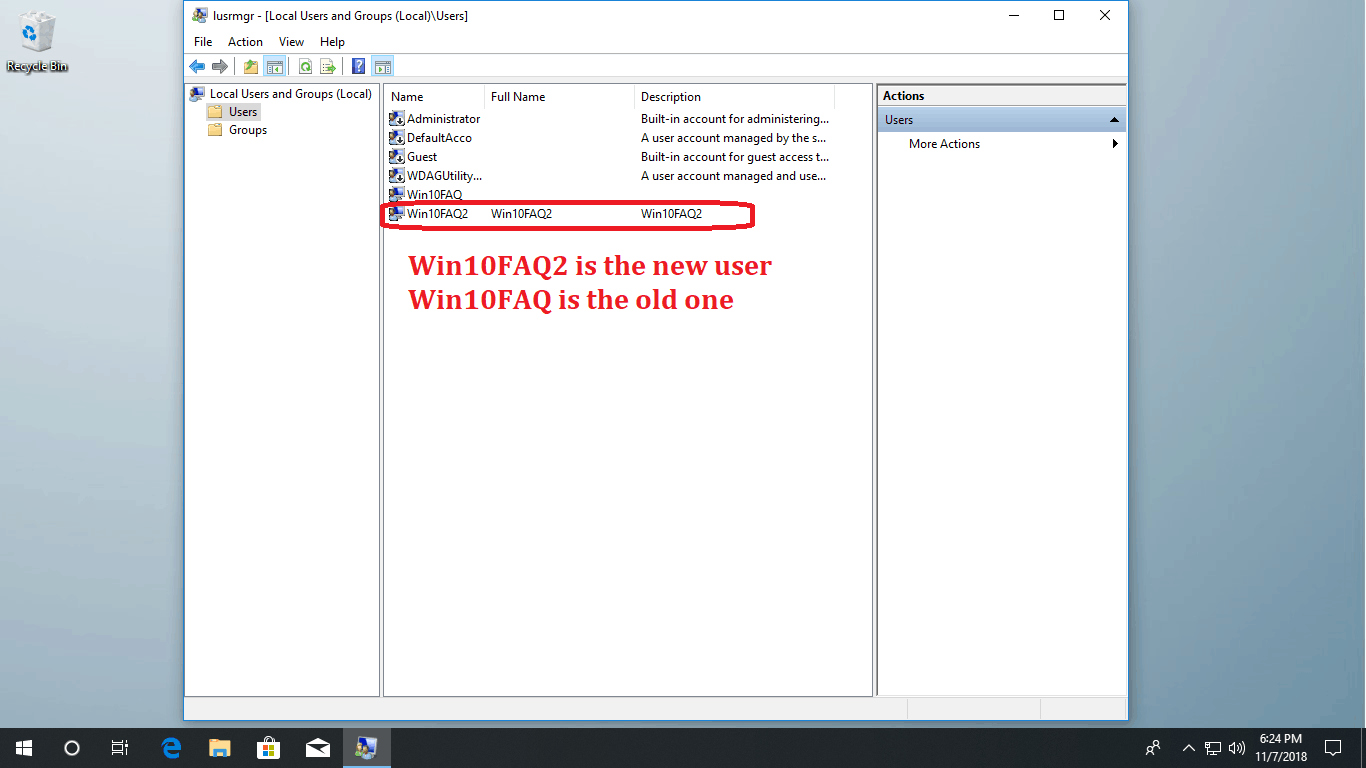
- If you want to make sure the user was created, you can double click on the Users folder and you’ll find both users (the current one and the new temporary one) plus others if they exist.

Step II: Switch Users and Backup the ImmersiveControlPanel Folder
Now that we have created a new temporary user, we need to switch to it in order to copy the ImmersiveControlPanel folder to an external storage device. Here’s how to do it:
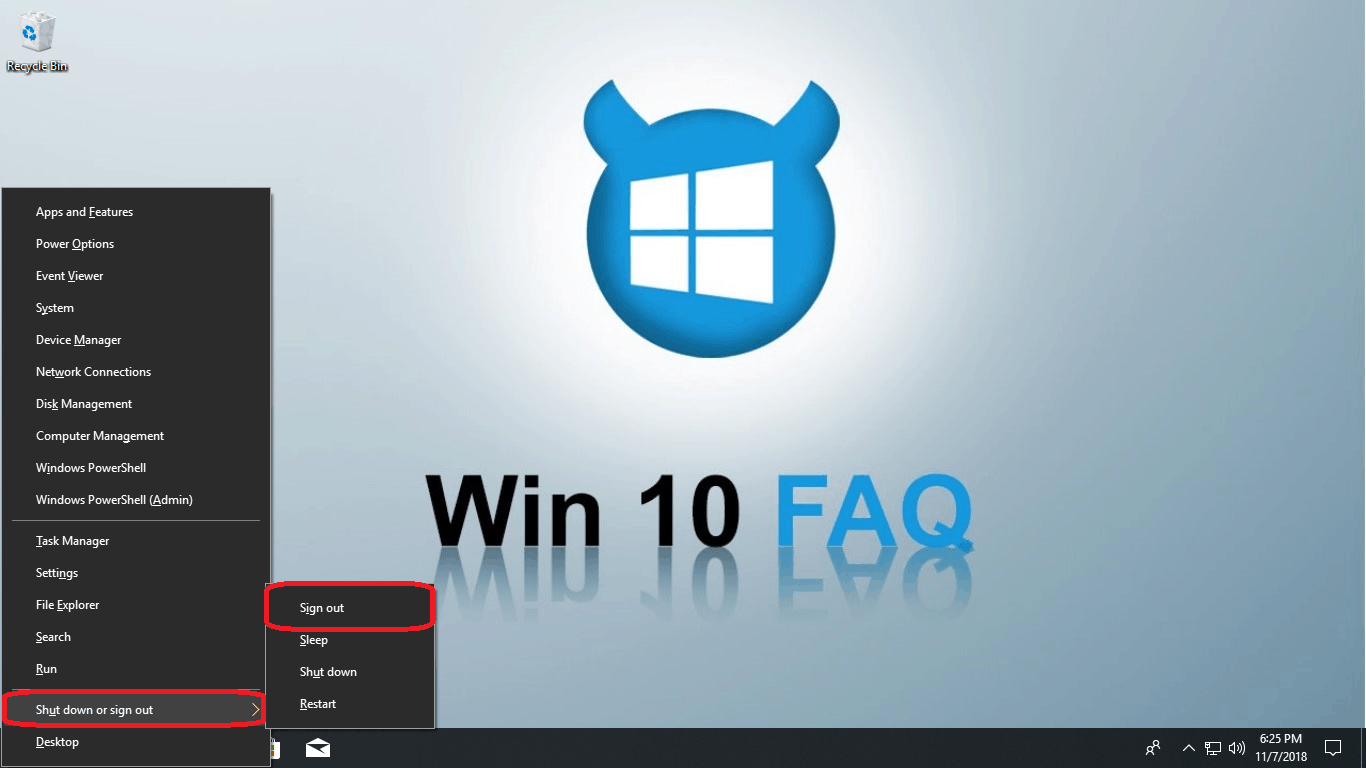
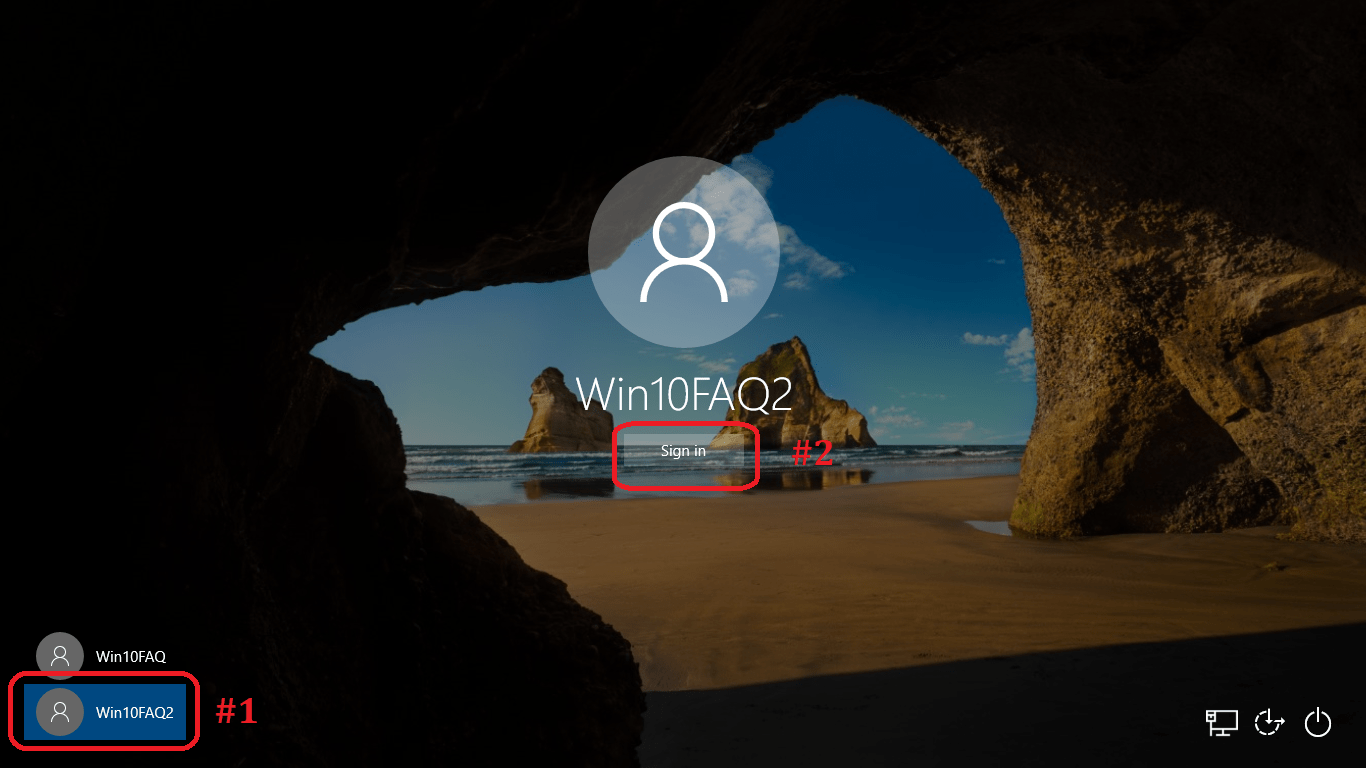
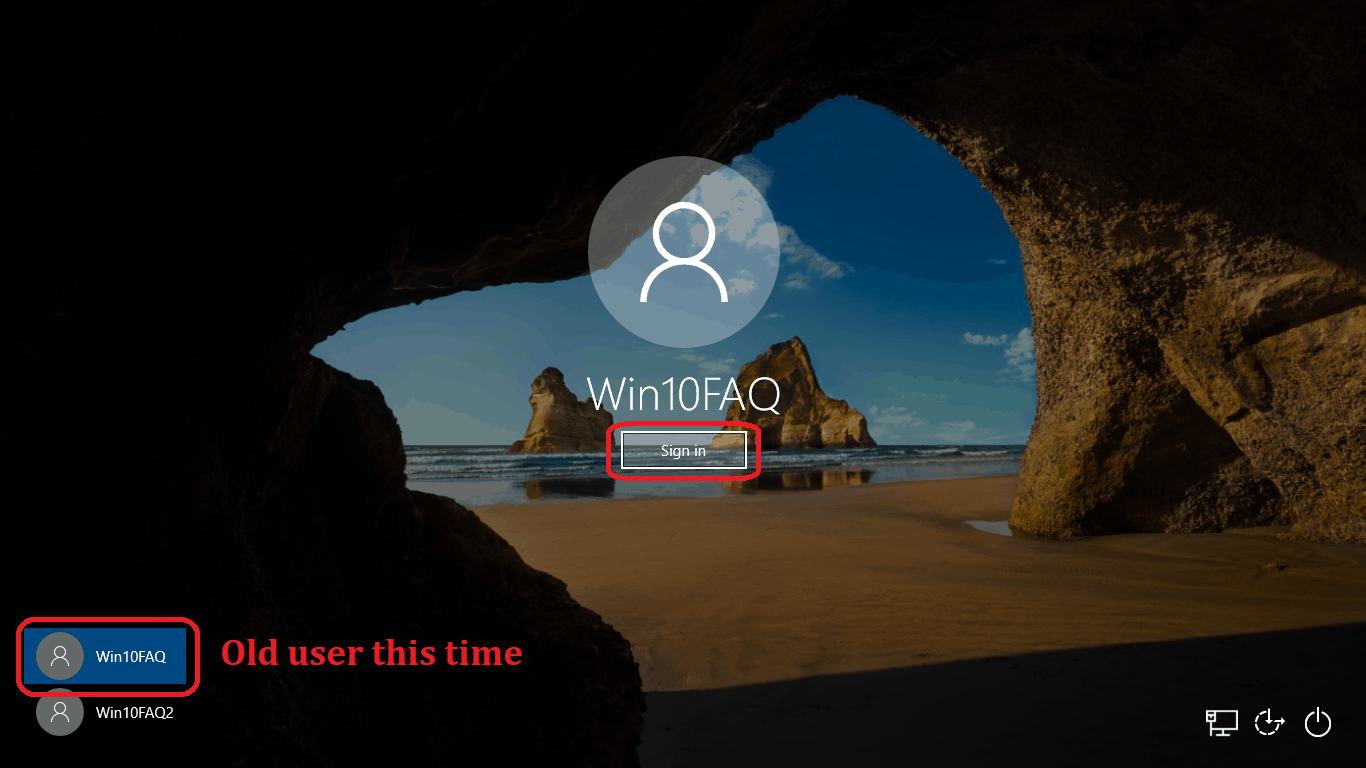
- Press the Windows logo key + X and choose Shut down or sign out > Sign out.
- Now when you computer signs out and then wakes up, you need to choose the new user from the bottom left corner and then click Sign in.
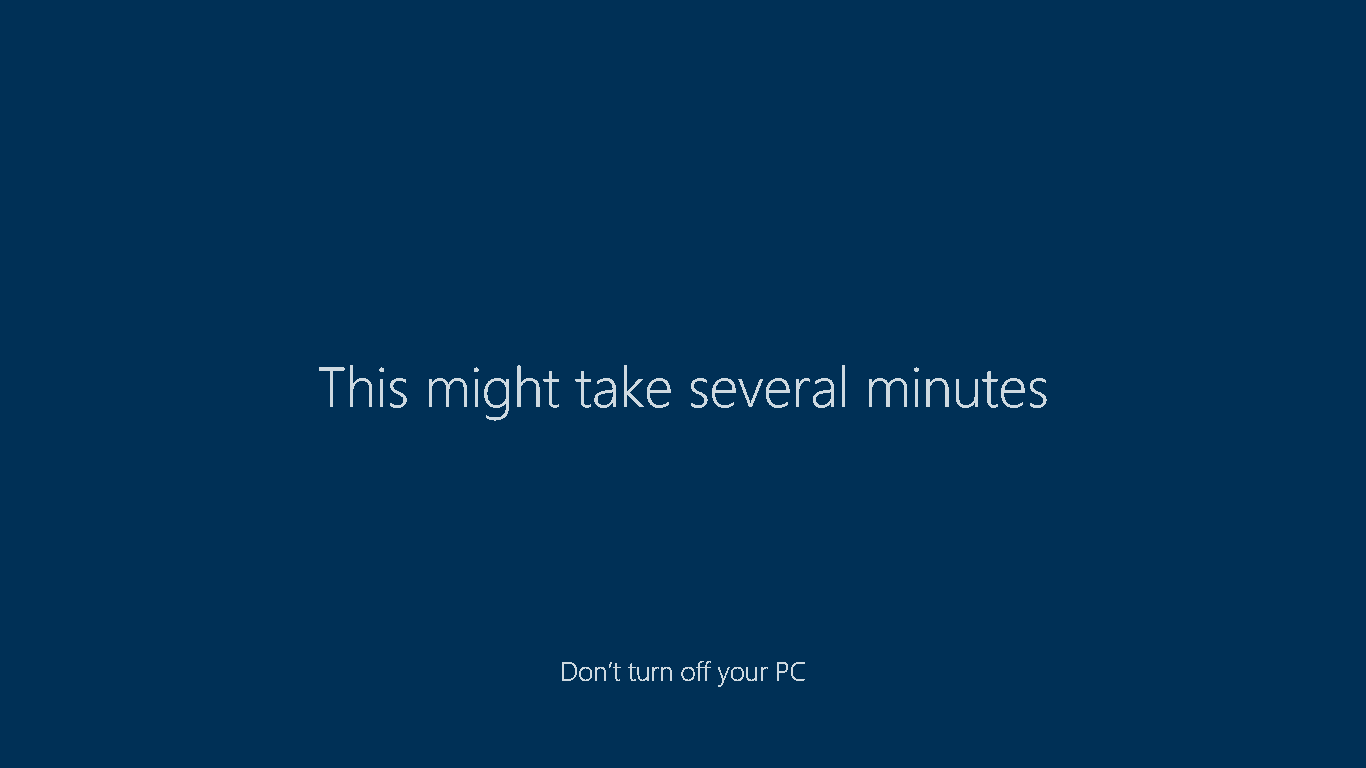
- This will be the first time to sign in to this user, so be patient and in a few minutes you’ll be logged in.
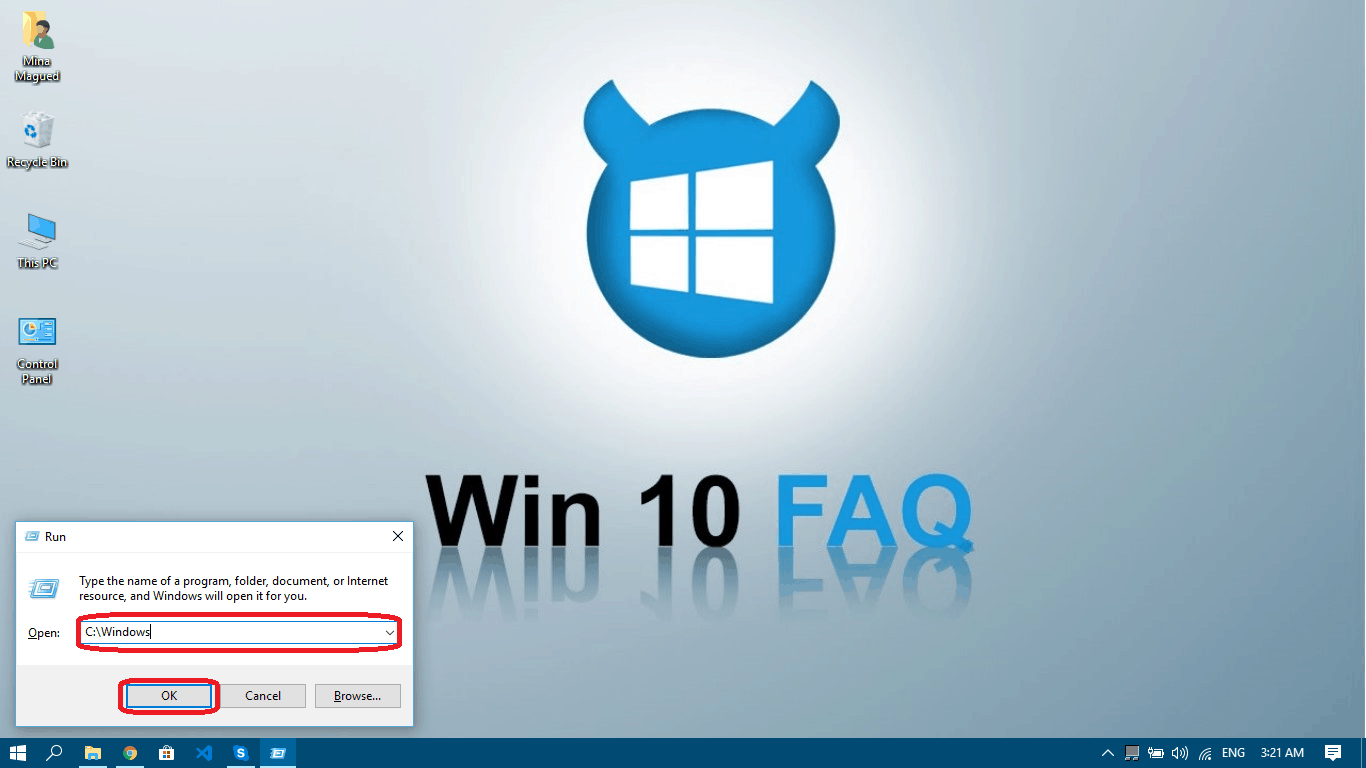
- Once you’re in, press your Windows logo Key + R to launch your Run app and then type C:\Windows then press Enter or click Ok. This will get you to the directory where you can find the ImmersiveControlPanel folder.
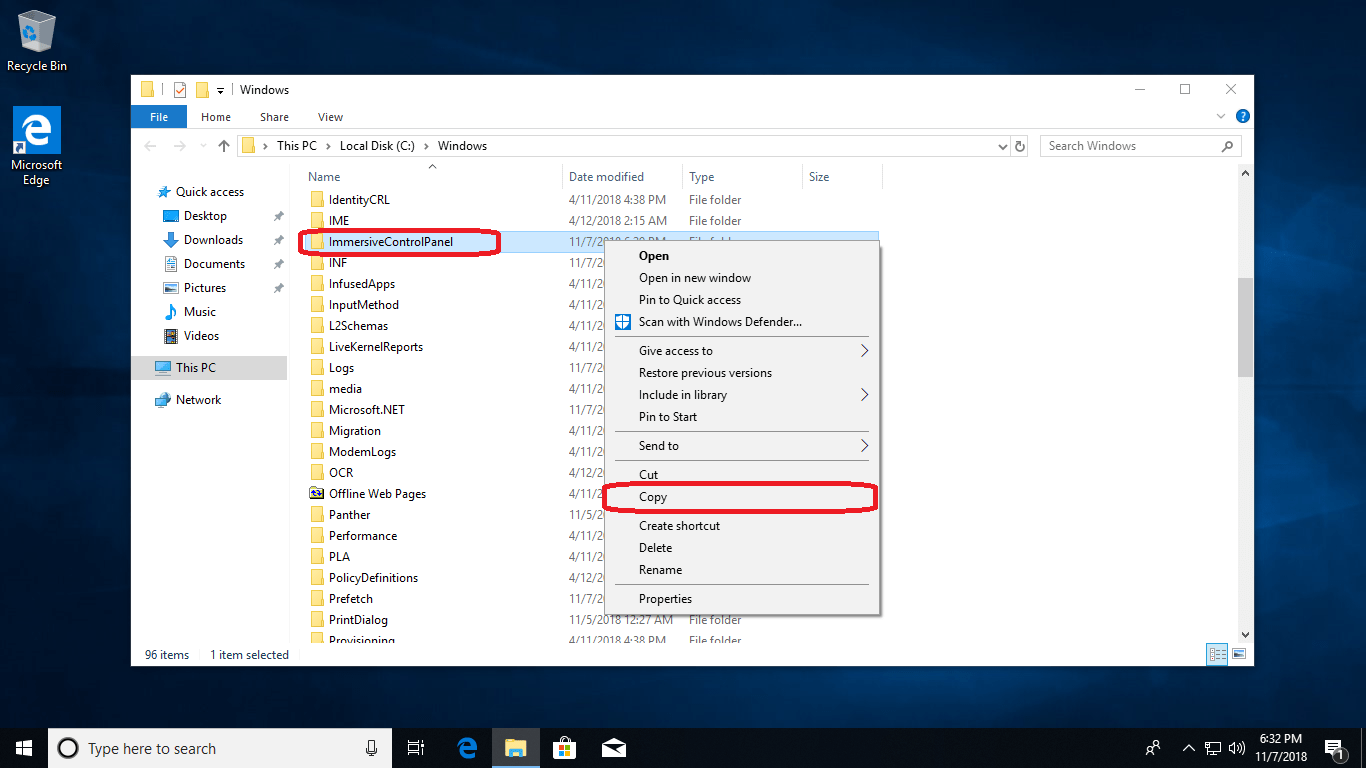
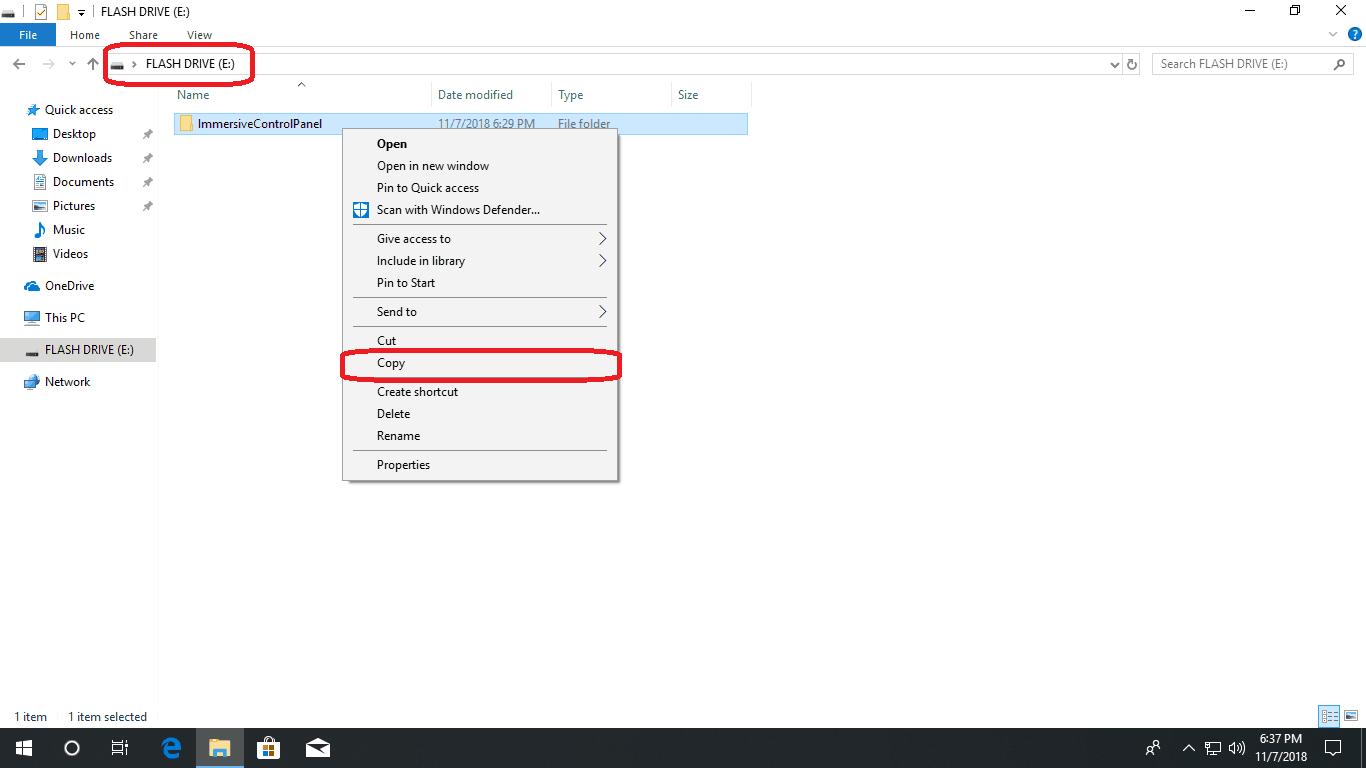
- Once you locate it, right-click on it and choose copy.
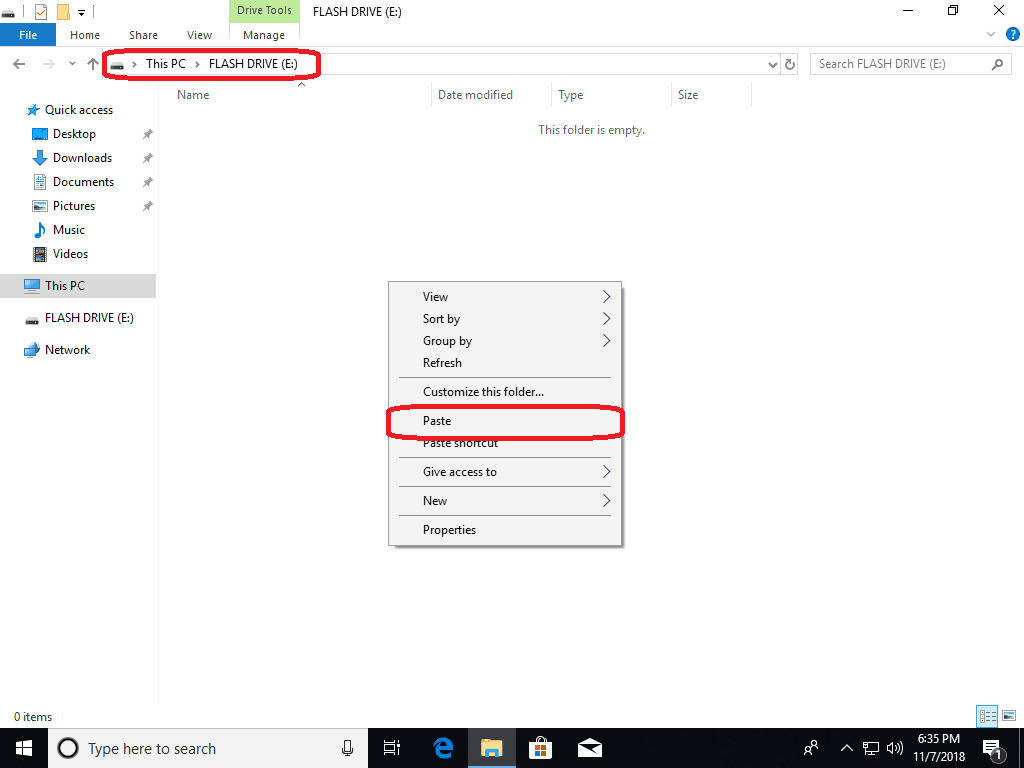
- Go to your external flash drive and paste the folder.
Now we have a copy of the working settings app, we need to replace the one in the old user with the new one.
Step III: Replace the ImmersiveControlPanel Folder
Let’s hit it immediately:
- First of all, you need to return to the original user you were having problems with. Repeat the same steps you followed in the last section to login to the old user (Step 1 and 2 Section II).
- Open your storage device where you kept a copy from the good ImmersiveControlPanel folder. Right-click on the folder and choose Copy.
- Press your Windows logo Key + R to launch your Run app and then type C:\Windows then press Enter or click Ok.
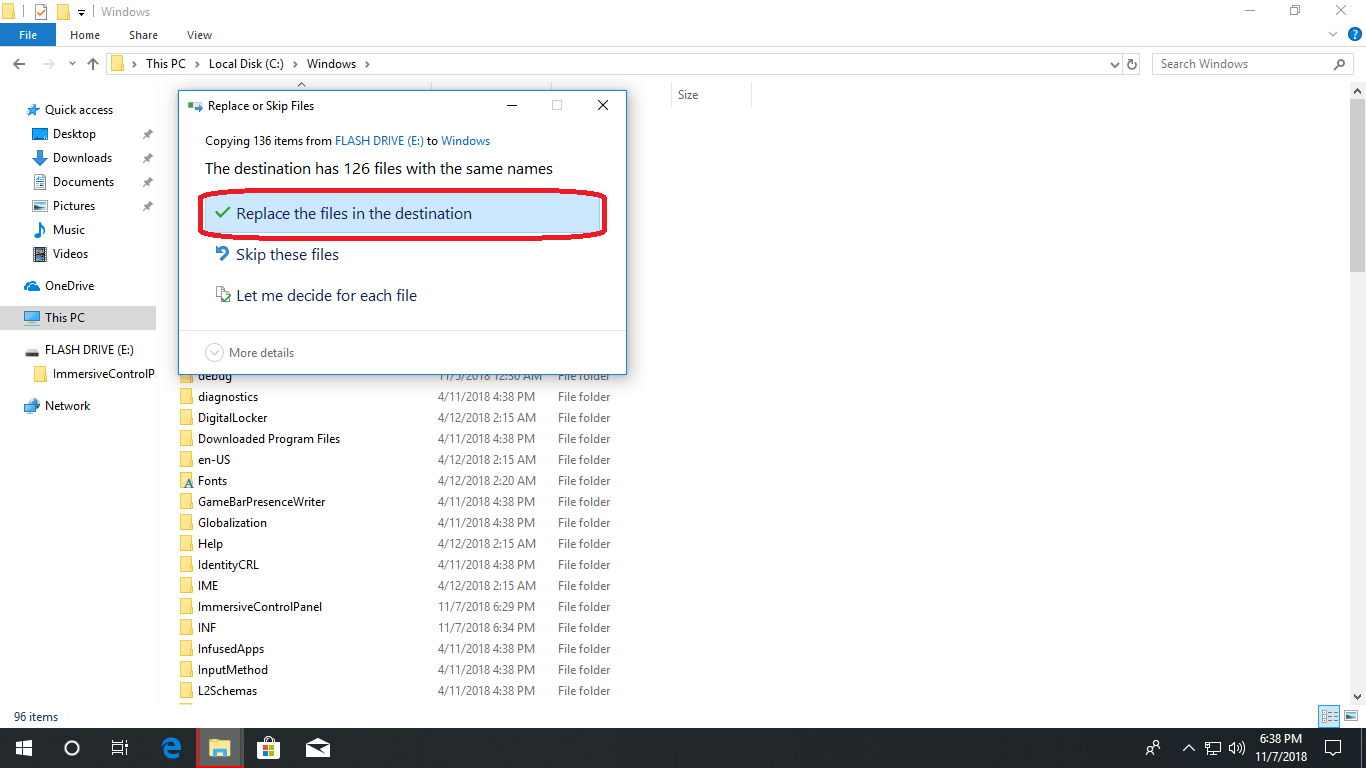
- Now all what you need to do is right-click in any blank area and choose Paste.
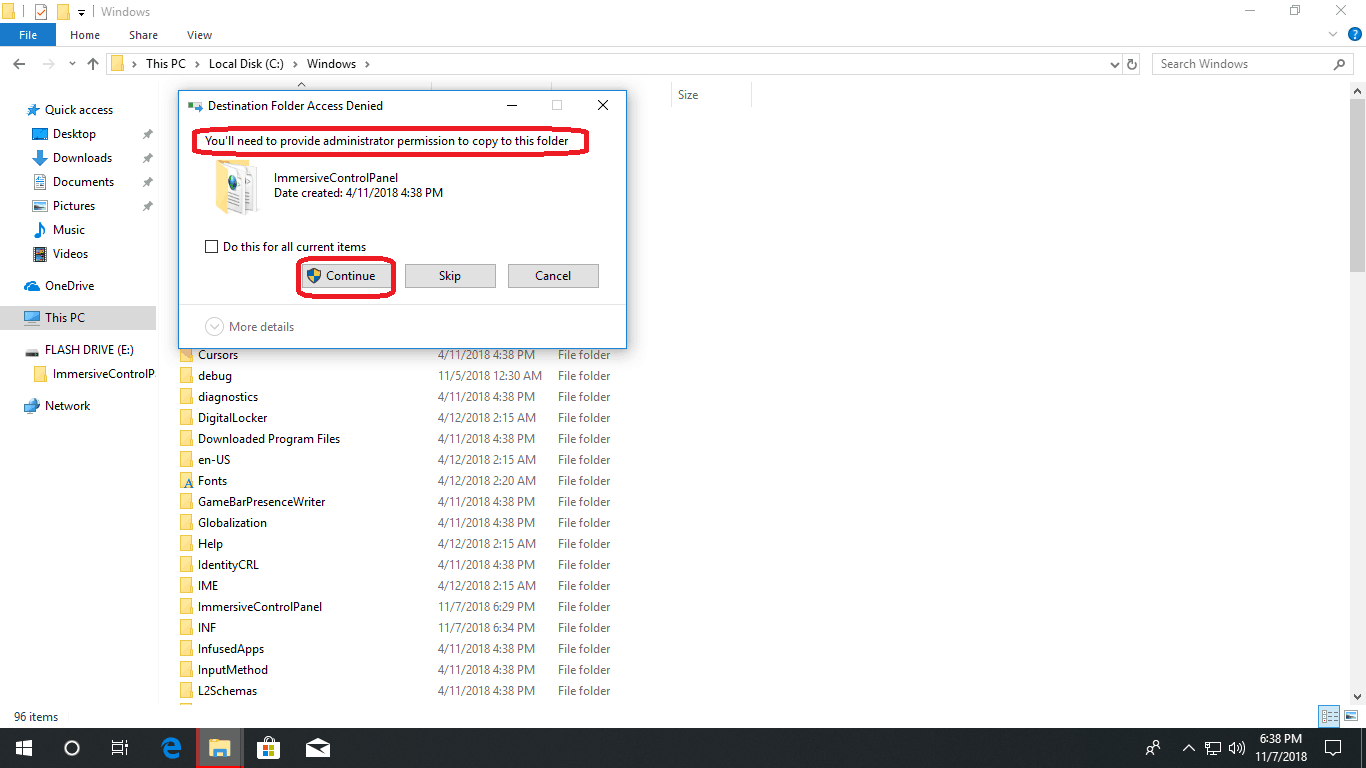
- When asked to replace duplicate files click Replace the files in the destination.
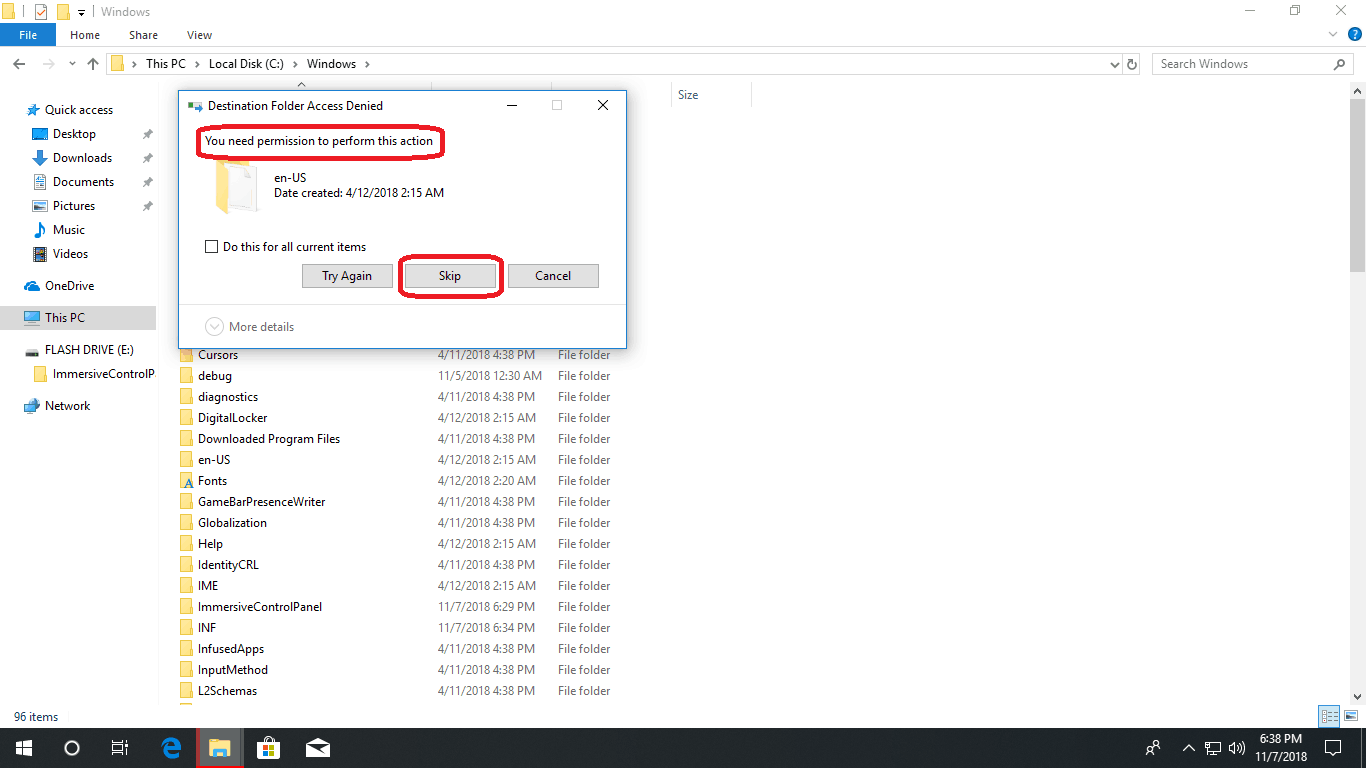
- Here you need to be careful about two types of messages and take the correct corresponding action:
- If it tells you: You’ll need to provide administrator permissions to copy to this folder click Continue, not Skip…. Don’t click skip on this one!!!!!!!!!!!.
- If you get an message saying you don’t have permissions to copy certain files, just click Skip, you have my blessing here.
- If it tells you: You’ll need to provide administrator permissions to copy to this folder click Continue, not Skip…. Don’t click skip on this one!!!!!!!!!!!.
- Once your copy is finished, you can now right-click on your desktop and access your Display Settings and the Personalize window without a problem. You’re welcome!


Suggested Read: How to Solve the GWXUX.EXE Error
Final Thoughts
If you have any questions or comments, feel free to leave a comment below. We’d love to hear from you. You could also share this article with others if you’ve found any of this information useful.
Do you got any more technical questions about your Windows 10 PC? Try visiting our website. You could find a topic that might help you with your concerns. Or you might have a direct question like What Are Best Windows Explorer Alternatives and How to Create a Bootable Pendrive.
I hate that word ” You have my blessing” . and I am the one not blessed. How to solve instead?
Hello Jac, I didn’t mean annoying you, it’s just a word that came out of me and I like to keep things natural in my articles. Otherwise, did it work in the second user or it’s also faulty when you created the second user? If so, then it’s clear your Windows copy is damaged and you need either to reset your Windows or maybe reinstall it.
ImmersiveControlPanel you need permission to perform this action
Just “Try again” “Skip” and “Cancel”
HOW?
I cannot see why this would work. The ImmersiveControlPanel folder is in C:\WIndows and is thus the same for ALL users. Anyway, I followed these instructions to the letter and nothing changed. More obviously, if the new user got a fresh install of the ImmersiveControlPanel folder, they the problem would not exist for that user, but it does.
hello , thank you for your share, can i ask if i copy the folder from other PC ? is it also working ?
Worked like a charm!
Now, if only Microsoft addressed that Start Menu trouble…
Hello,
When I get the message saying you don’t have permissions to copy certain files, I click skip but nothing is copied leaving the folder as it is. The problem remains the same.
Hello everyone,
I have the same issue, I tried nearly everything I found in the internet but nothing worked…
when I understood that it’s something related to the registry files I tried something and it worked like magic ??
simply use ccleaner program go to the registry section then do scan and fix all issues and you are well done and good to go without even a restart .
Thank you! This worked!! I tried multiple options and thought I lost my computer…I am bookmarking this!