Changing your username in Windows 10 depends on the type of account you have. Like many users, you might use a Microsoft account to log in to Windows. These accounts display the name registered to them on the login screen, usually your real name. If you aren’t using a Microsoft account, then you have a local account. These accounts display the name that was entered when Windows was installed. This could be your real name, or a username you came up with.
In most cases you’ll be changing the name on an account that you created and own, but if your account is managed by an organization such as school or work, you will likely be unable to change your account name yourself. If you need to change your name on a organization managed account you may need to ask an administrator to change it for you. Considering most users will not have this issue, this guide will be about managing accounts that you own.
Quick Jump
- Check your account type
- Change your Microsoft account name
- Change your local account name
- Change the name of your user folder
If you’re not sure what type of account you have, here’s how to find out:
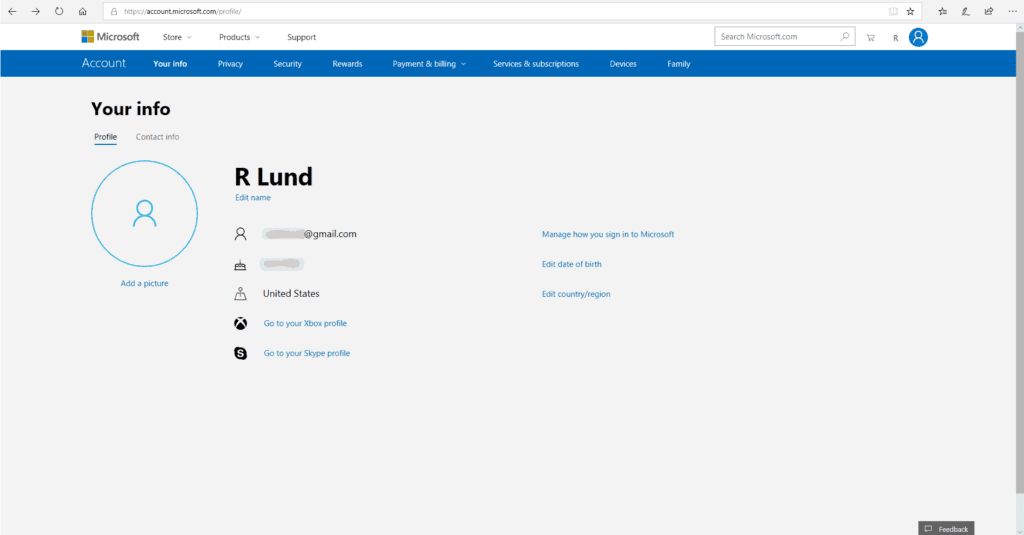
- Open search (click on it or press Win + S) then begin typing “account”. Click on Manage your account when it comes up. It may show up lower in the results on your screen. The “Your info” page will open.
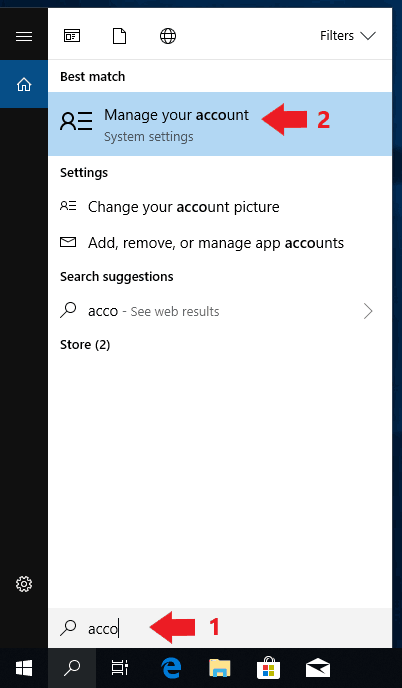
- If you see your name with “Local Account” at the bottom, you have a local account.

- If you see an email address below your name and have a “Manage my Microsoft account” option, then you have a Microsoft account.


Here’s how to change your name on a Microsoft account:
First, you will need a working internet connection and web browser on the computer you are using to change the name on your Microsoft account. Once you’re ready, follow these steps:
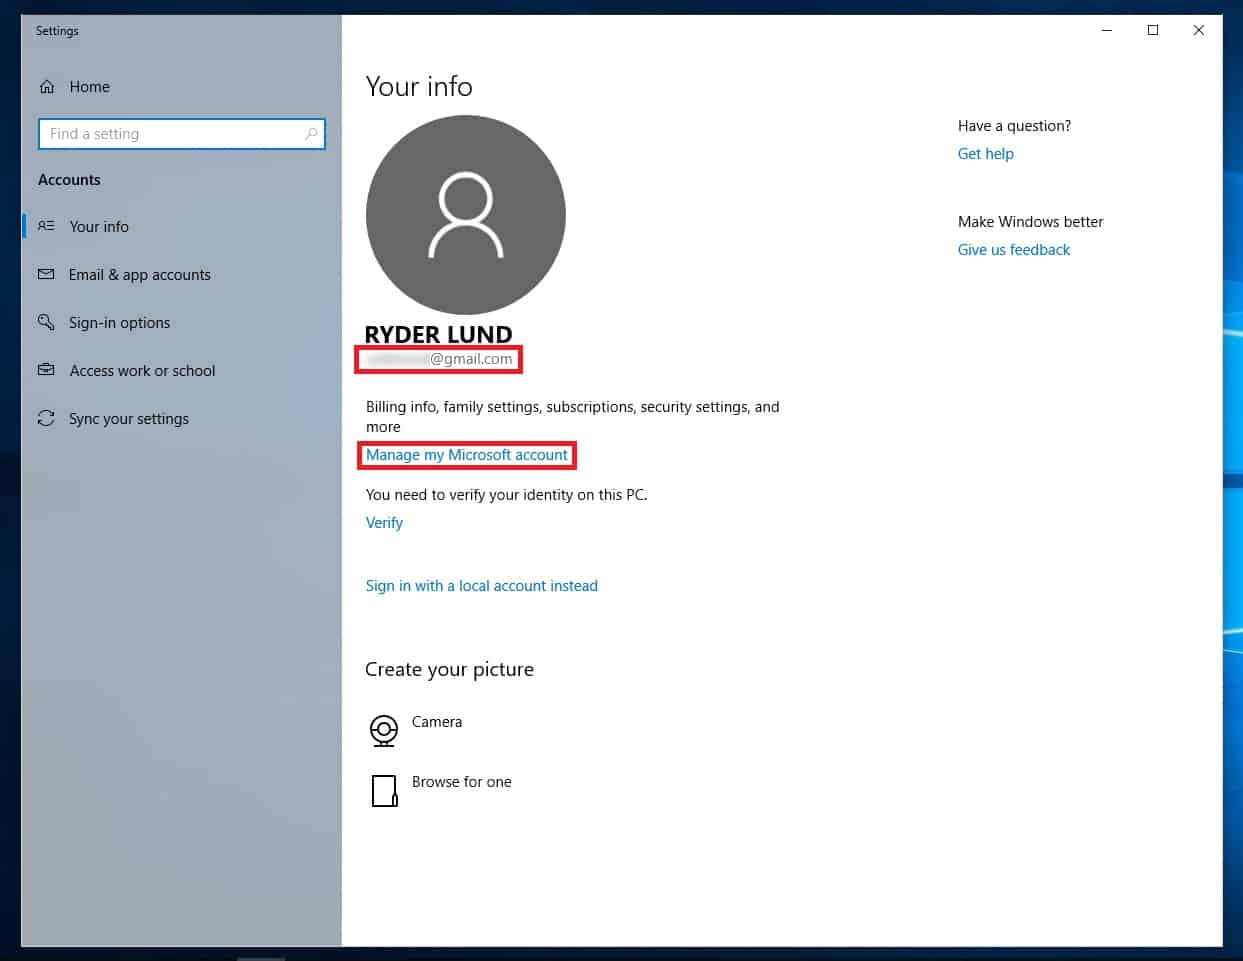
- Open search (click on it or press Win + S) then begin typing “account”. Click on Manage your account when it comes up.
- In the window that opens, click on Manage my Microsoft account.

- Your default internet browser will open to a page where you can manage your account. You should be automatically logged in. Log in with the email and password of your Microsoft account if you are not.

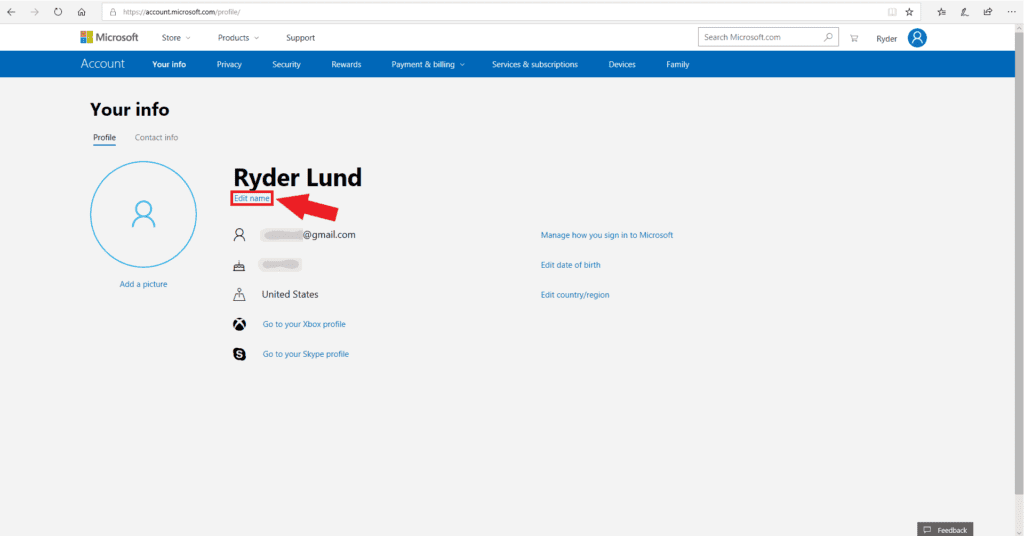
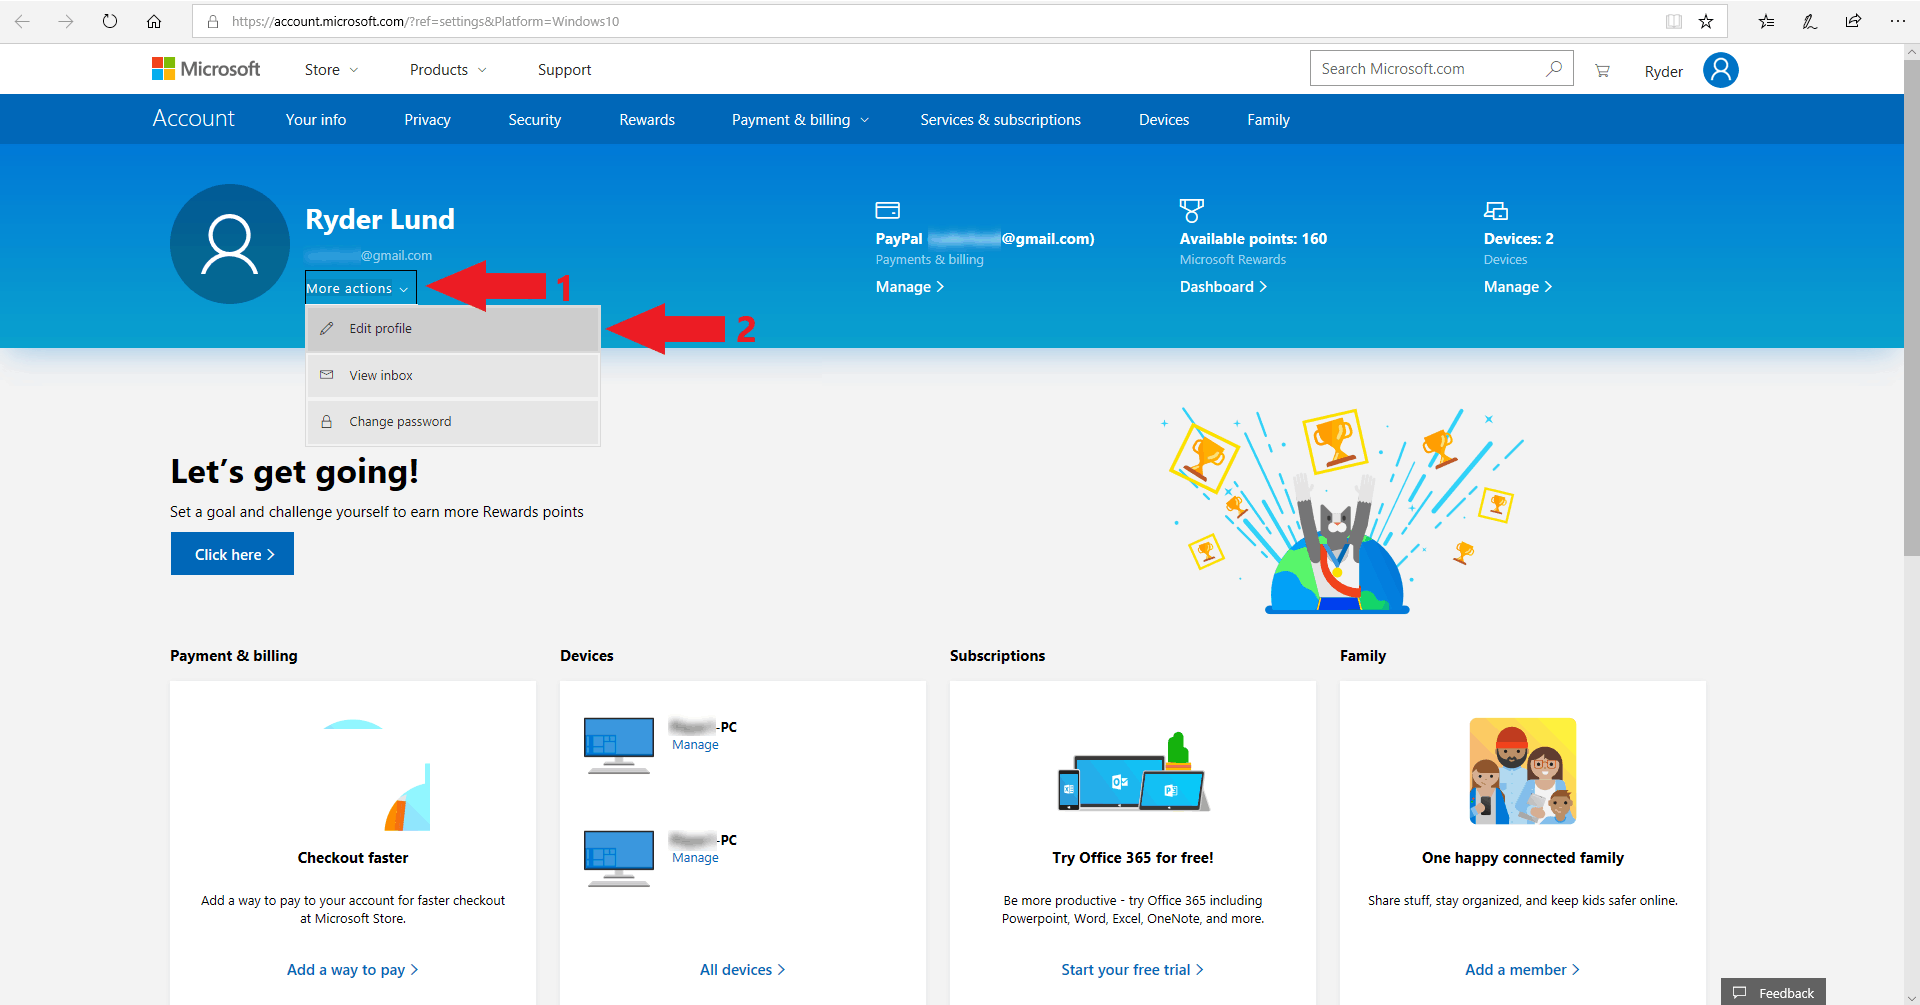
- Below your name click on More actions then Edit profile.

- You should now be on a page with your personal information. Click on Edit name under your name.
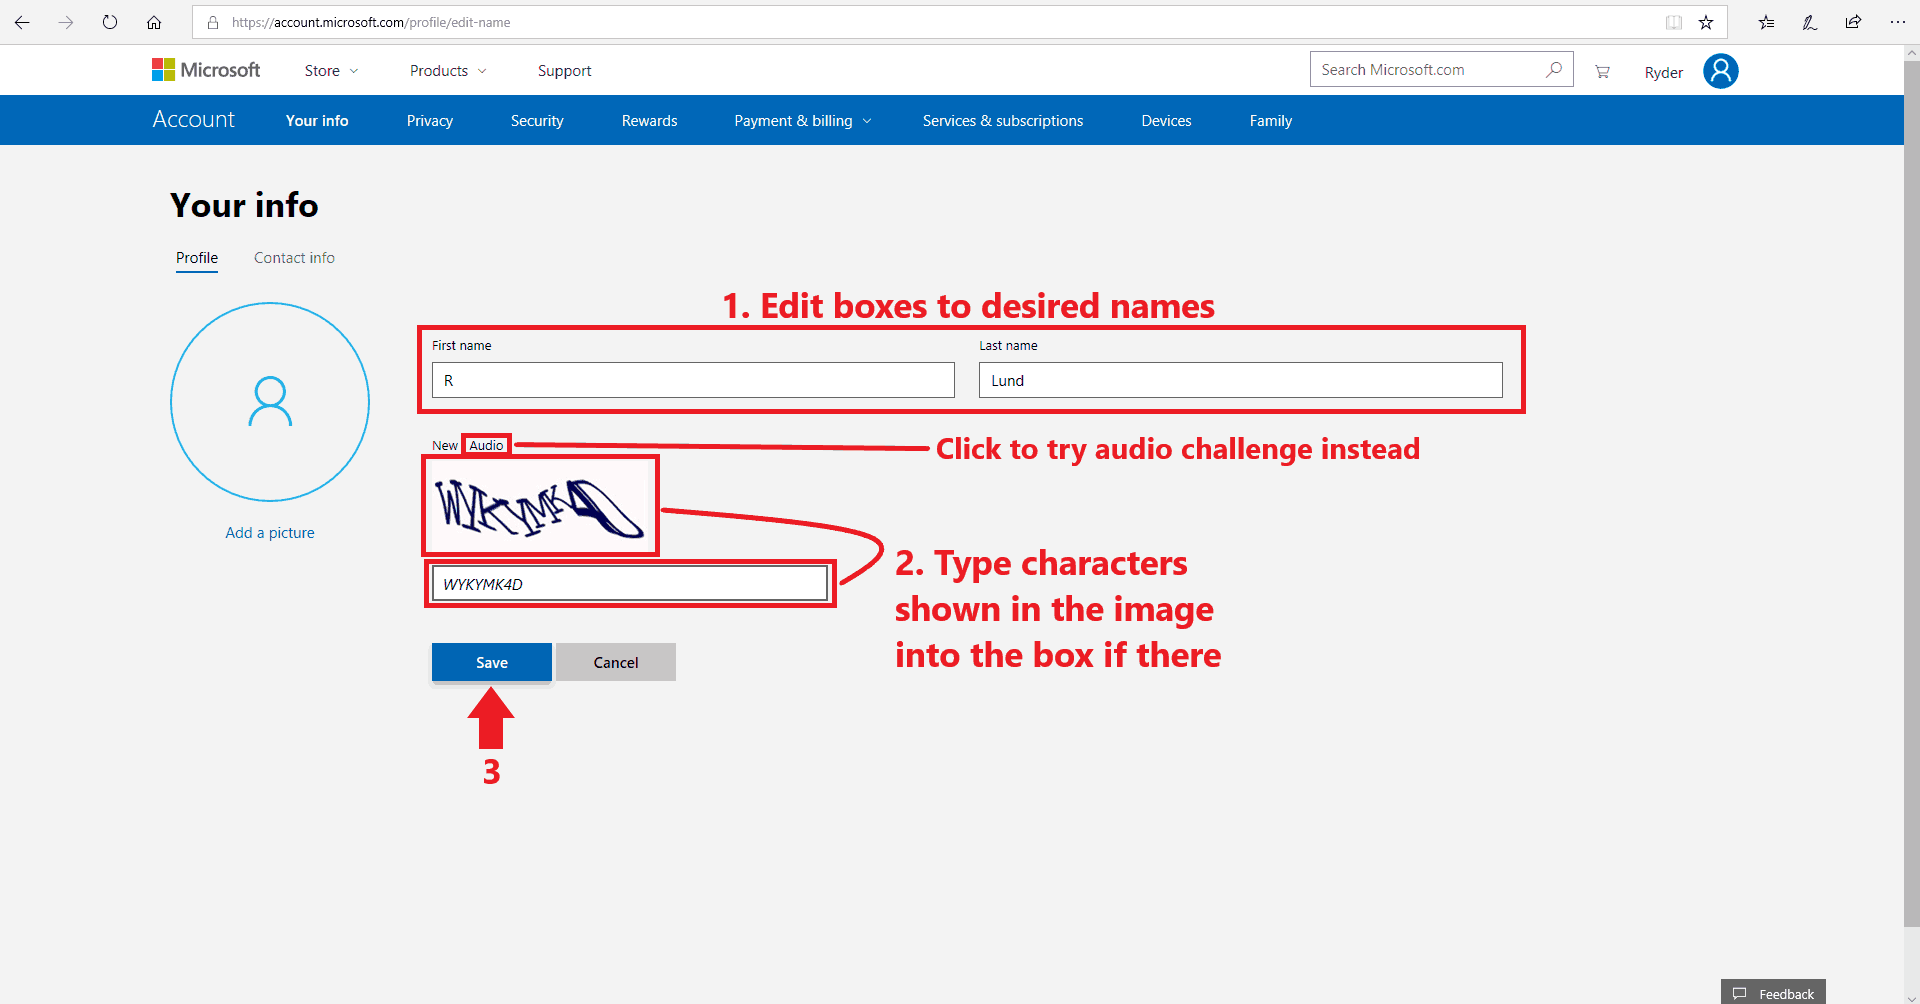
- You can now edit the first and last name fields as needed. You can change them to your initials (1 letter), but neither field can be blank. After changing your name, enter the CAPTCHA code displayed in the image if you get one and click Save.
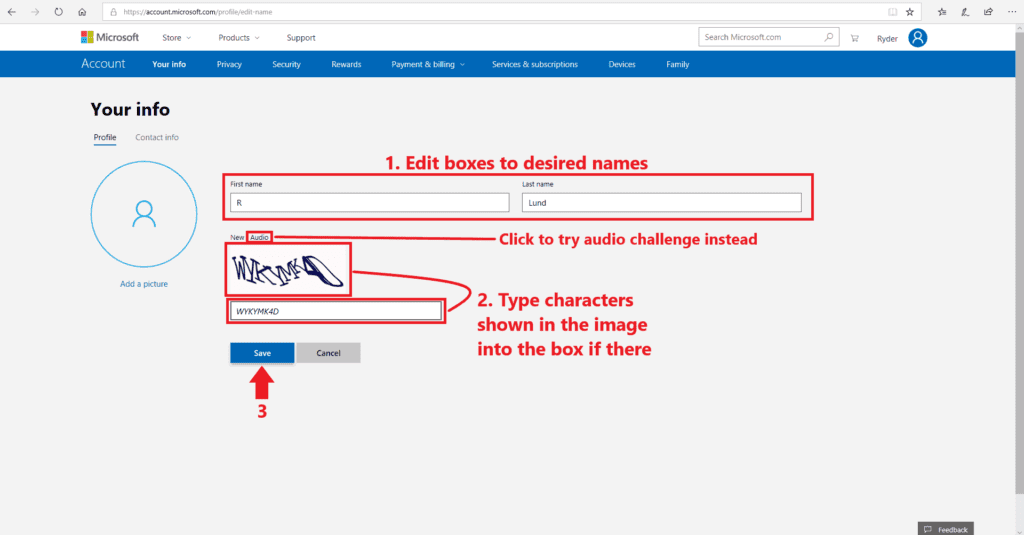
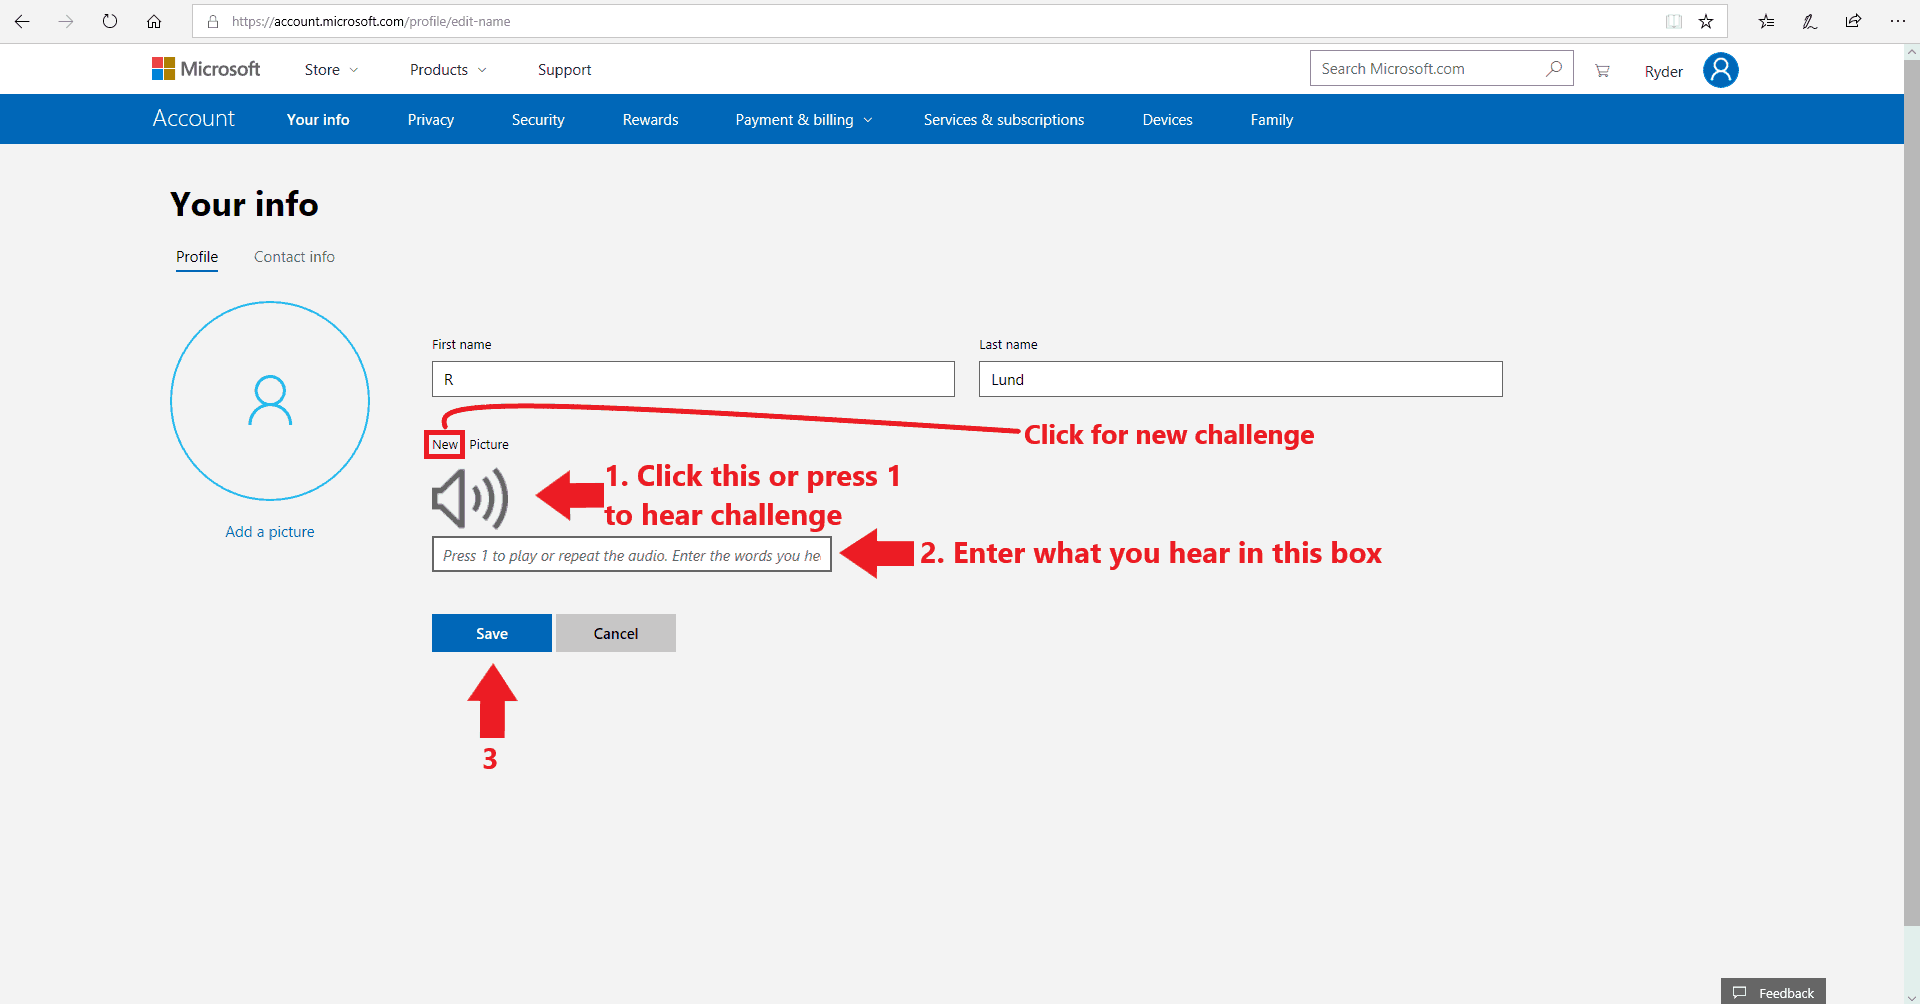
- (Optional) If you have trouble with the CAPTCHA challenge, you can click on New for a different one, or click Audio to receive an audio challenge and enter what you hear into the box. Click Save when done.

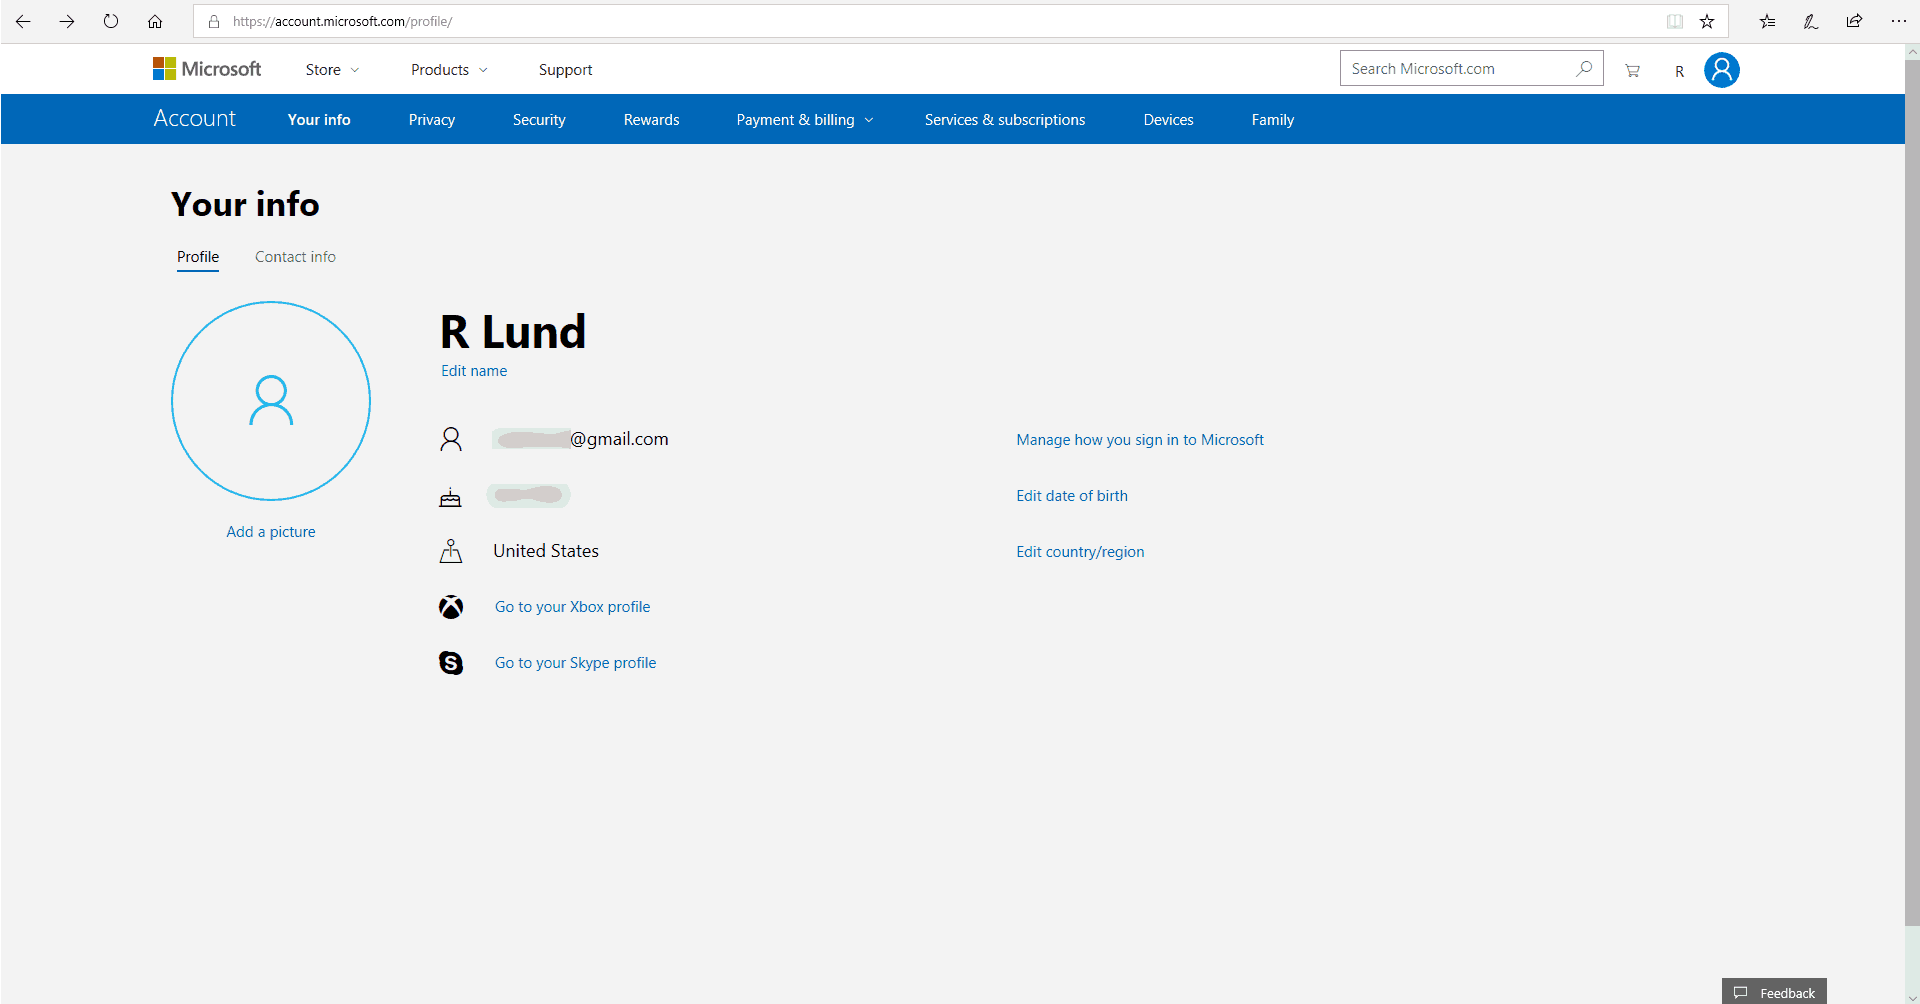
- You will be brought back the “Your info” page where your name change will be shown.
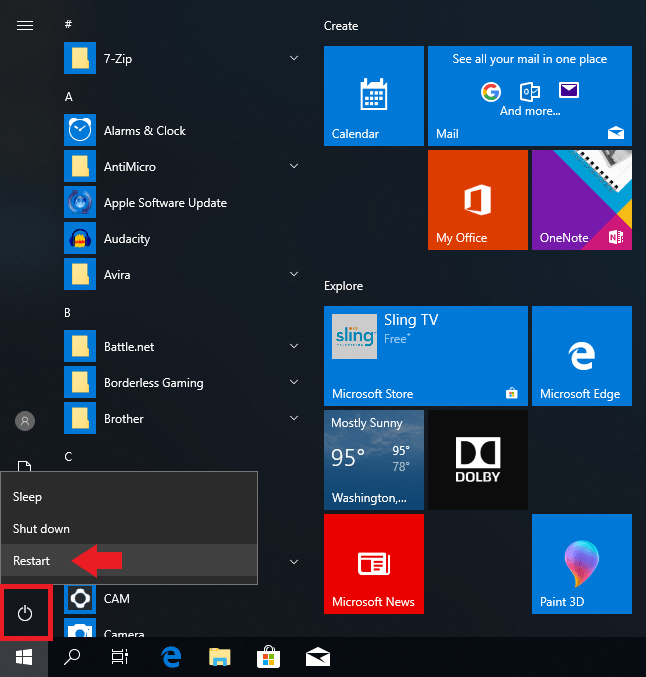
- Now Restart your computer(Start menu, power icon, Restart).


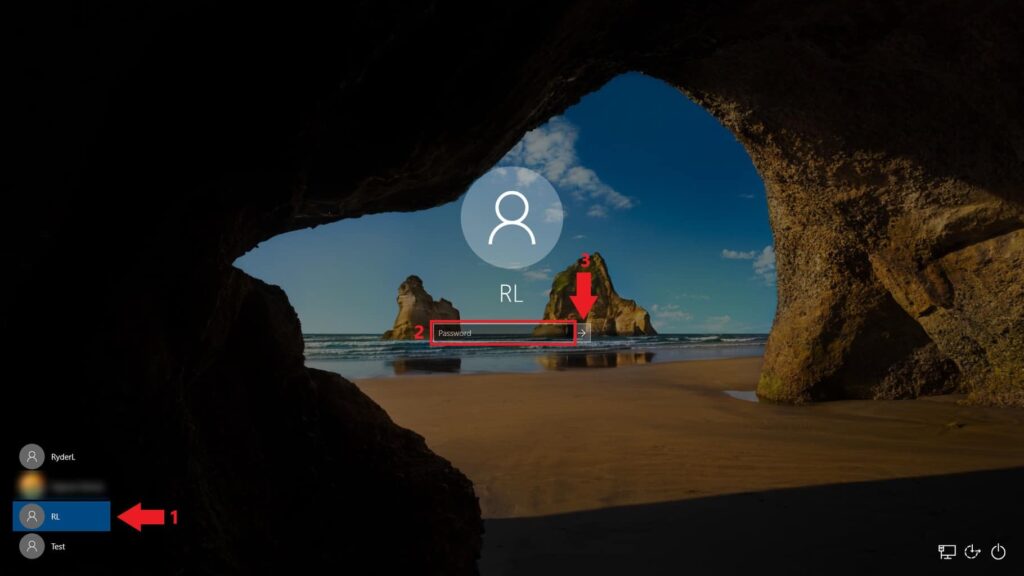
Once Windows has finished restarting you should see your new name displayed when logging in:
You’ll also see your new name if you go back to “Manage your account” and on your user folder. However, this is mainly cosmetic and will not change the actual name of your user folder. If for some reason you need to change your user folder name at a disk level, what to do is covered further on in the guide.
It’s also important to note that as this changes the name on your Microsoft account, this change will also be shown on everything that is connected to it. Other computers you use the account on, Outlook email and anything else that uses your Microsoft account will show your new name.
With a local account, changing your name is a bit different:
Unlike with a Microsoft account, changing your name on a local account doesn’t require internet access and is done through Control Panel. Here’s what to do:
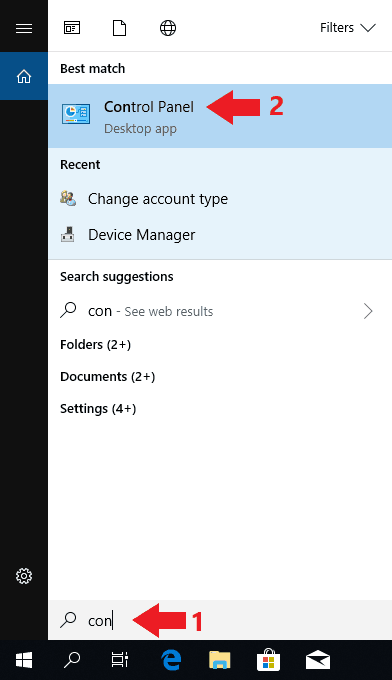
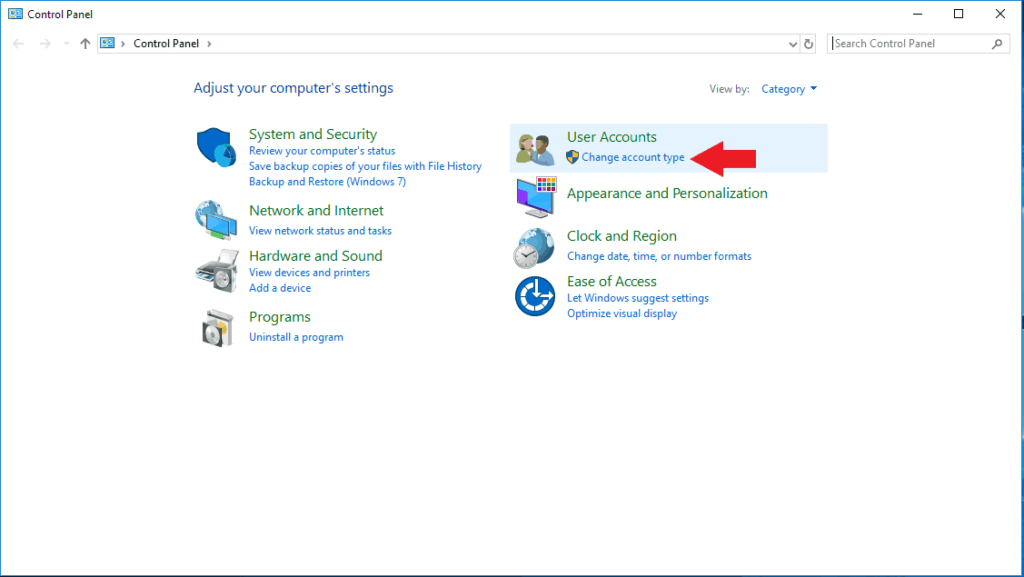
- Open search (click on it or press Win + S) and begin typing “control panel”. Click on Control Panel when it shows up.
- Once Control Panel is up, click on Change account type under User Accounts.
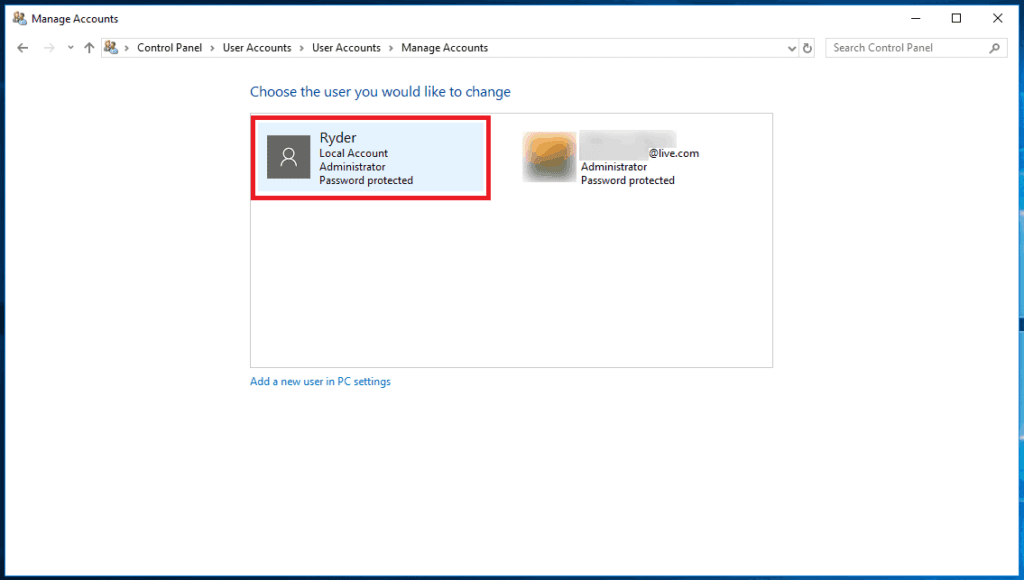
- Click on the account you’re changing the name of. Your page will of course have different accounts than mine and possibly only have one.
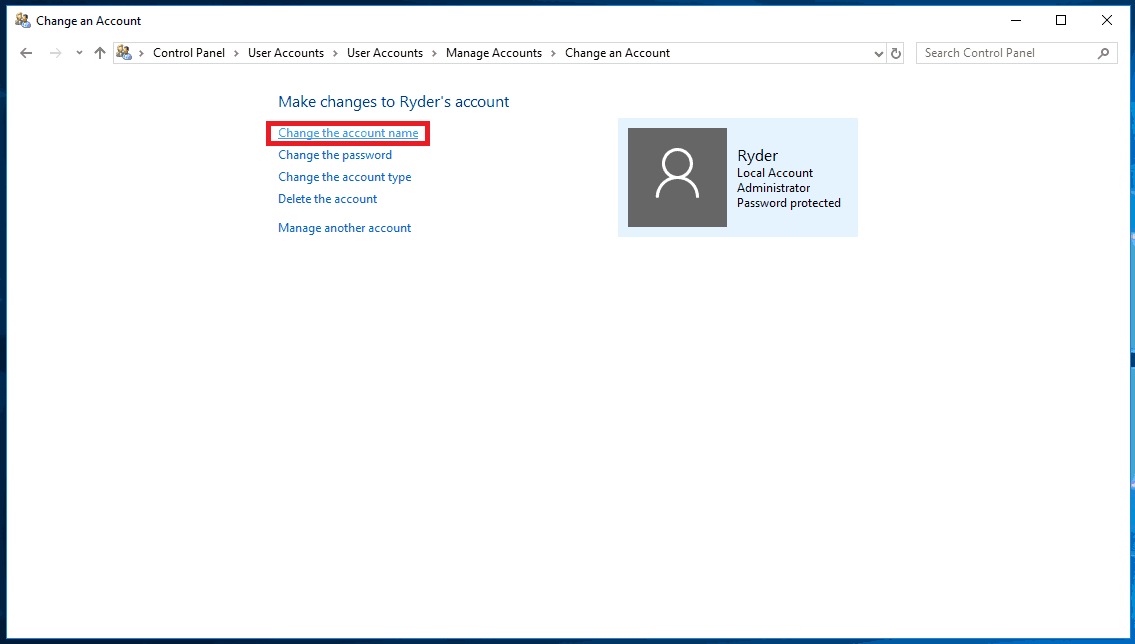
- A page with options for your account will come up. Click on Change the account name.
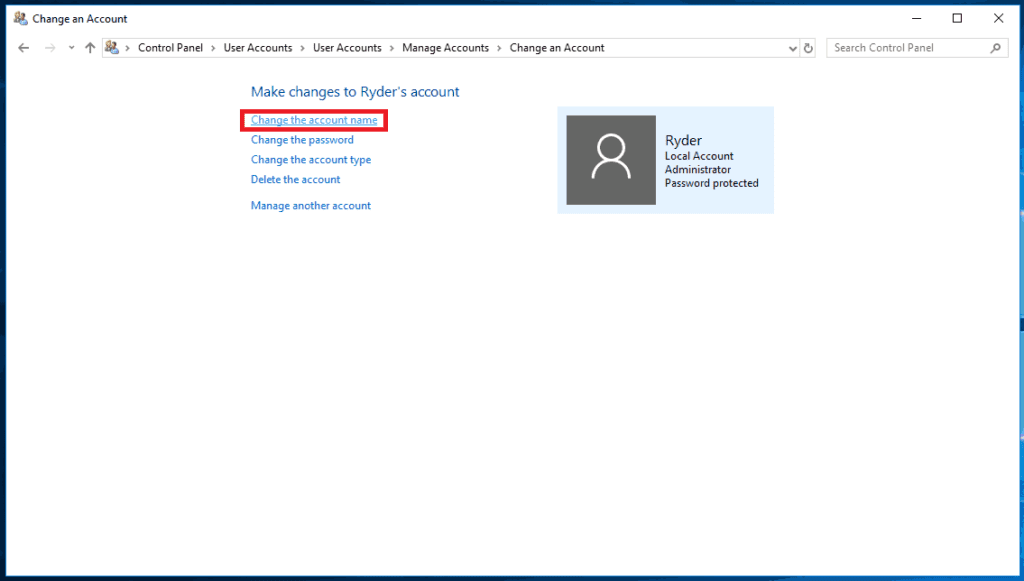
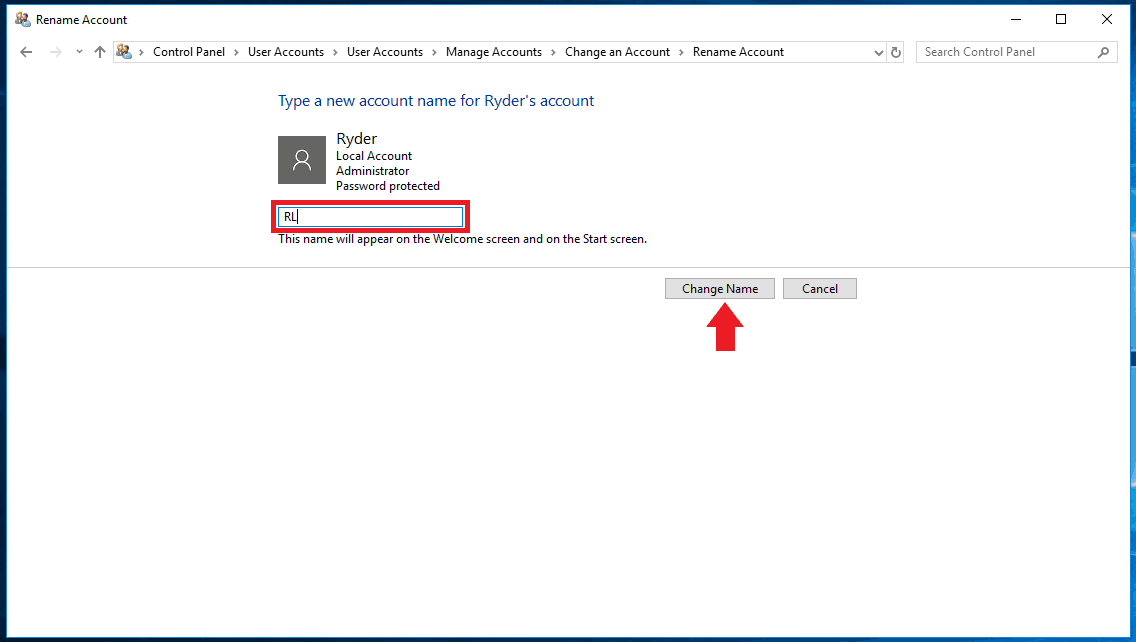
- Enter the name you want into the “New account name” box, then click Change Name when done.

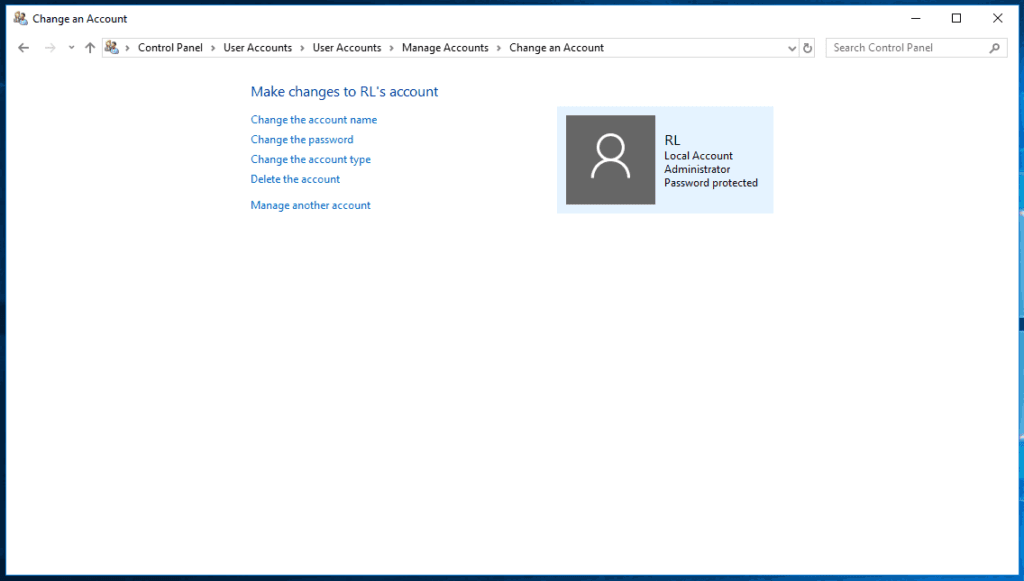
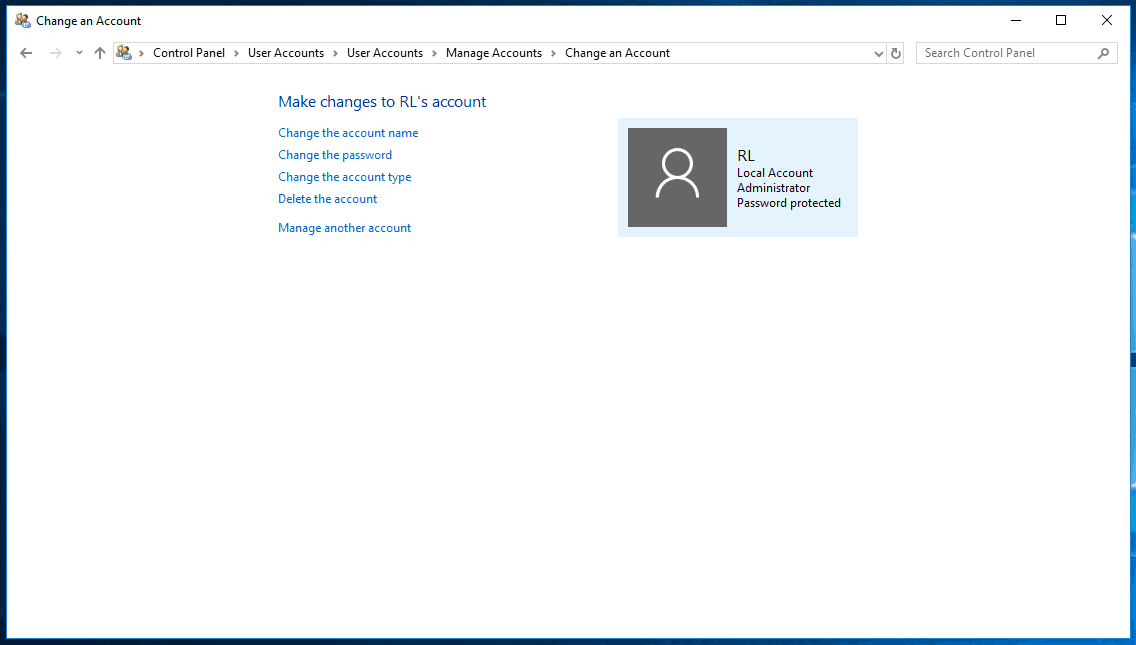
- Your new account name should now be displayed.
- You may need to Restart(Start menu, power icon, Restart) in order for the change to fully update.


As with a Microsoft account, changing your name on a local account doesn’t change the name of your user folder. The folder will keep the name of your original account. If you want to change the name of the user folder, read on.
Changing the name of your user folder can be tricky:
Because renaming your user folder can be difficult, you should only change your user folder name if it’s important. For example, if the current name is causing errors with certain programs. Otherwise, it’s recommended to leave it as is. If you still want a different name for your user folder, here’s what you should know first:
To start, while there are several possible methods for changing the user folder’s name, most of them have the potential to cause more harm than good. That’s why the best way to change your user folder name is often to actually just create a new account with your desired name and move over your personal files to the new account.
You should be aware that themes and other personal settings will be set to default on the new account and that you may need to reinstall some programs; specifically programs that were installed with the “just me” option checked on the previous account.
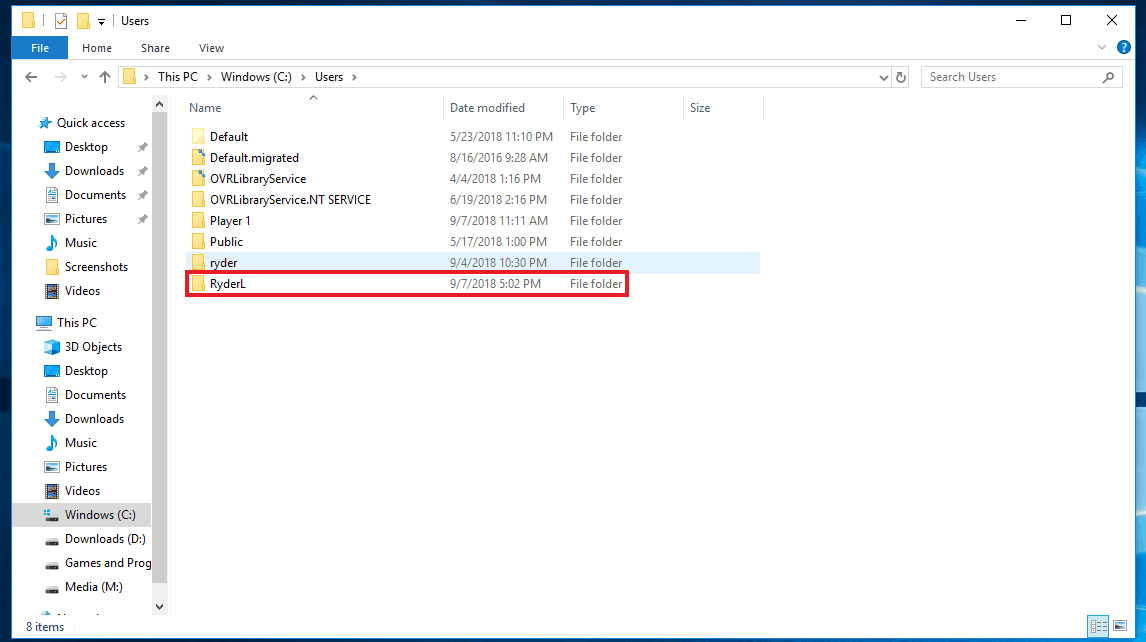
It’s also important to note that you cannot create an account that has the same name as an already existing user folder. For example, I can’t create another account named “Ryder” even after changing the previous one to “RL” because the user folder is still named “ryder” on the “RL” account.
The account you create will be a local account, but after you’re done you can add your Microsoft account to it if you want. This will of course cosmetically overwrite the new user folder name with your Microsoft account name. You may want to rename your Microsoft account beforehand to what you plan to name the new account if you want them to match.
With that covered, here’s how to make a new account:
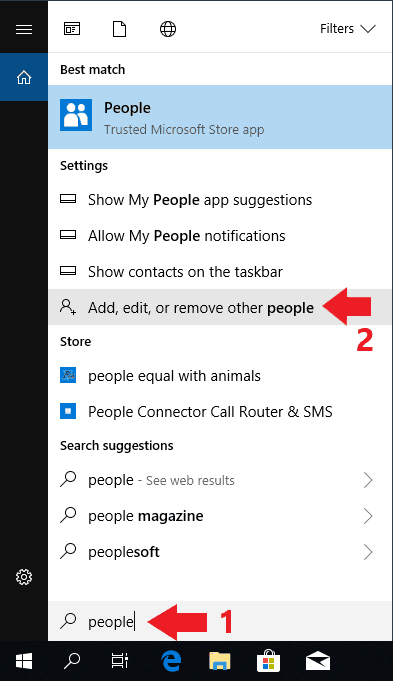
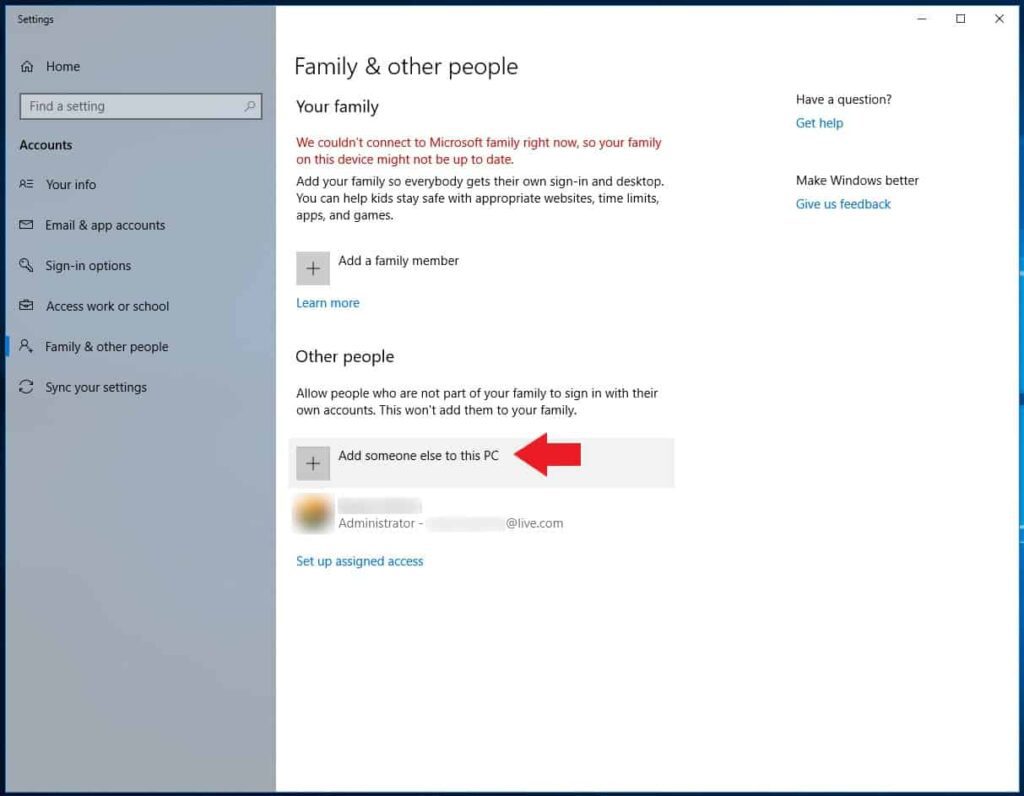
- Open search(click it or press Win + S) and type out “people”. One of the results should be Add, edit, or remove other people. Click on it.
- Click Add someone else to this PC under Other people.
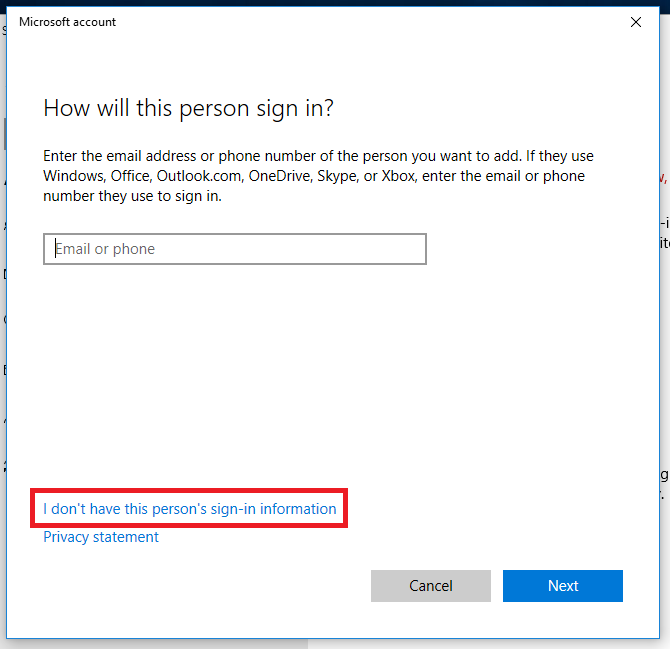
- On the window that comes up, click I don’t have this person’s sign-in information.
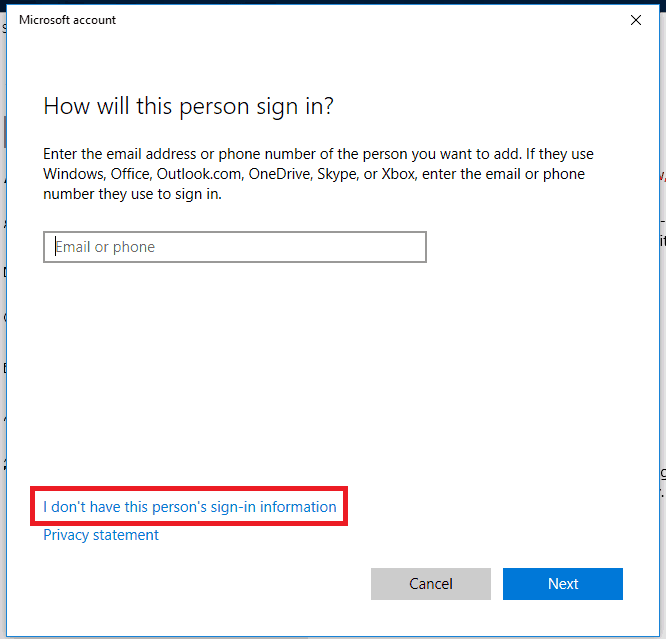
- Click Add a user without a Microsoft account on the next window.
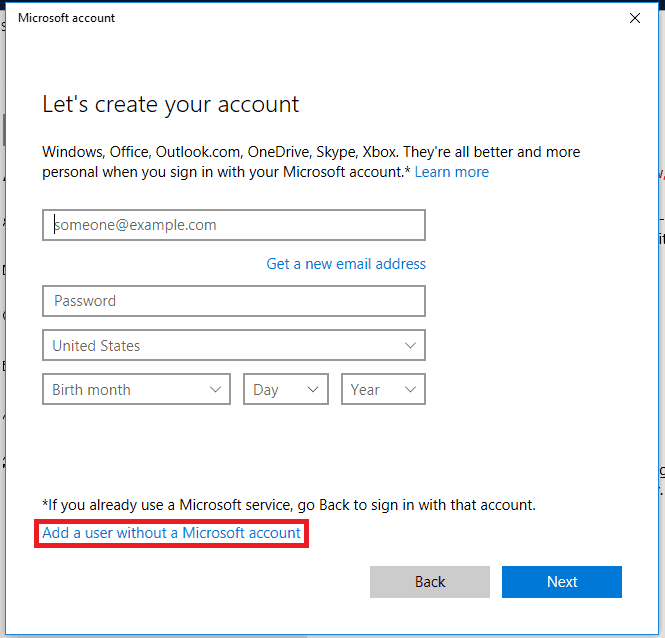
- Enter your desired name in the Who’s going to use this PC? box. While optional, it’s recommended to make a password for your new account.

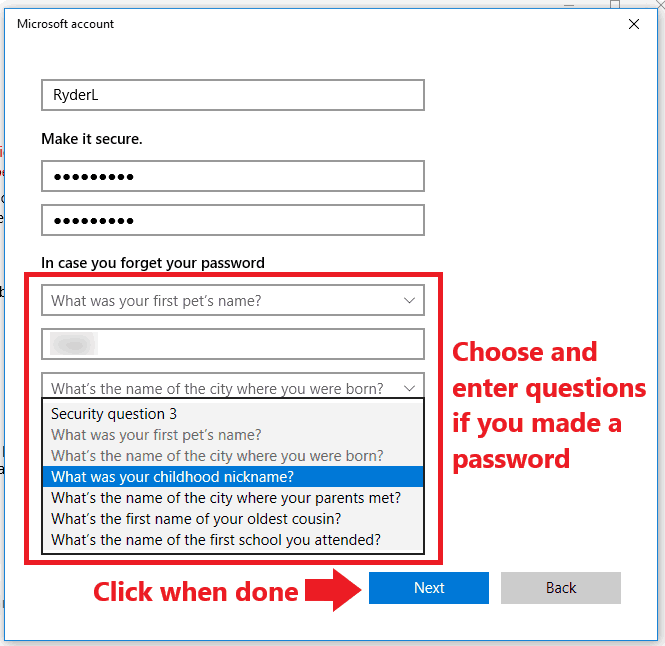
- Entering a password will also require you to make security questions. Choose and answer them, then click Next when done.
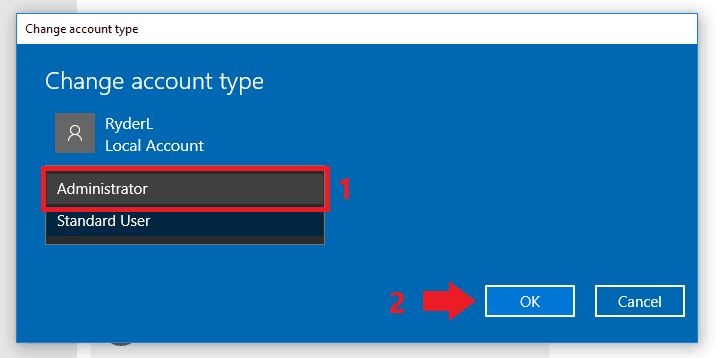
- Your new account will now appear listed under Other people. Click on it then click Change account type.
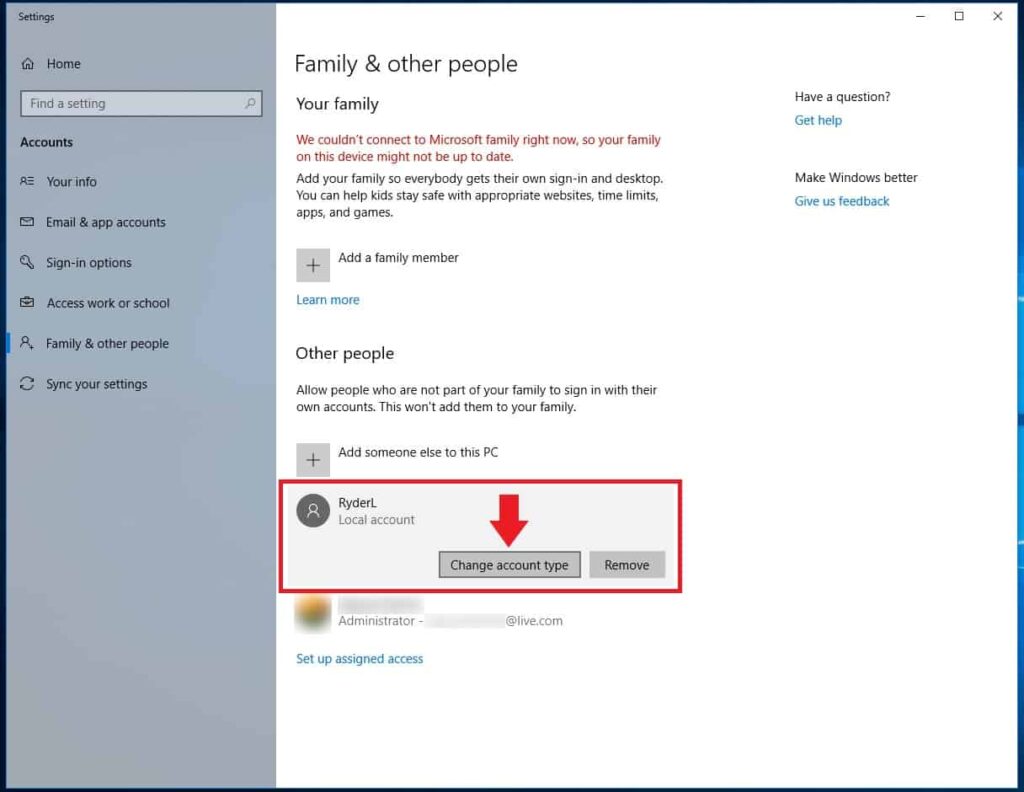
- In the next window select Administrator in the drop-down list then click OK. Your account is now an Administrator account, which will allow you to enter the password of your new account for administrative actions, or not need to use it at all, rather than needing to enter your previous account’s password for them.


You can now log in to your new account, here’s how:
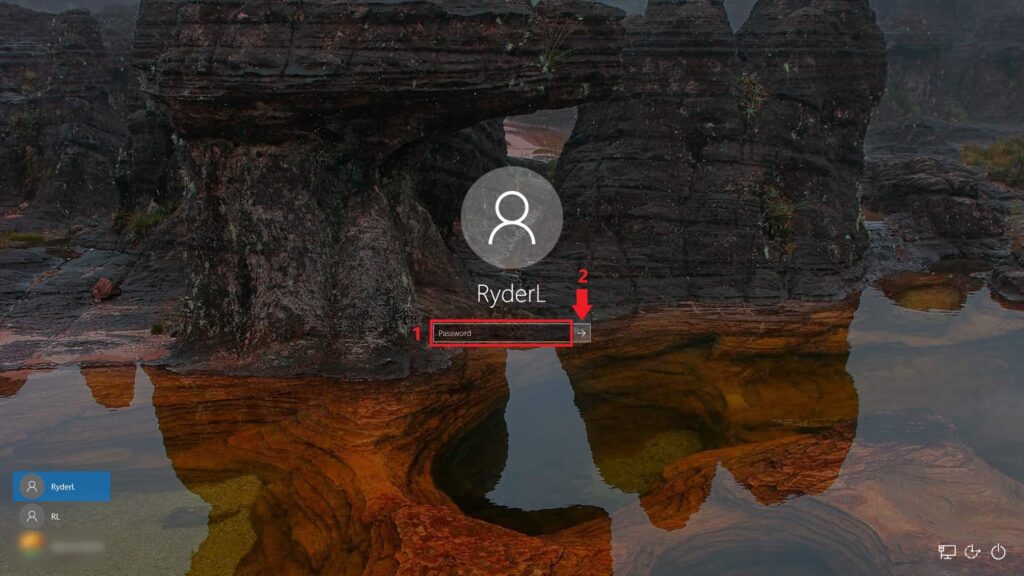
- Open the start menu(click it or press Win) then click on your profile. A menu with a list of options and the other profiles on your computer will come up, click on the one you just created.

- You’ll end up on the login screen for your new account. Enter your password and press Enter or click the arrow.
- Windows will have a screen letting you know it’s setting things up. When it’s done you’ll end up on the desktop. Yours will likely look a bit different.


Now that you’ve created a new account, the next step is transferring files from your current user folder to the new one:
You’ll first need to log off of your new account and then back on to your previous one, following these steps:
- Open the start menu(click it or press Win), click on your profile then click Sign out.

- Once signed out, sign back in to previous account by clicking on it then entering your password if needed.

Now that you’re back on your old account, continue to the steps below. Following them should allow you to transfer nearly all of your settings and personal files to the new account, but some settings may be stored elsewhere.
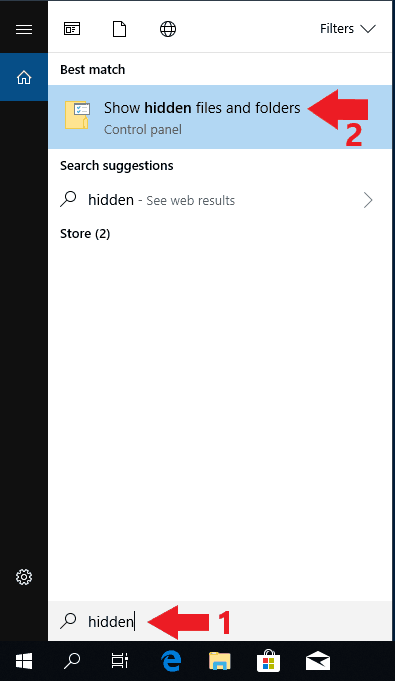
Before you can copy over the files, you’ll first need to enable the displaying of hidden files and folders if it isn’t already. Here’s how:
- Open search (Click it or press Win + S) and type in “hidden”. A result for Show hidden files and folders should come up. Click it when it does.
- You’ll see an entry for Hidden files and folders. Under it click on the bubble for Show hidden files, folders and drives.
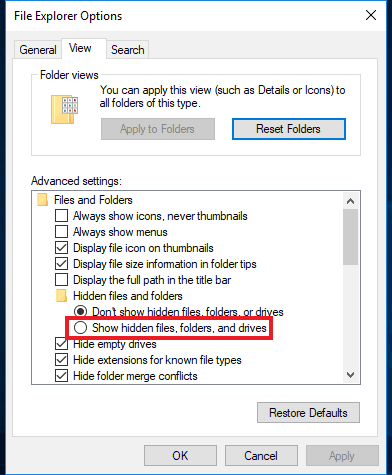
- Now click Apply then OK.

Hidden folders should now be visible, allowing you to transfer all the files and folders. Here’s how to start transfering:
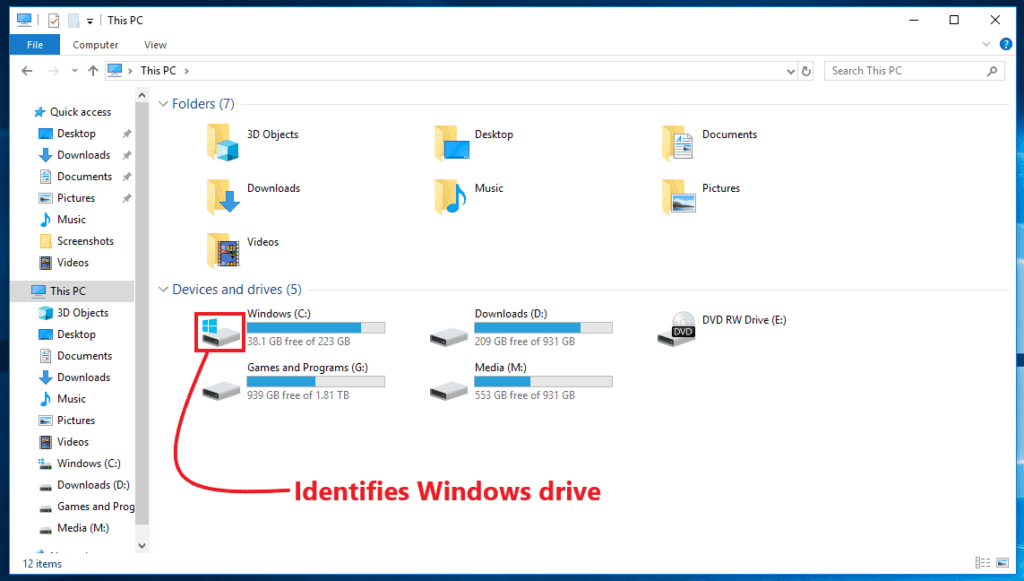
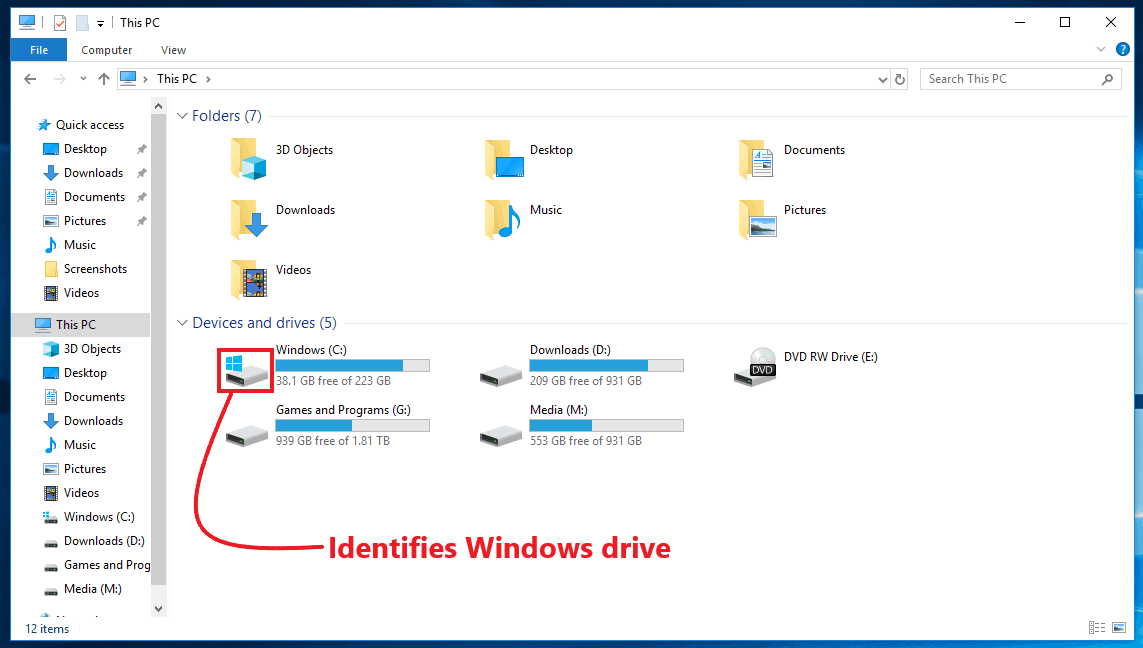
- Open File Explorer (click it or press Win + E) and click This PC and then double click to open your Windows drive, usually the C: drive. You can identify it by the Windows logo in the icon.
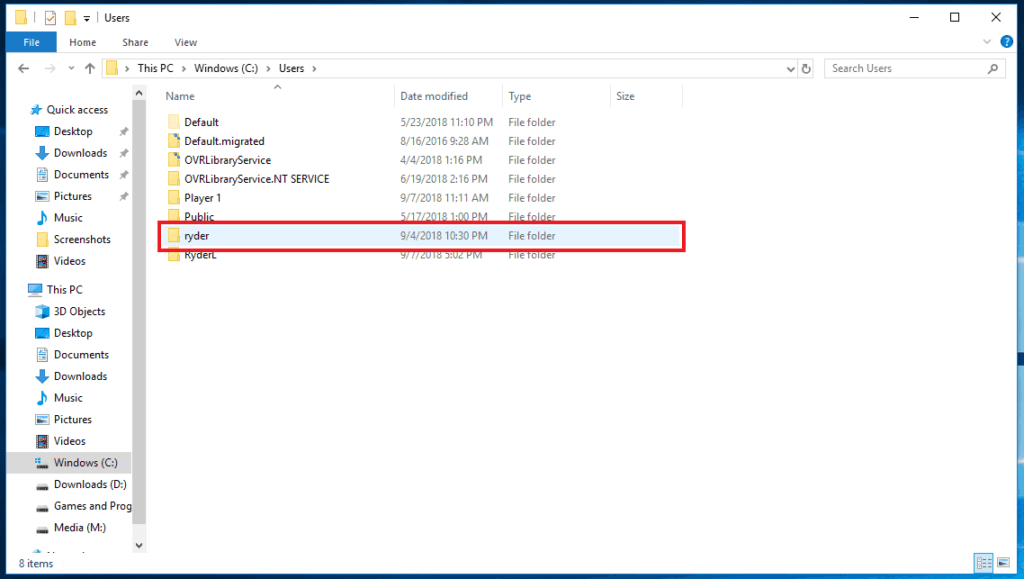
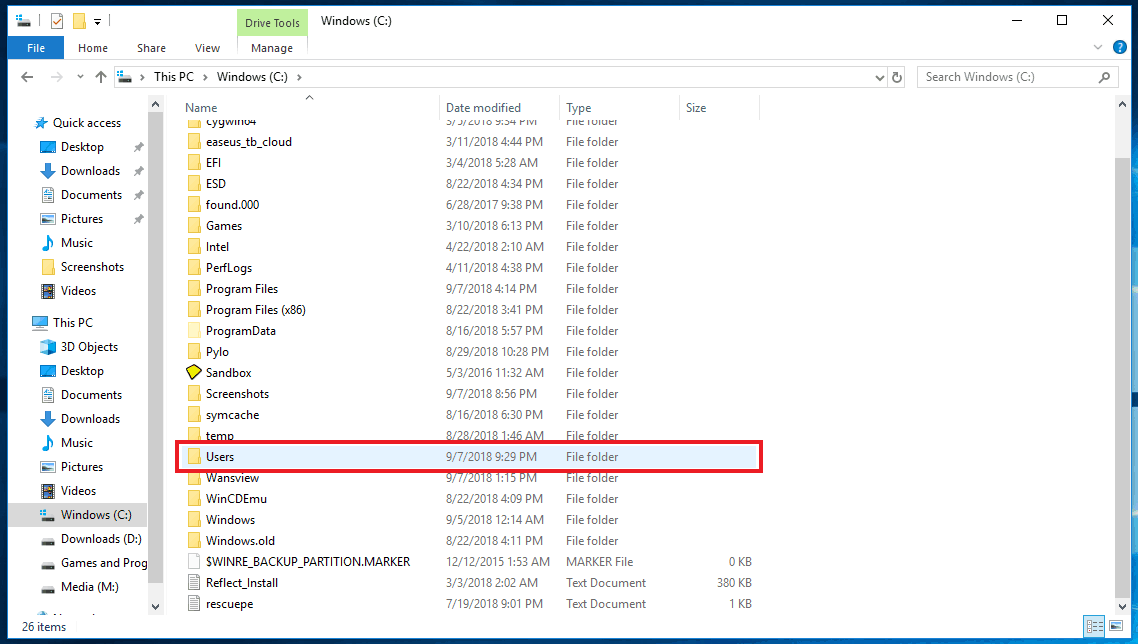
- Locate the Users folder and open it.

- Identify which folder is your current account’s(in my case it’s “ryder”) and open it.
- Select all the folders and files inside(click and drag, or Ctrl + A), right click on the selected items then click on Copy(or press Ctrl + C). Make sure you Copy the files, not Cut. Now click on the back arrow to navigate back to the Users folder.

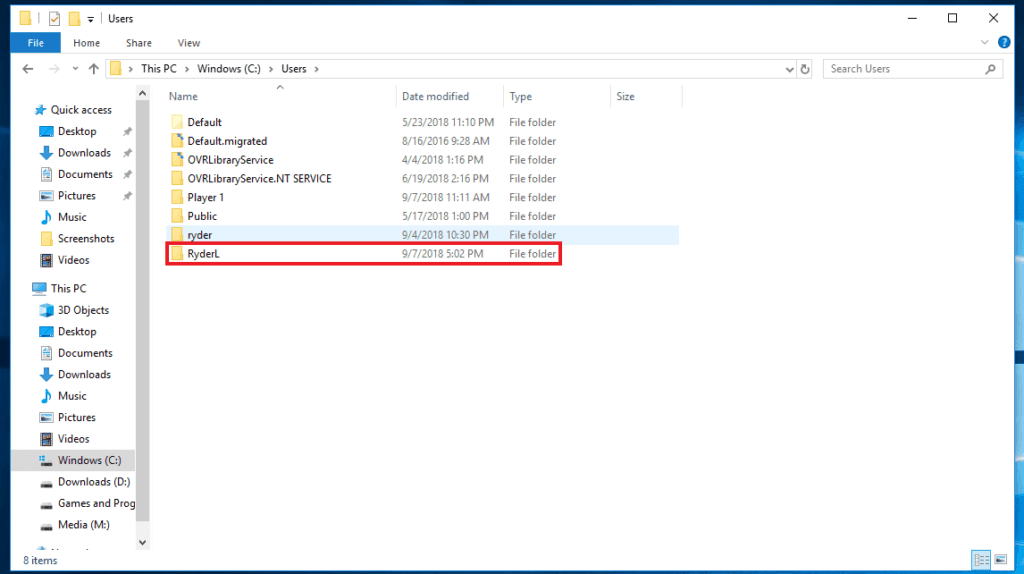
- Now open your new account’s user folder (in my case, “RyderL”).
- In your new user folder right click on a blank area and then click Paste(or press Ctrl + V). This will copy over the folders and files.
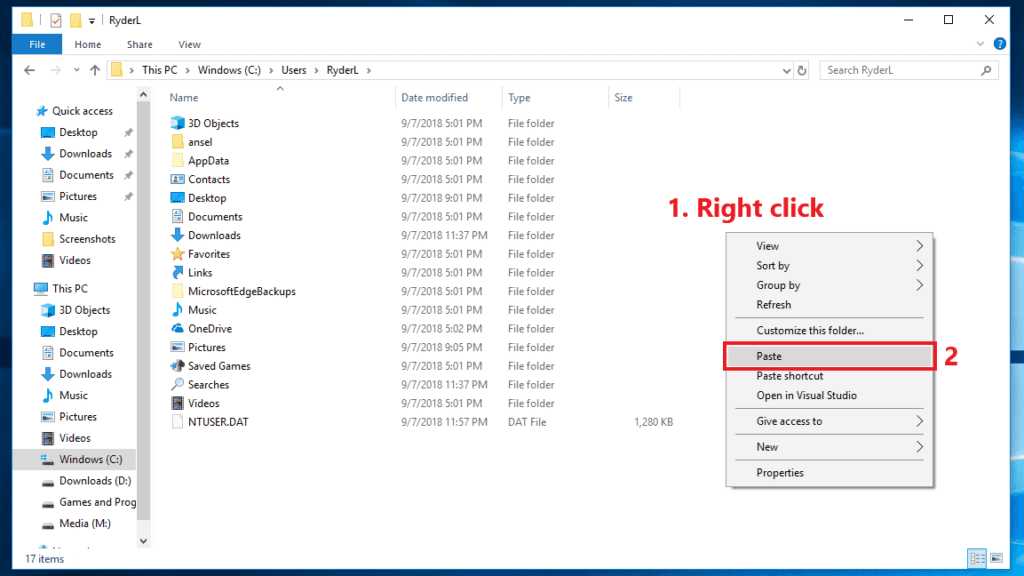
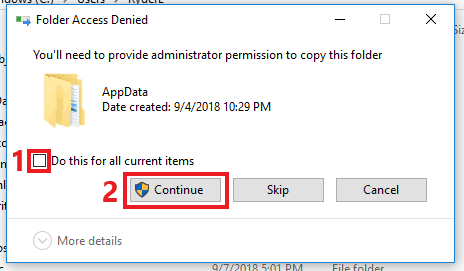
- A prompt asking for administrator permission should come up. Check the Do this for all current items checkbox and then click Continue.
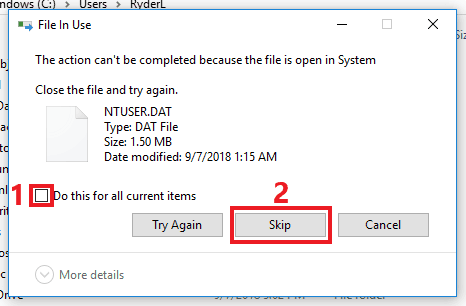
- You may get a “File In Use” error. Check the Do this for all current items checkbox and then click Skip.
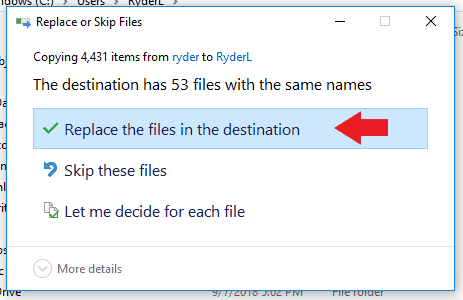
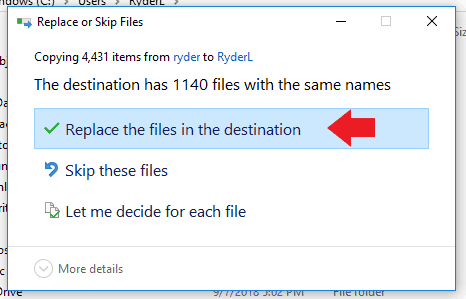
- You should then get a “Replace or Skip Files” prompt. Click Replace the files in the destination. The files will begin copying over.
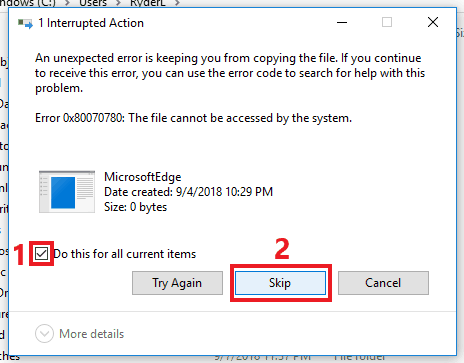
- Additional error messages may come up. As before, check the Do this for all current items checkbox and then click Skip.
- You may also get an additional “Replace or Skip Files” prompt. Click Replace the files in the destination once again.
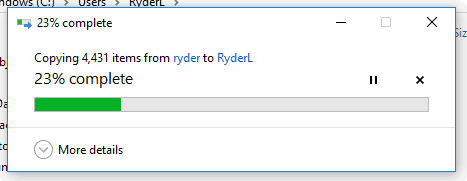
- You should see a progress bar as the files copy over, both between prompts and after answering all of them. This process will likely take some time. Wait for it to complete.


Once this process is done, you’re now ready to access your new account. Log in as shown before.
It’s likely that you will need to tweak things on the new account in order to get them as they were on your previous account. Therefore it’s important to leave your old account in case you need to go back for more files or to see what your previous settings were.
Frequently Asked Questions
How many Windows 10 users are there?
Windows 10, as far as some of the most recent studies show, is used on around 200 million PCs, laptops, tablets, and other smart devices worldwide. However, it’s far from being the most popular version of Windows, as many people still cling on to Windows 7 (whose support ended a few years back) and Windows 8.1 (despite its initial less than stellar reception).
Overall, there are 1.5 billion Windows devices out there, and 1.4 billion Android devices (as a small bonus fact).
How do I manage users in Windows 10 and Windows 11?
On both operating systems, if you want to tweak general settings for each account, you’ll have to go to Start > Settings > Accounts > Family & other users.
From there, you can select to add another user, modify your existing user, or, as an Administrator, delete or heavily modify other users’ access privileges. You also have the option of either creating local profiles or connecting a Microsoft account to get the full spyware modern Windows experience.
How do I enable local users and groups in Windows 10 home?
You can do it by pressing the Windows + X key combo and then selecting Computer Management. From there, look on the left panel select Local Users and Groups under the expanded list of Computer Management (Local). You should be able to see two folders: Users and Groups.
If this method does not work for you, then you can try the Windows + R key to bring up the Run Command. Type lusrmgr.msc and hit Enter. This method should work flawlessly because you’re practically forcing your PC to open the process.
The Bottom Line
That concludes this guide. Hopefully it has helped you change your account name to your liking. If you have found this article to be useful, please consider sharing it with others so that we may help them out as well. Also feel free to drop us a comment below with any more details, questions, suggestions, and so forth.