Getting your internet to work properly can often be tricky business, especially when it comes to Wi-Fi. If your computer is connected to Wi-Fi but you don’t have internet access, there are several potential causes. Software and settings issues are the most common culprits, but problems at a hardware level are also likely. In order to get your internet working again you first need to narrow down the source of the problem.
Quick Jump
- No internet for just your computer, or the whole network?
- Overview of different network devices
- Fixing no internet for just your computer
- Restarting
- Using the troubleshooter
- “Forgetting” your Wi-Fi network
- Flushing the DNS cache
- Changing the DNS servers
- Automatically assigning an IP address
- Fixing problems with your Wi-Fi adapter
- Removing viruses/malware
- Removing problematic antivirus software
- Doing a network reset
- Fixing no internet for the whole network
Finding the cause starts with checking if the problem is on just one computer, or on all devices:
Check if your other devices connected to Wi-Fi, such as smartphones, streaming boxes or other computers have internet access. If the rest of the devices using your Wi-Fi can use the internet fine while your computer can’t, it’s likely to be an issue with settings or software on your computer, but it can also be a problem with you Wi-Fi adapter.
- Click here to go to the section on troubleshooting network settings.
- Click here to go to the section on fixing Wi-Fi adapter issues.
If none of your devices have internet access, then it’s likely a problem with your hardware. Specifically, either your router or modem. An outage due to maintenance by your ISP(Internet Service Provider), or a problem on their end are other possible causes. Click here to skip ahead to fixing this issue.
Not sure what exactly a modem and router are? Here’s what you should know:
A modem is the device that connects our home or job to the internet, and a router takes the signal from a modem and sends it to all the devices (computer, smartphones, etc) in our home or job through both wired and wireless means. All in one devices that function as both modem and router, often known as modem/router combos, are also pretty common.
There are a few different types of modems out there:
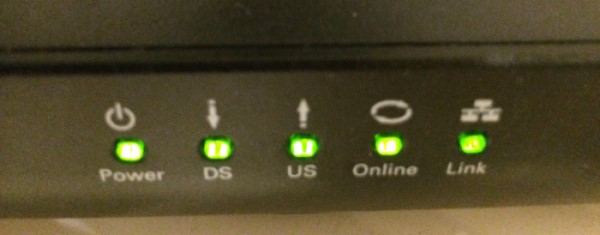
A modem will typically be a small box with status, or indicator lights on the front and power and data connectors in the back. The number and arrangement will vary, but most modems will have at least a power and a internet connection indicator light. Many will also have a downstream (data received), upstream (data sent) and a link or activity light. Usually when the power, downstream, upstream and connection lights are steady and the activity light is blinking, that means the modem is properly connected to the internet and other devices.
One of the most common modems are cable modems, which have coaxial connectors and reach the internet through cable via this connection. If you have one, it should look something like the one pictured below.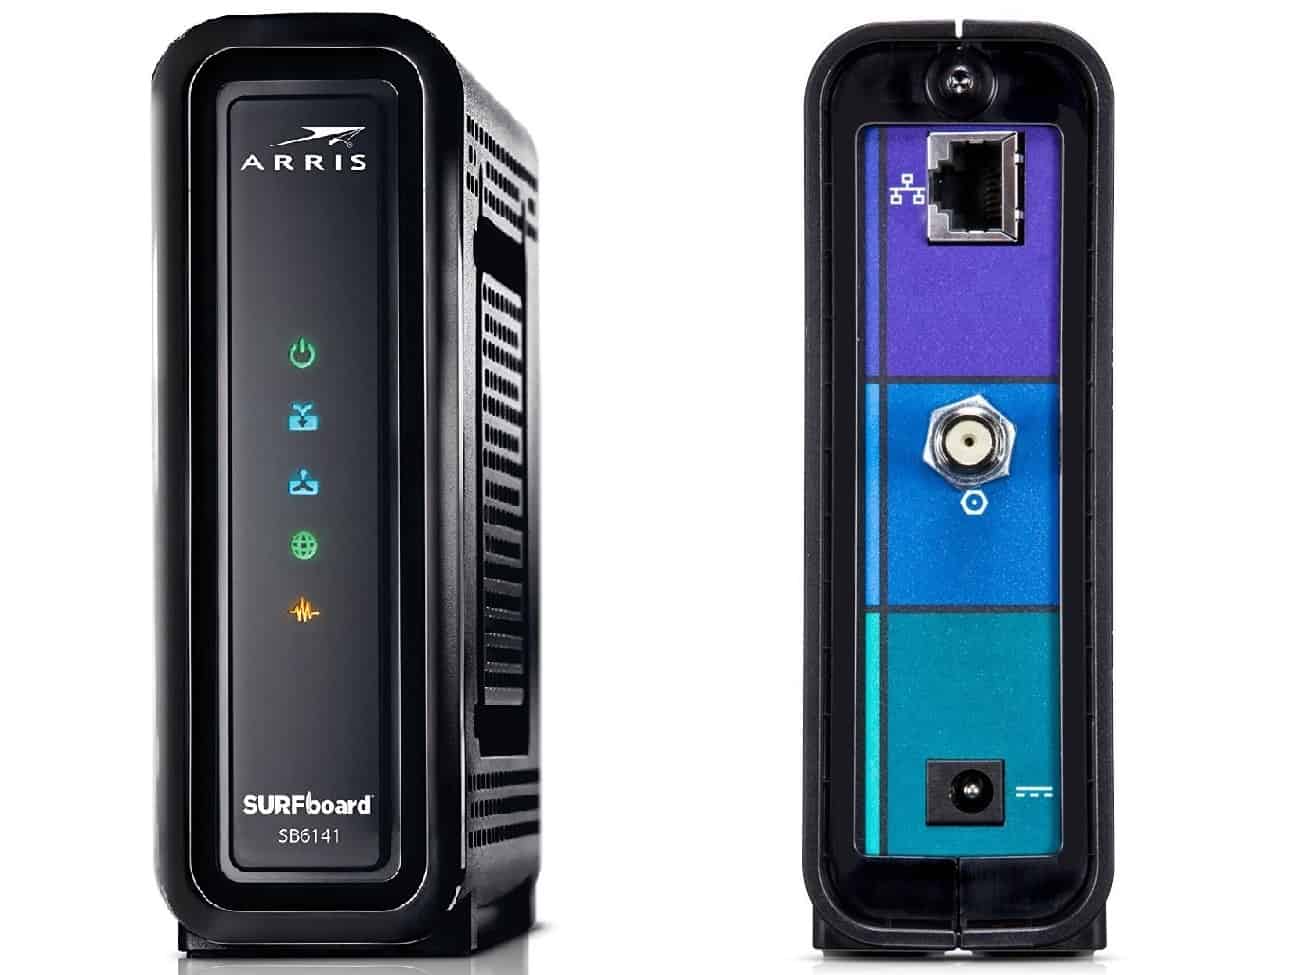
DSL(Digital Subscriber Line) modems are another common type. They reach the internet through the phone line, but in a way that can allow phone service to still work at the same time, unlike dial-up modems. They also allow a much faster internet connection than dial-up, but not as fast as cable modems. Below is an example of a DSL modem.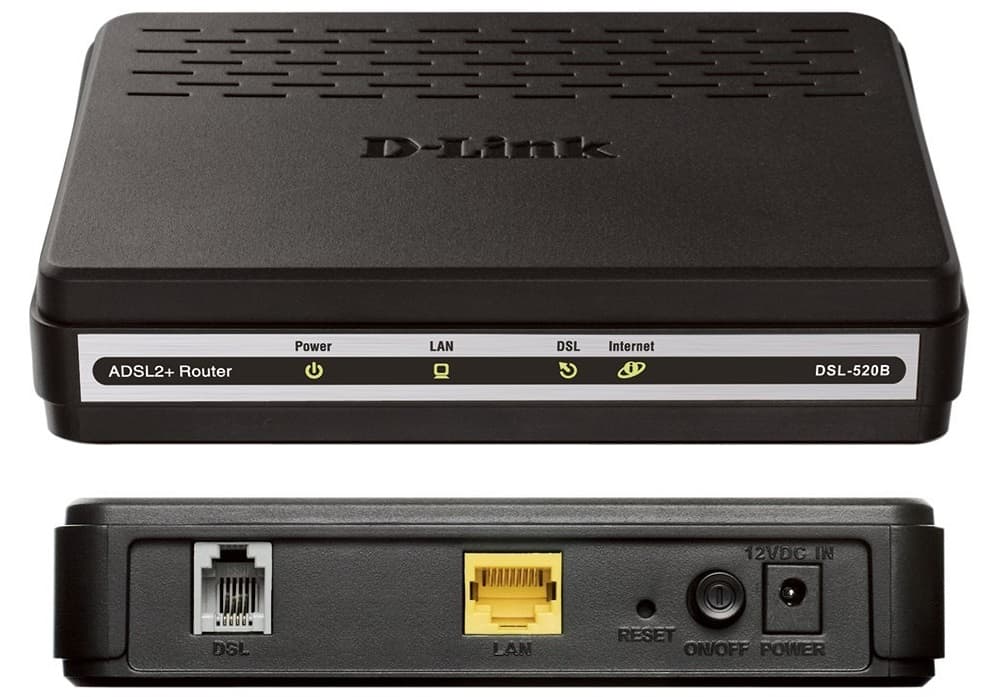
Speaking of dial-up, if you live in a remote area where cable or DSL internet aren’t available, you may be stuck with it. Dial-up modems work by sending specials sounds through the phone line which are interpreted as data in order to connect to the internet. Although it’s unlikely you’ll have Wi-Fi if you have a dial-up modem, I’ve included them for completion’s sake. Pictured below are some examples of different dial-up modems.
Another, much more popular and modern possibility for those in remote areas is having a satellite modem. These modems reach the internet by connecting to orbiting satellites through a satellite dish, much like how satellite TV works. This connection is much faster than dial-up, but can also have the same drawbacks as satellite TV, like losing signal during storms. Some examples of satellite modems are pictured below.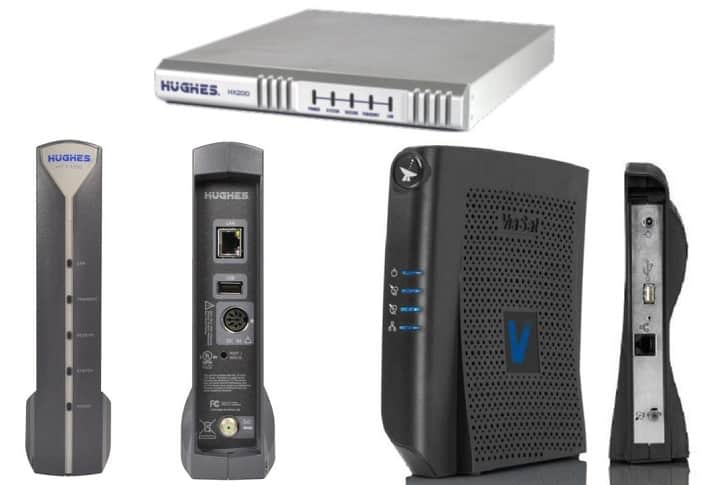
While modems connect to the internet itself, routers are what connect all of your devices to the modem:
Routers are very true to their name. They route all the data back and forth between your internet using devices and the modem. There are routers that are just for wired Ethernet connections, but most are wireless routers. They allow devices to connect to them through Wi-Fi.
Without a router you are only be able to connect one device to the internet through the Ethernet connector on the modem. A router allows multiple devices to be connected to the modem through it, both through Ethernet cables and Wi-Fi. Below are 2 examples of wireless routers.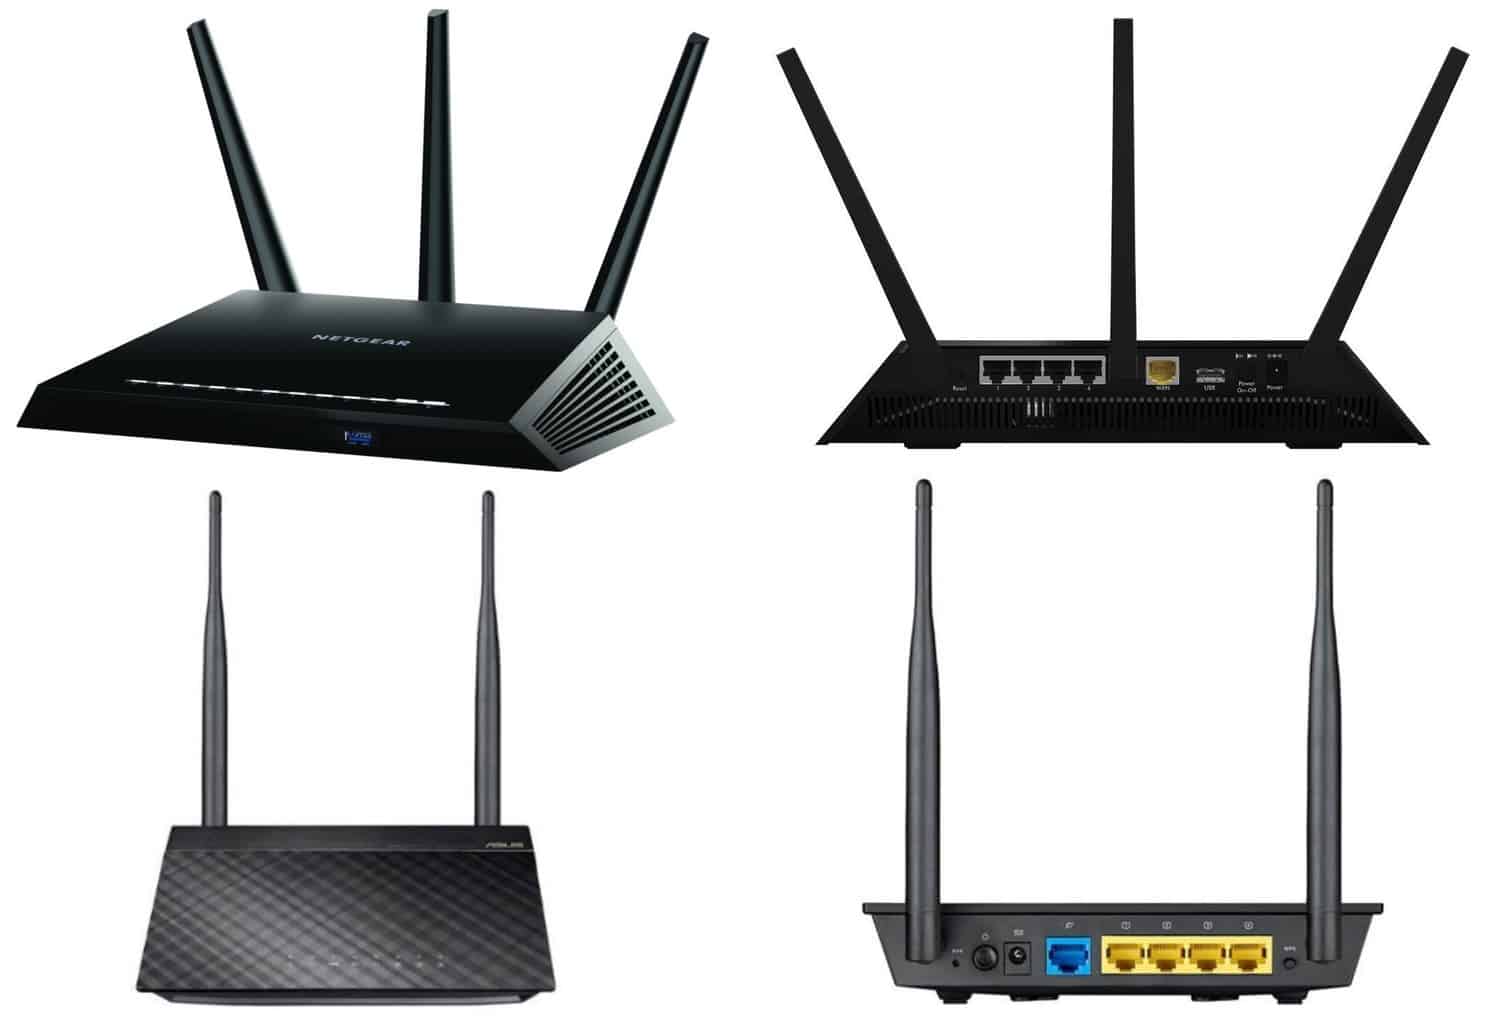
Modem/router combos are able to to the jobs of both devices:
Modem/router combos both connect to the internet through whichever means, usually DSL or cable, and route the signal to your computers and other devices. They are also known as Wi-Fi modems and modem routers.
Having one device that does everything can be easier to manage and take up less room. They are usually provided by your ISP, but can be purchased separately as well. Three different examples of these combo devices are pictured below.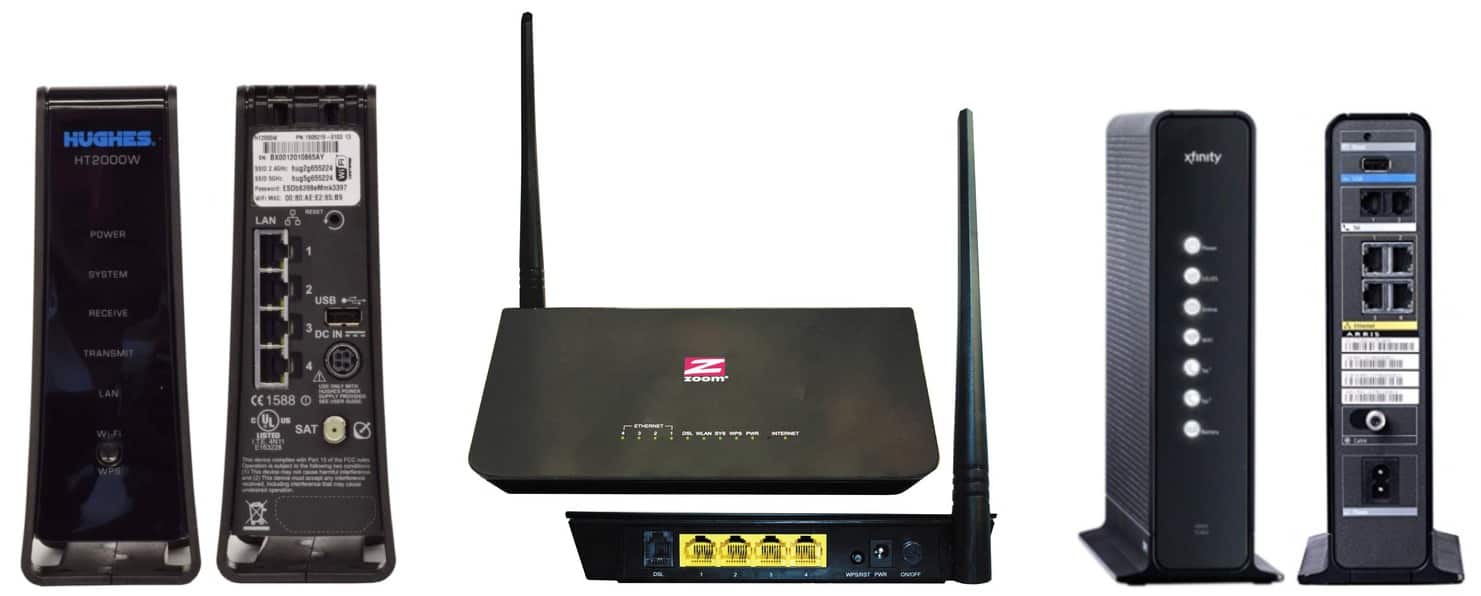
The device that connects your computer to the router is known by many names, often called a Wi-Fi adapter or wireless adapter:
The terms Wi-Fi adapter and wireless adapter usually refer specifically to the external types of devices. They are virtually all USB devices of some kind, coming in all shapes and sizes. Pictured below are some examples of them.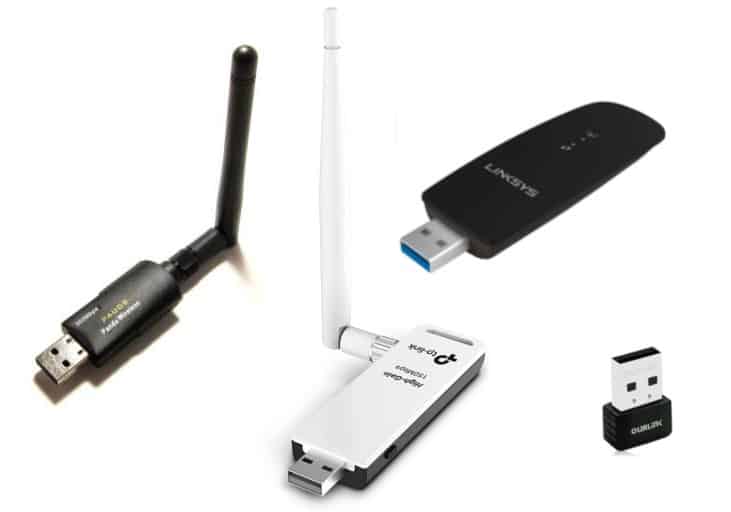
For internal components in both laptop and desktop computers, Wi-Fi card or network card are more common terms. Although network card often refers to devices with a physical Ethernet connector rather than one for WiFi. Below are examples of a desktop and laptop Wi-Fi card.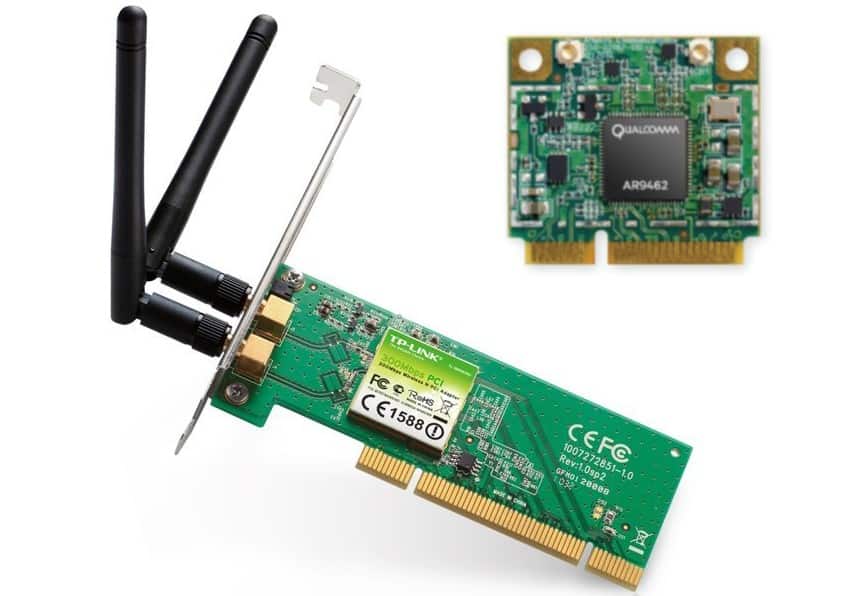
For simplicity’s sake, we’ll just call it a Wi-Fi adapter in all its forms for the rest of this guide. Now that we’ve covered the basics of how wireless internet hardware works, let’s move on to getting your connection working again.
When only your computer is without internet access, there’s several different fixes you can try:
As mentioned before, the problem will often be due to software or settings issues. But before diving into the more advanced fixes, there’s one very simple one you can do.
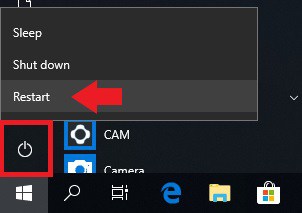
Fix #1: Restarting your computer
It may seem like too simple of a step to actually fix anything, but I’ve found that even many complex seeming issues are gone after restarting Windows.
- Just open the Start menu, click the power icon and then click Restart.
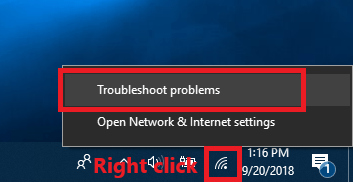
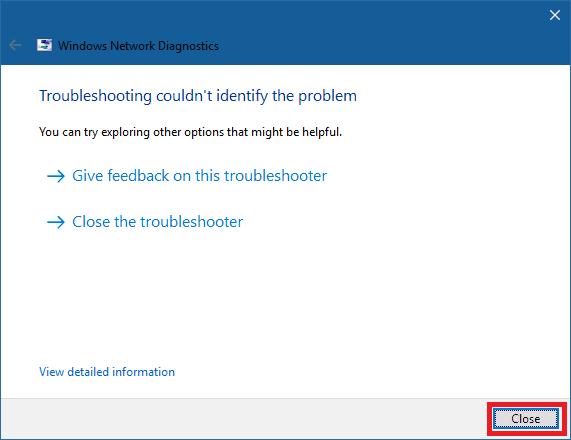
Fix #2: Using the Troubleshooter:
The network troubleshooter, also known as Windows Network Diagnostics, can often fix common and simple internet problems. Here’s how to start it:
- Right click on the Network icon on the taskbar and click Troubleshoot problems.
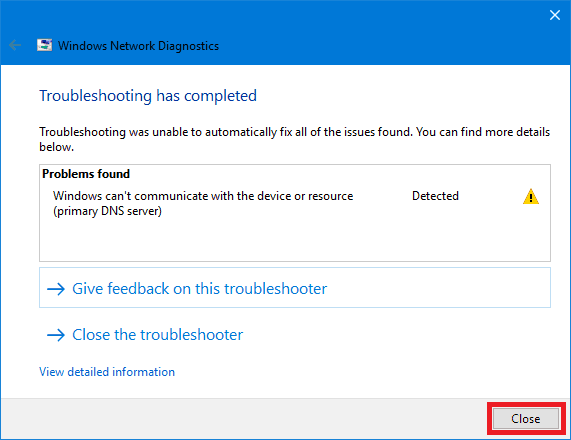
- Windows Network Diagnostics will come up and attempt to diagnose and fix the problem. Wait for the results.

- If a problem is detected it will either apply a fix, or if it’s not able to it will provide a message about the problem. It will look something like the one pictured below, but will likely be a different one. Even if it wasn’t able to fix the problem on its own, it should provide a suggestion on what to try next, or at least information on it that you can then put into an online search to help figure what to do next. Click Close when done.
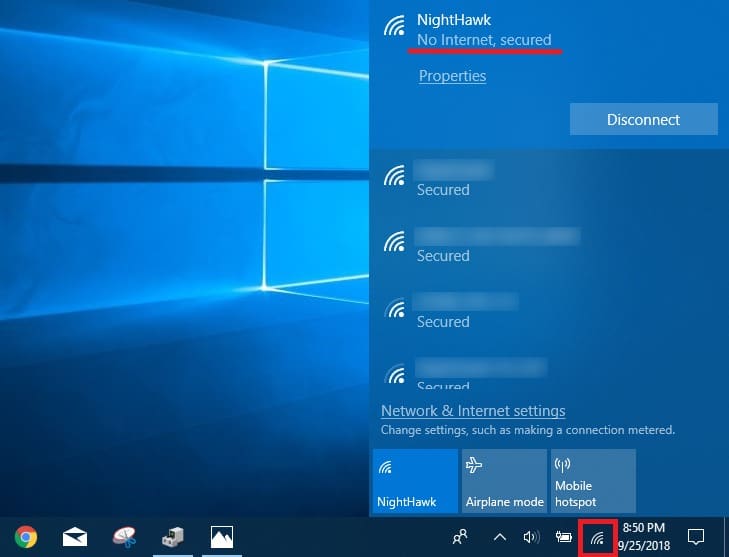
Fix #3: “Forgetting” and reconnecting to your Wi-Fi network
Sometimes there can be a problem with the saved password or other information for a Wi-Fi network stored in Windows. You can reset this by having Windows “forget” the network, which allows you to then connect to it as if it were a new network. Here’s how:
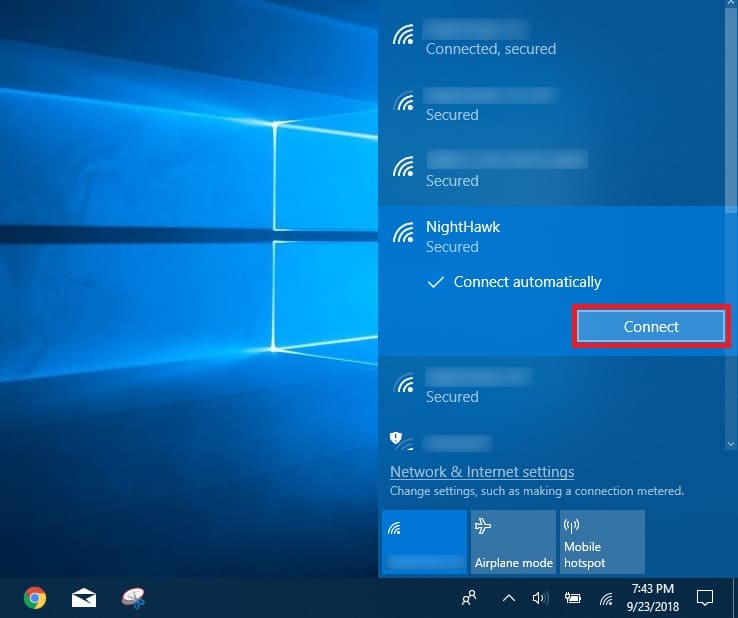
- Click on the Network icon(should be a Wi-Fi symbol) on the taskbar, which will bring up a list of detected Wi-Fi networks. Locate your current network. It will likely say No Internet, secured below the name.
- Once located, right click on it and then click on Forget.
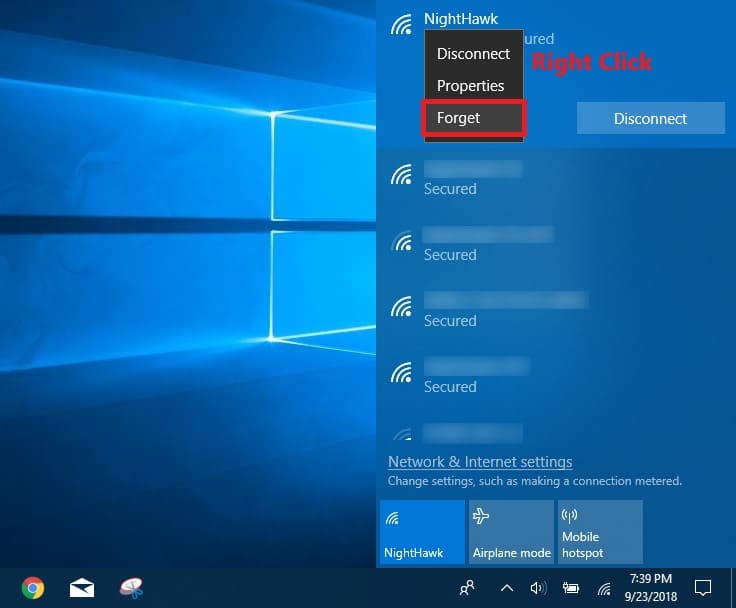
- The network should then disappear and reappear lower on the list of networks. You may need to close out of and click on the Network icon again for it to show up. Once you see it, click on it and then click Connect.
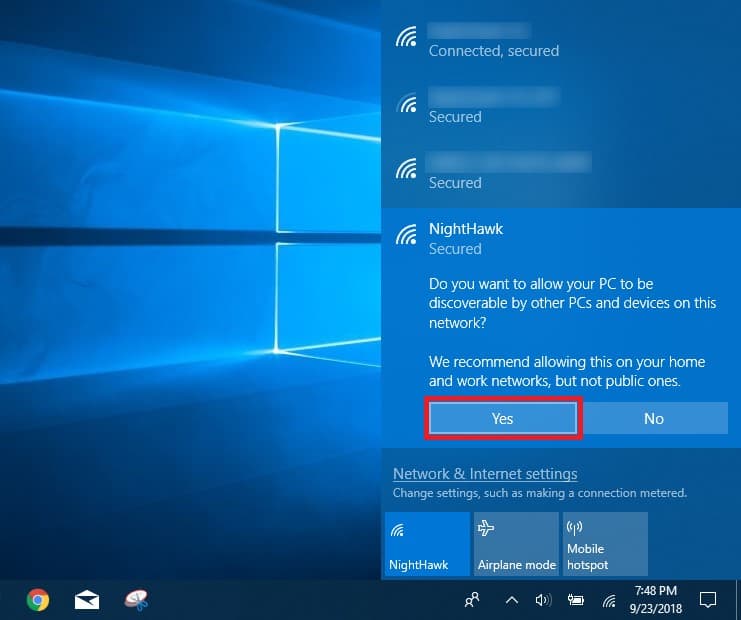
- Enter your password/security key into the box and then click Next.

- You’ll be asked if you want your PC to be discoverable by other devices. Click Yes if this is your home network.
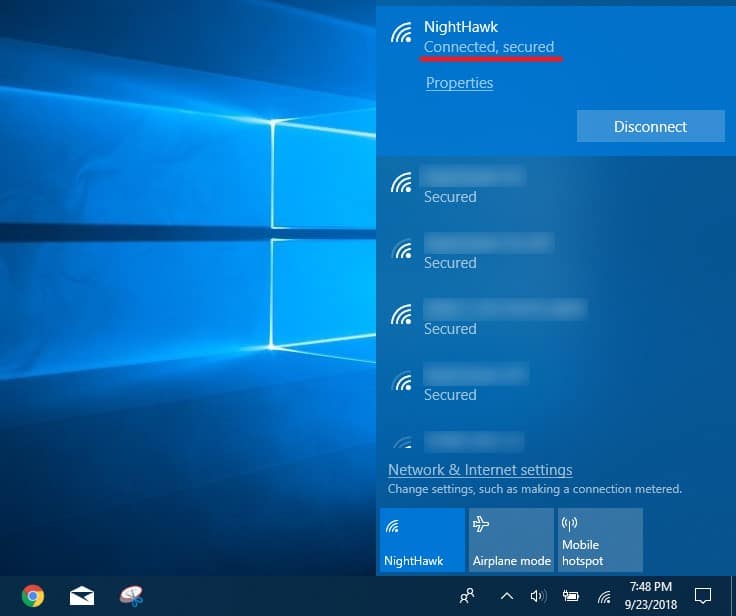
- After a little while it should connect and show up at the top of the list with Connected, secured below its name if it was successful.
Fix #4: Flushing the DNS cache
Issues with DNS(Dynamic Name Service) settings are a common cause of internet problems. Flushing the DNS cache, which stores information on website names and addresses, can often get things working again. Here’s what to do:
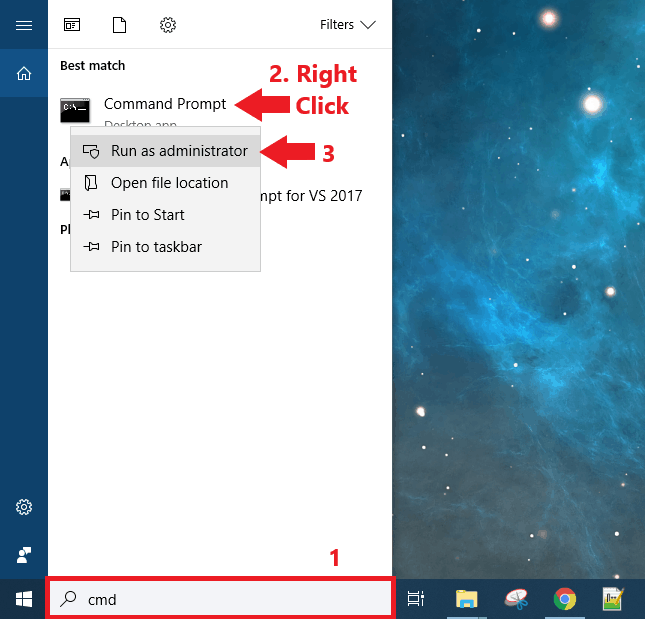
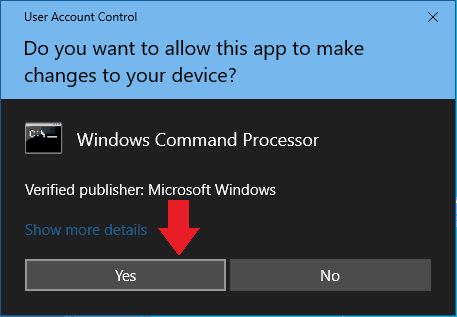
- Open windows search(click it or press Win + S), type in “cmd” then right click on Command Prompt when it comes up and then click Run as administrator.
- Click Yes on the UAC prompt that comes up.
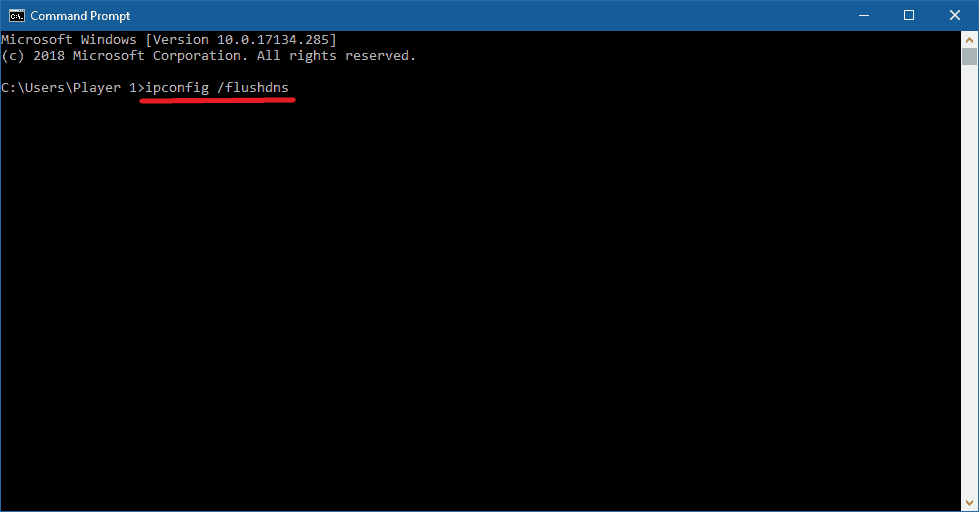
- In the Command Prompt window type or copy and paste:
ipconfig /flushdns
then press Enter.
- The Command Prompt window should say that it was successfully flushed. Close the window(click the “x“)
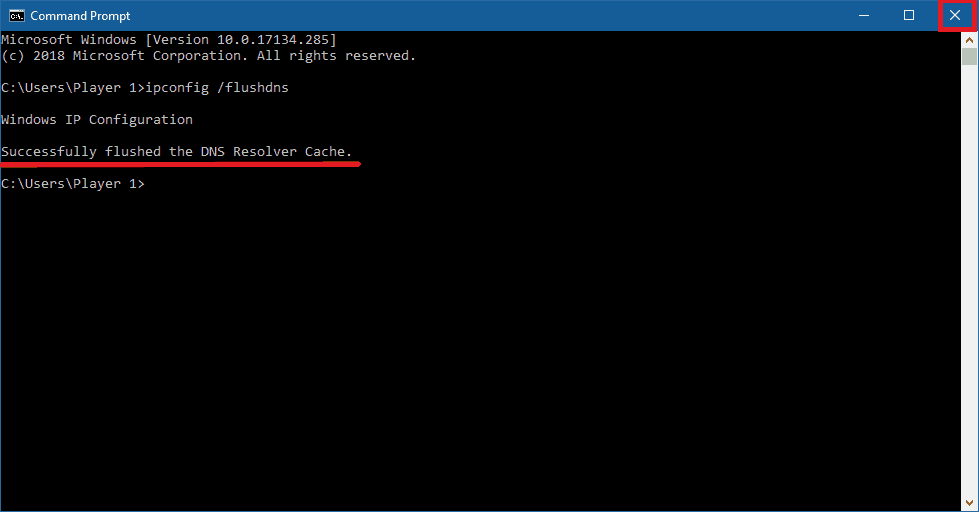
- Now restart your computer and see if you can access the internet.
Fix #5: Changing your DNS servers
DNS servers are what allow you to access websites by their .com, .net, etc, names. They do so by matching the names to correct IP(Internet Protocol) addresses. If your current DNS servers are not working properly you won’t be able to access any websites unless you enter the IP address instead. You may be able to fix this by changing the DNS servers that you’re using.
Usually your DNS servers are provided by your ISP and acquired automatically, but there are several alternatives. Google‘s DNS service is one of the most popular, while the servers Cloudfare and OpenDNS provide are considered among the best options.
OpenDNS requires some additional configuration to use, so we’ll use the Google and Cloudflare servers as examples. In most cases Cloudflare has the fastest DNS servers, so websites may actually load faster for you while using it. Feel free to also do your own research on DNS servers and choose the one that will work best for you.
Here’s how to change your DNS servers:
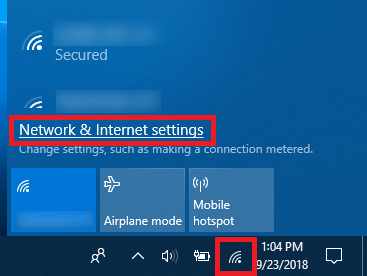
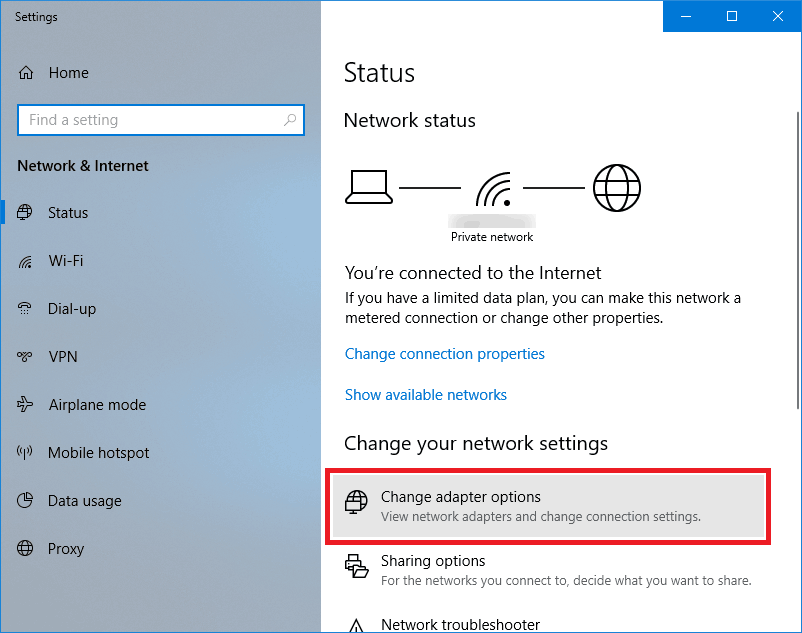
- Click on the Network icon(should be a Wi-Fi symbol) then on Network & Internet settings.
- In the window that comes up, click on Change adapter options.
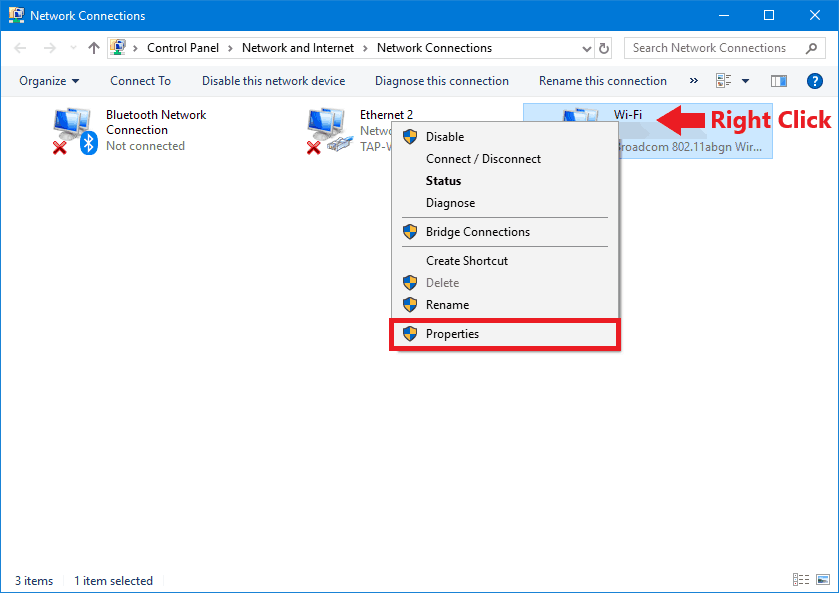
- Another window will come up showing the different network connections on your computer. There may be multiple connections, but the one you’re currently using should be named Wi-Fi, possibly with a number after it and should show the name of your Wi-Fi network. Right click on it and then click Properties.
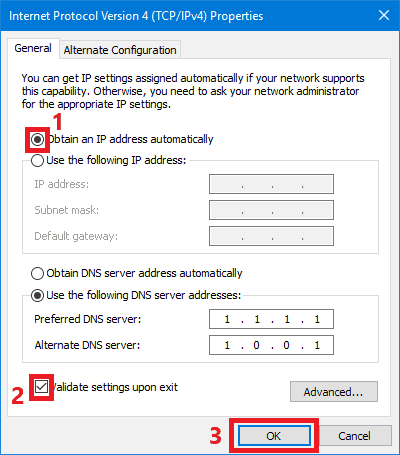
- Click on Internet Protocol Version 4(TCP/IPv4) in the window that comes up, then click the Properties button.

- The new window that comes up will have a section for entering DNS servers addresses. Click the Use the following DNS server addresses bubble if it is not already selected.
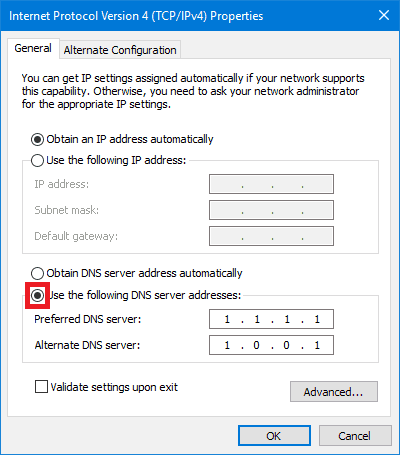
- For using Google’s DNS servers, enter 8.8.8.8 into the Preferred DNS Server box and 8.8.4.4 into the Alternate DNS server box. For Cloudfare’s, enter 1.1.1.1 into the Preferred DNS Server box and 1.0.0.1 into the Alternate DNS server box. You can also enter the DNS servers of another provider, or even servers from two different ones into each box. Check the Validate settings upon exit box and then click OK when done.

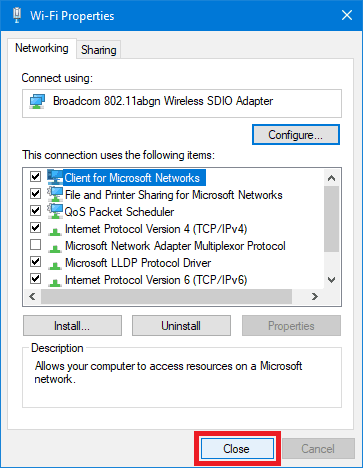
- Now click Close on the remaining window.
- Windows Network Diagnostics will come up again. If everything is now working fine it will say it couldn’t identify the problem. In that case, click Close and confirm it’s working by opening your web browser. If it’s still not working and the troubleshooter wasn’t able to fix the issue, close it and try the next fix.
Fix #6: Setting your IP address to be obtained automatically
Every device on a network has its own IP address. If multiple devices are somehow assigned the same address, or it otherwise becomes invalid, you won’t be able to access the internet. One way to fix this is setting Windows to obtain the IP address automatically, which is done in the same section as changing the DNS servers. Here’s what to do:
- Follow steps 1 through 4 of the previous fix until you get to the Internet Protocol Version 4(TCP/IPv4) Properties window.
- Once there, click the Obtain an IP address automatically bubble if it isn’t already selected. Check the Validate settings upon exit box and then click OK when done. Note that some ISPs may require you to manually specify a certain IP address in order for their service to work properly. If that’s the cause you may need to contact them to fix IP address issues.
- Click Close on the remaining open window.
- Windows Network Diagnostics will now come up. If everything is now working fine it will say it couldn’t identify the problem. In that case, click Close and confirm it’s working by opening your web browser. If the problem was not fixed, still close it and try another fix.
Problems with your Wi-Fi adapter may be why you have no internet connection:
There are a lot of different things that can go wrong with a Wi-Fi adapter, both on the software and hardware side. That being said, sometimes something as simple as disabling the adapter then enabling it again can get it working.
Fix #7: Disabling then re-enabling your Wi-Fi adapter.
- Move the cursor to the Start Menu and right click on it, then click on Device Manager.

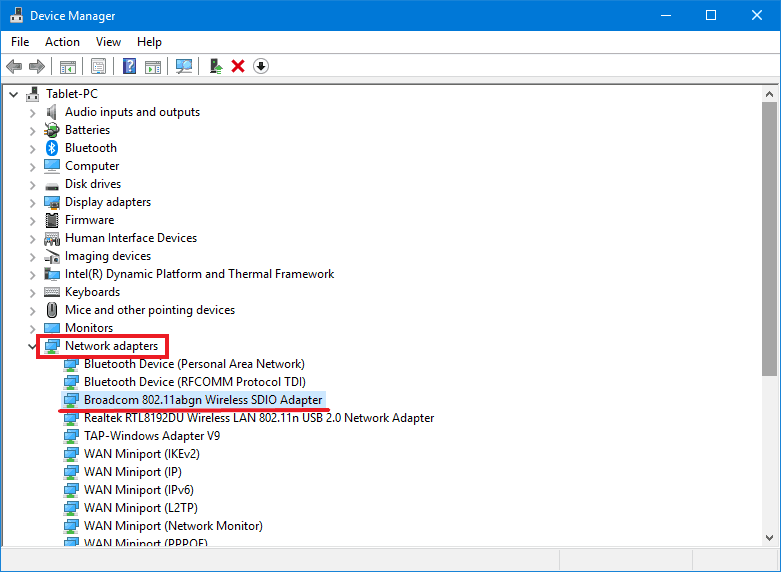
- In Device Manager, find and click Network adapters. Now find your Wi-Fi adapter in the list, it should have Wireless or Wi-Fi in the name.
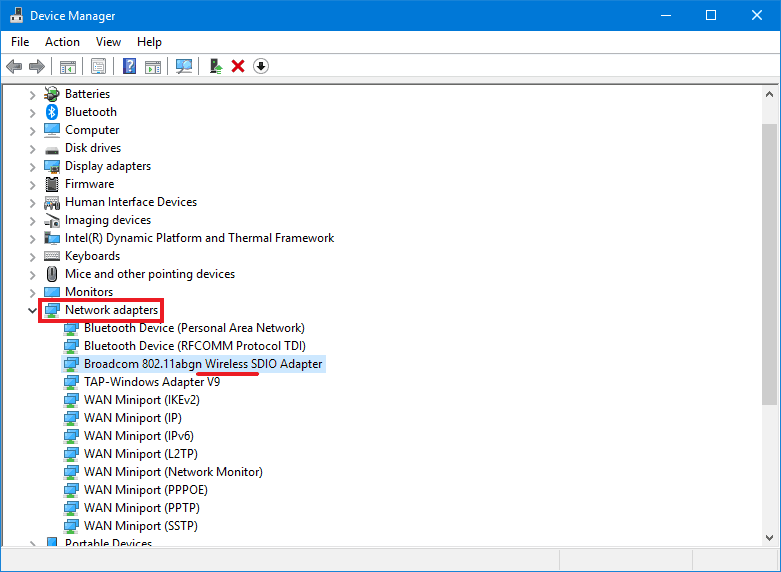
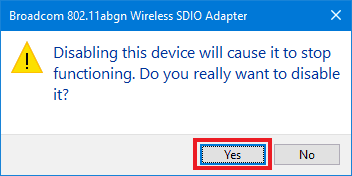
- Once found, right click on it and select Disable device.

- A prompt asking if you’re sure you want to disable it will come up. Click Yes.
- The window will close and the device list will refresh and then show that the adapter is now disabled by having a downward arrow in the icon. Now enable it again by right clicking on it and then clicking Enable device. The list should again refresh and the adapter will now be enabled.

If it worked, your adapter should automatically reconnect to your Wi-Fi network and you should be able to access the internet again. If not, there’s several fixes left you can try.
Fix #8: Updating/Reinstalling your Wi-Fi adapter’s driver software
You may have no internet because your Wi-Fi adapter’s driver software is corrupted or outdated. In order to fix either of these issues, you’ll want to uninstall and reinstall your adapter’s driver, possibly updating it in the process. When you have no internet connection, this can be difficult to do.
You can temporarily gain internet access if you have another working Wi-Fi adapter you can use. You can even borrow a USB Wi-Fi adapter from another working computer if you don’t have an extra one. If you’re able, plugging in an Ethernet cable from your router to your computer can also work.
If you aren’t able to temporarily restore internet access to your computer, you’ll have to find and download the driver files from another computer or device and transfer it to your computer. How to do this will be covered later on.
Method #1: Reinstalling the driver software with temporary internet access:
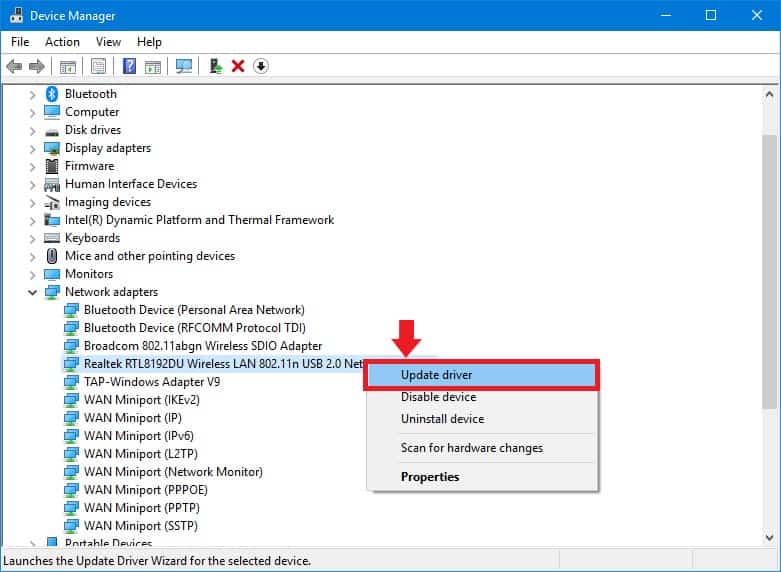
- Move the cursor to the Start Menu and right click on it, then click on Device Manager.
- In Device Manager, find and click on Network adapters. Now find your Wi-Fi adapter in the list, as before, it should have Wireless or Wi-Fi in the name. Make sure it’s the adapter you’re having trouble with and not the temporary one you plugged in.
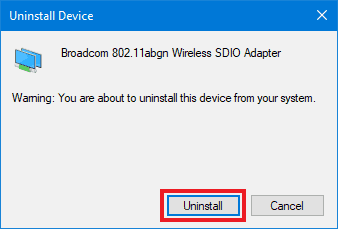
- Right click on it then click on Uninstall device.
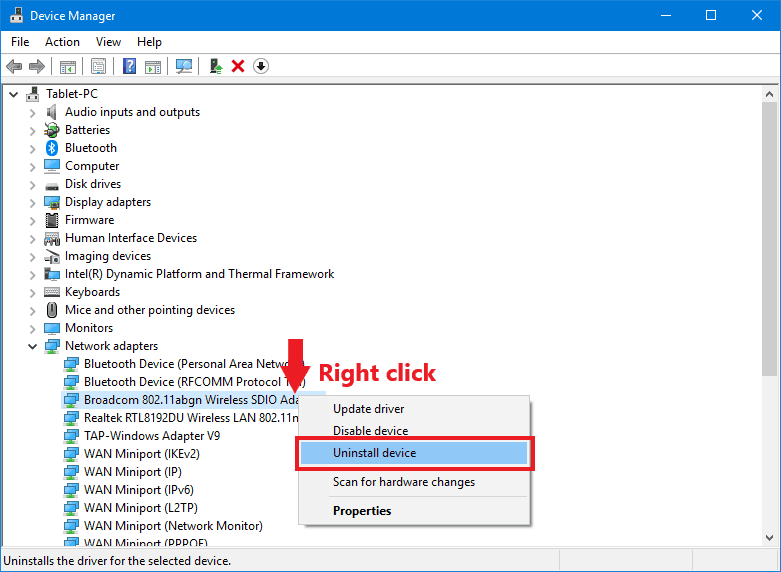
- You’ll receive a prompt asking if you really want to uninstall it. Click Yes.
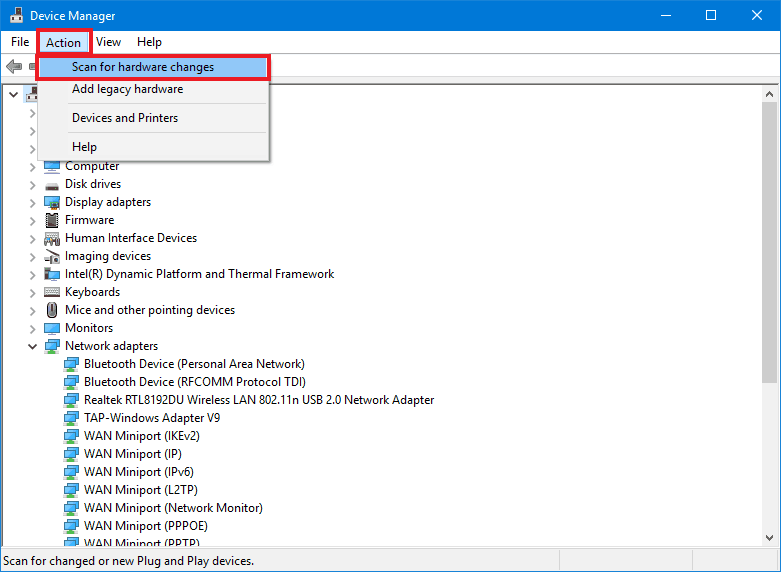
- Now click on the Action menu at the top and then on Scan for hardware changes. This will refresh the device list, which should make Windows detect and then reinstall the adapter with the latest driver. If the Wi-Fi adapter was not detected and reinstalled, you’ll have to download the driver from the manufacturer’s website as discussed here.
- To be sure the latest driver version was installed, we’re also going to manually make Windows check for updates. Right click on your adapter and then click on Update driver.
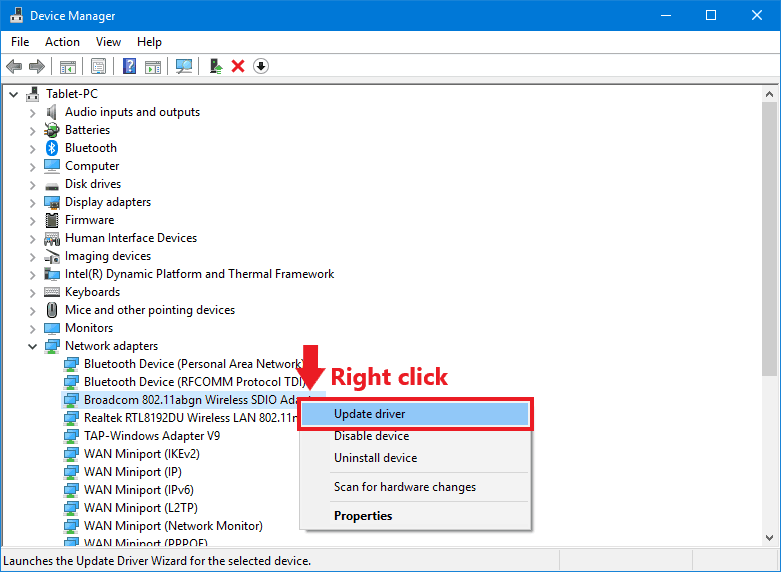
- In the new window click on Search automatically for updated driver software.
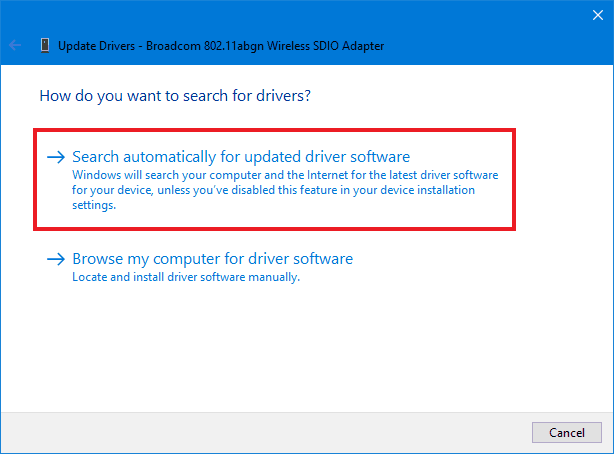
- A new window will open and search for updates. Wait for it to finish.

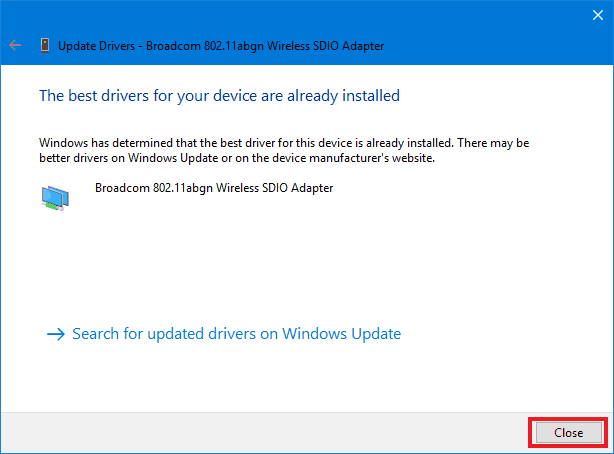
- If an update was found, it will be installed. If not, it will say that the best drivers are already installed. Click Close when done.
- (Optional) When no updates are found, you can also click on Search for updated drivers on Windows Update, which will open the Windows Update section of Settings.

- Now click on Check for updates.

- If any updates are found, they will be installed. Either close the window, or click Restart now if prompted to.
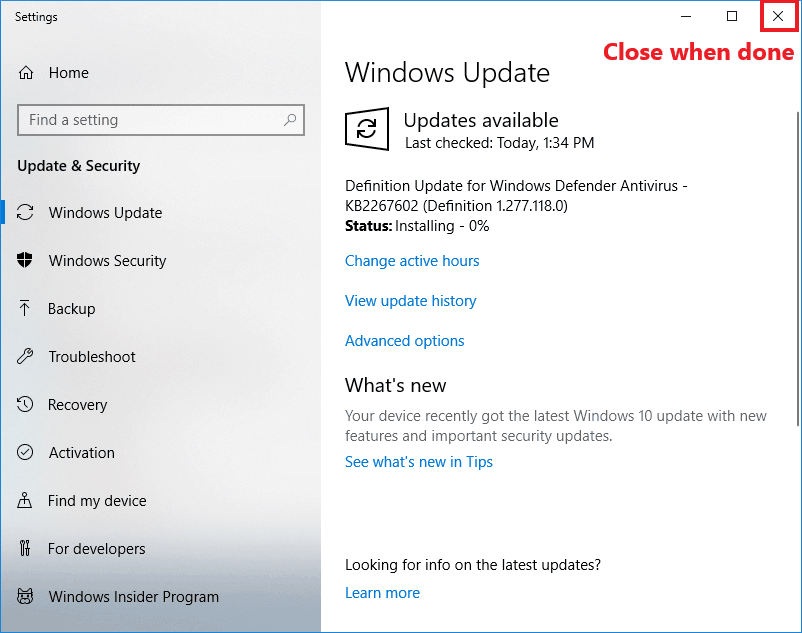
- (Optional) When no updates are found, you can also click on Search for updated drivers on Windows Update, which will open the Windows Update section of Settings.
- After finishing updating via either method, you should restart your computer.
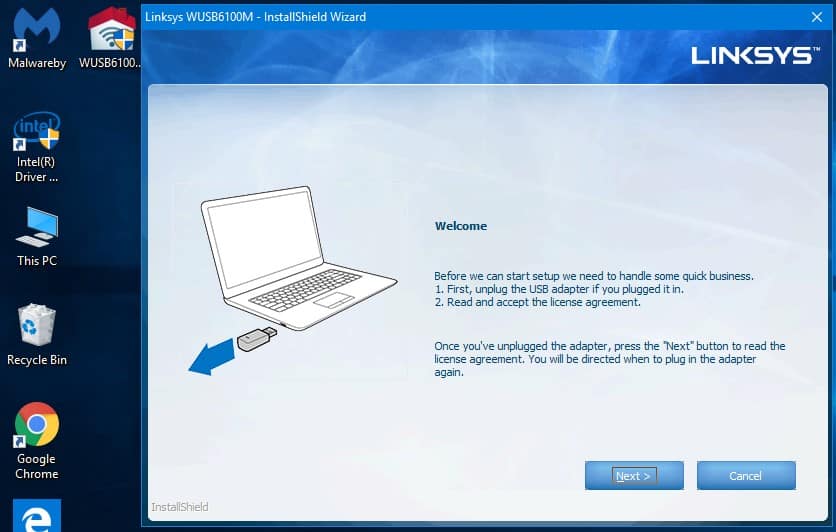
Method #2 Part 1: Downloading driver software manually and transferring it to your computer
If you’re not able to gain temporary internet access on your computer, you’ll need to download the drivers manually from a computer that does have internet. First, you’ll need to identify your Wi-Fi adapter in order to find the right drivers. The layout of the website you download the driver file from and how the driver works will vary quite a bit with each adapter, so these directions will more be general advice.
- If you have the packaging and materials that came with your adapter it should list the official website from which you can find and download the drivers. The packaging may also have come with installation media you can use to reinstall an old driver that may work.

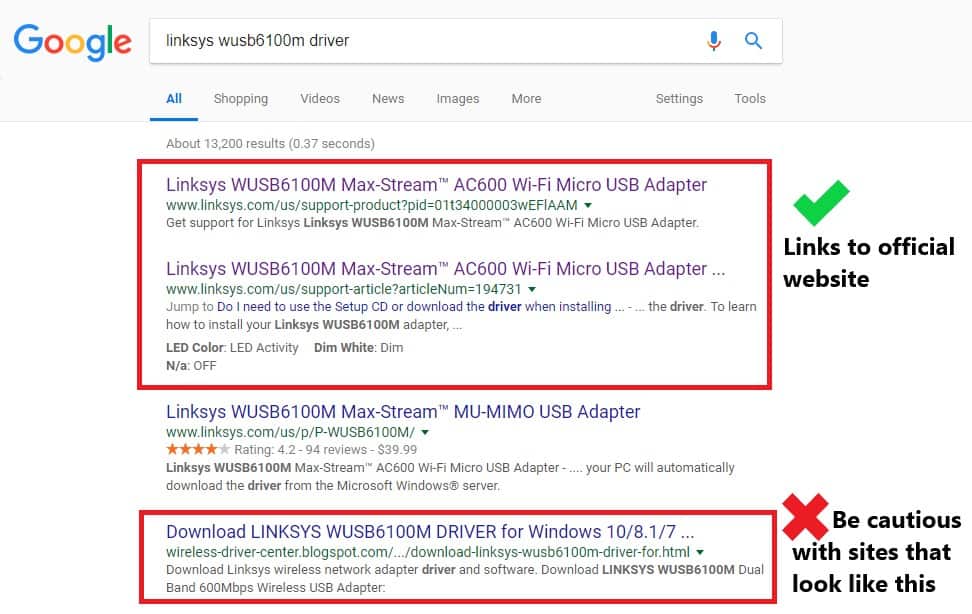
- If there’s no official website listed, just doing an internet search for “*adapter name* driver” on the other computer should help you find a download for the driver. Always try to download from the official website if possible and be on the lookout for suspicious websites while searching, as sometimes such websites may host malware disguised as driver software.
- You can see the name of your adapter in Device Manager by following steps 1 and 2 of the previous method on your computer, if you aren’t able to locate the name otherwise.
Second, you’ll need a USB drive or other media, like an SD card or even a rewritable DVD, which you can use to transfer the driver software from the computer with internet access to your computer.
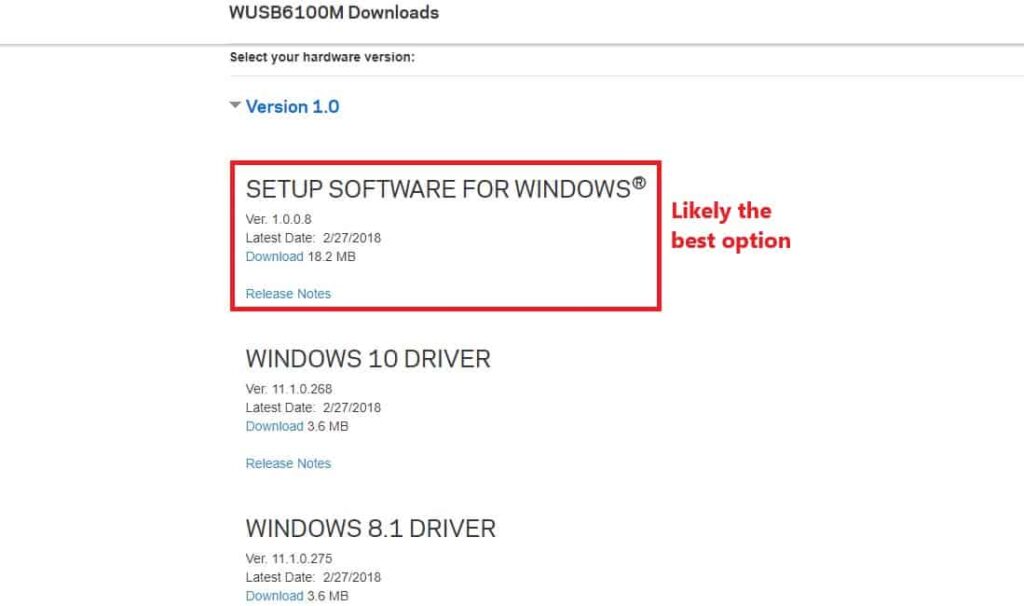
- Once you have the transfer media ready and have found a download site, look for a Windows 10 compatible driver on it, or setup software that works with multiple versions. If you have an older device, Windows 8 and possibly even Windows 7 drivers may work if Windows 10 versions are not available. Below is an example of a driver download page.
- After you have found and downloaded the right driver for your Wi-Fi adapter, plug in your USB drive or other media and transfer the driver file to it.
- The file you downloaded will likely be in your Downloads folder.

- Drag and drop, or copy and paste your driver file from the folder to your USB drive or other media.
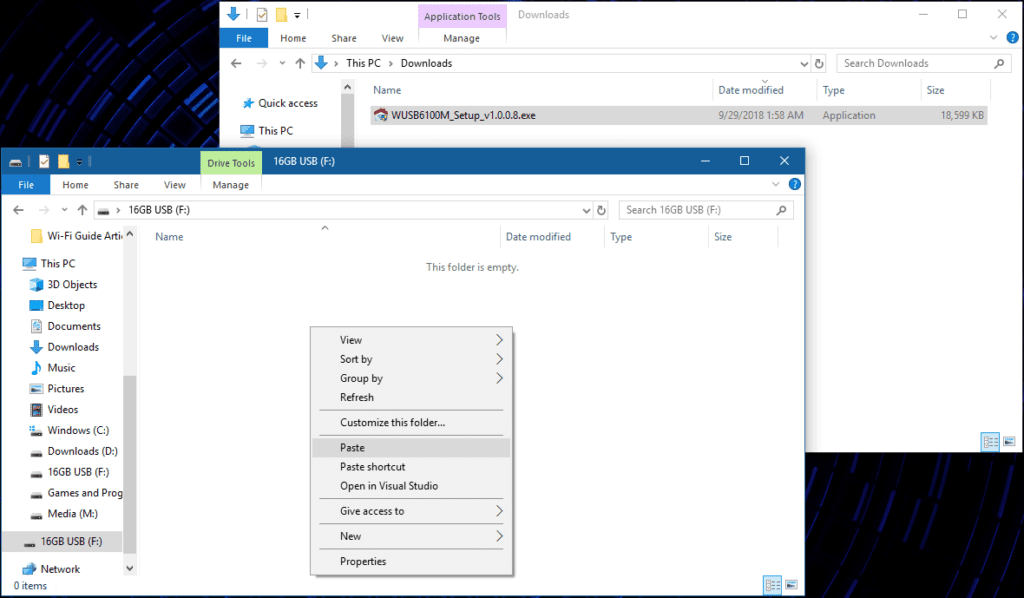
- The file you downloaded will likely be in your Downloads folder.
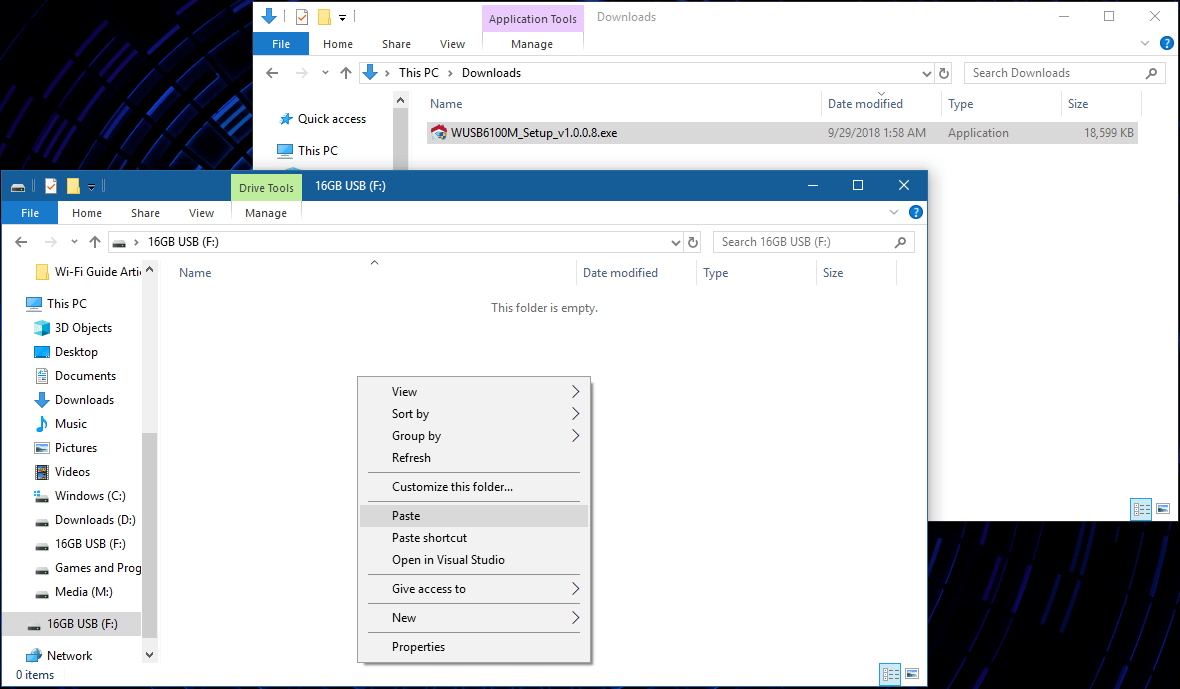
- Once transferred to the drive, remove it from that computer and plug it in to your computer without internet access. Now you can transfer it to your computer by dragging and dropping or copying and pasting to the Desktop or whichever folder you wish.

Method #2 Part 2: Determining file type
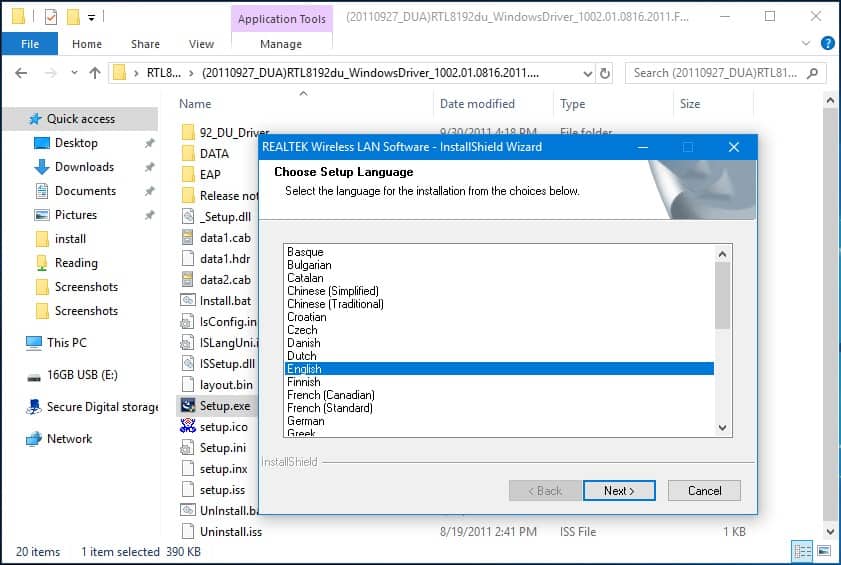
After the driver file is transferred to your computer, what you do with it will depend on what type of file it is:
- If it’s a setup .exe or .msi executable file, you can just double click on it to run it and then follow the instructions it gives.
- If it’s a .zip, .rar, .7z, or other compressed file, it could either contain a setup executable, or the raw driver files within. Either way, you’ll first want to extract the files from it. You may need free software like 7-zip in order to do so.

- Once extracted, if there’s an executable file, just double click on it to run it and follow the instructions.
- If you can’t find an executable file, then it’s probably the raw driver files, in which case things get a bit more complicated.
- Once extracted, if there’s an executable file, just double click on it to run it and follow the instructions.
Method #2 Part 2A: Installing raw driver files via folder
You’ll need to use Device Manager to install raw driver files. Here’s how:
- Move the cursor to the Start Menu and right click on it, then click on Device Manager.
- In Device Manager, find and click Network adapters. Now find your Wi-Fi adapter in the list, it should have Wireless or Wi-Fi in the name.

- Right click on it and then on Update driver.
- In the new window, click on Browse my computer for driver software.

- Now click on Browse and navigate to the folder you extracted which contains the driver files.
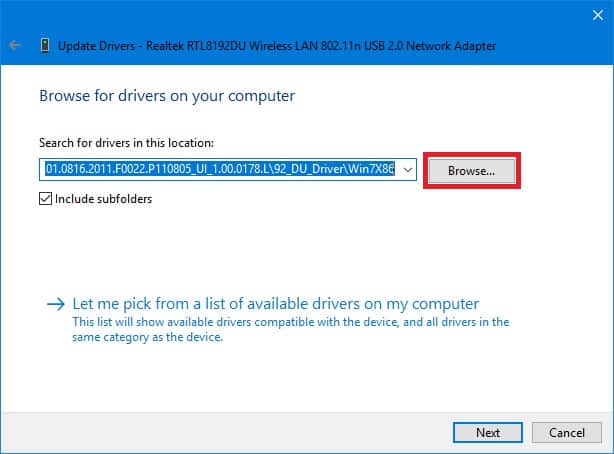
- Once you’ve located and selected the folder, click OK.
- Now click on Next.
- If Windows detects the drivers as being newer and compatible, they will be successfully installed. Click Close.
- If Windows did not detect the drivers as being newer or compatible, it will likely say the best drivers are already installed. In this case you’ll have to do things a little differently. Click Close.

- If Windows did not detect the drivers as being newer or compatible, it will likely say the best drivers are already installed. In this case you’ll have to do things a little differently. Click Close.
Method #2 Part 2B: Manually selecting the raw driver file to install
When Windows doesn’t automatically detect and install the driver in the folder, you’ll have to manually select it. Here’s how:
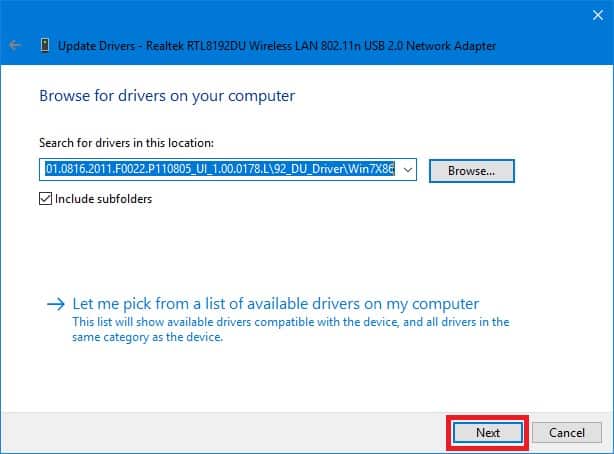
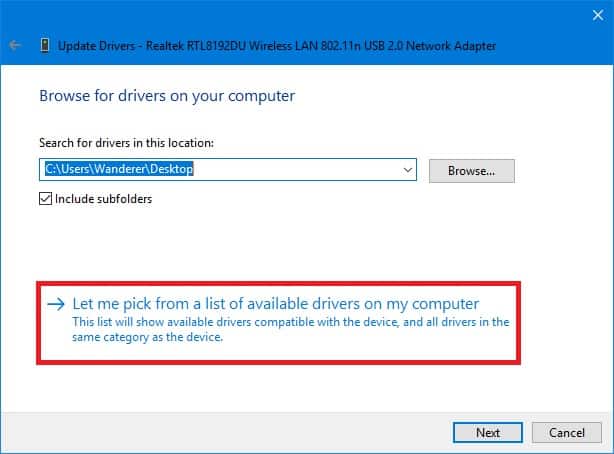
- Follow the previous steps from 1 to 4 to get back to the driver update window.
- Now click on Let me pick from a list of available drivers on my computer.
- There will be a list of currently detected compatible drivers. It may be empty for you. Click on Have Disk…
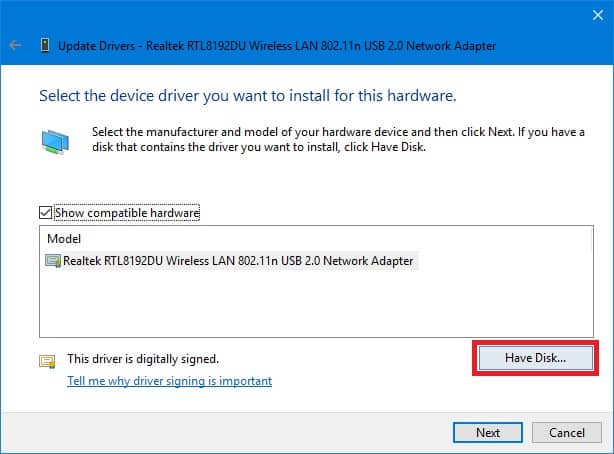
- A new window will pop up. Click Browse…
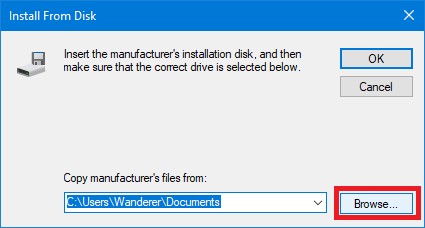
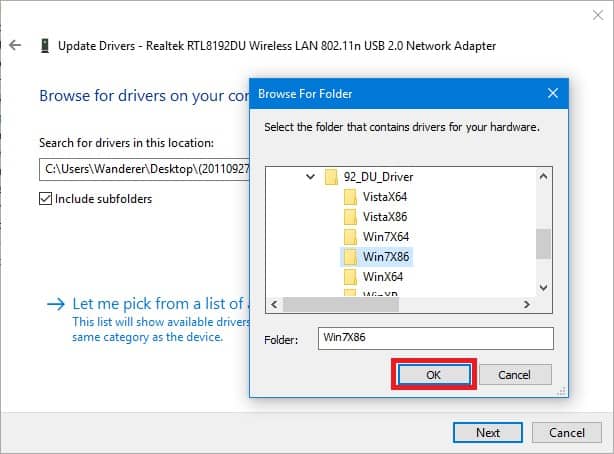
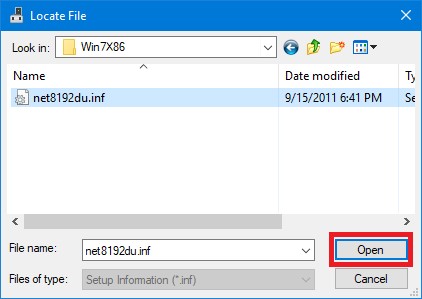
- Navigate to the folder where the driver file(s) are. There may be multiple folders and files and you’ll need to find and select the proper .inf file. Once selected, click Open.
- You’ll be back to the Install From Disk window. Click OK.
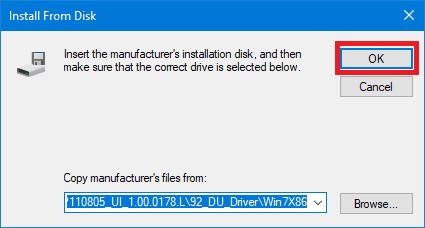
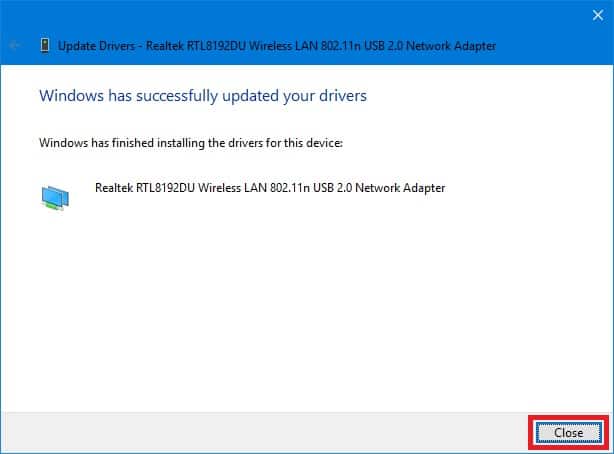
- If the driver is detected as compatible, it will be updated to the list. Click Next.
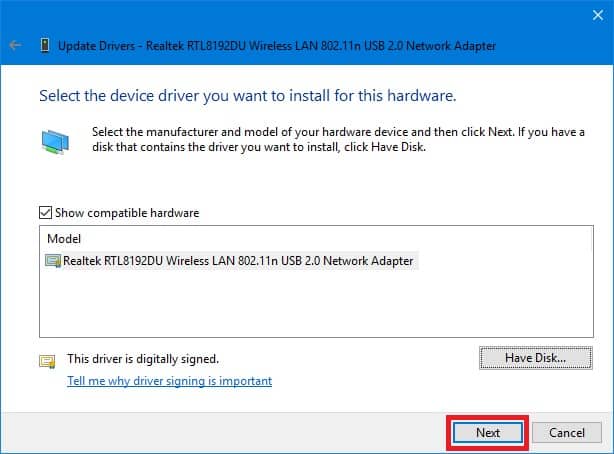
- After loading for a bit, the driver should be successfully installed. Click Close when done.
Fix #9: Replacing your current Wi-Fi adapter
If you weren’t able to install a new driver to your adapter, or you’re still not able to access the internet if it did install, it’s possible that your adapter is no longer working properly and may need to be replaced. One way to test this is if you have another Wi-Fi adapter you can test on your computer. If the second adapter works on your computer, it’s might be the first adapter that’s faulty.
You can further confirm this by taking the original Wi-Fi adapter(if it’s removable) from your computer and installing it on another computer to see if it works. If it works on that computer, it’s likely your computer that’s the problem. If it doesn’t work on either, you can be pretty sure that the adapter is the problem.
When looking for a new adapter, make sure to look at reviews before buying, either on the website you buy it from or other review websites if you plan to buy it at a store. You’ll want to find one that’s known to be compatible with Windows 10 and is reliable. As tempting as cheap off-brand devices can be, it’s usually a good idea to go with more well known brands, although the main thing is seeing what other people have to say about the adapter. And don’t rely on just the top reviews, looking at recent reviews can be helpful to see if there’s been a change in the product recently.
But before buying a new Wi-Fi adapter, there are still some more things you can try.
Fix #10: Removing viruses and other malware
Sometimes viruses and malware can keep your internet from working. You should run a full system scan with your antivirus software to check for and hopefully get rid of any viruses. If you don’t have antivirus software, it’s recommended that you download some. Windows 10 does have built in antivirus in the form of Windows Defender, but third party software is often better. I personally recommend either Avira or Bitdefender for good free antivirus. Microsoft also provides a list of antivirus software that works with Windows 10.
How to do a scan varies with different antivirus programs, so you may need to do an internet search and/or visit their website if you aren’t sure how. Here’s some links to the support pages on doing full system scans with a few of the popular ones:
The process should be similar for all antivirus software. If viruses are found and successfully removed, you’ll want to restart your computer afterwords.
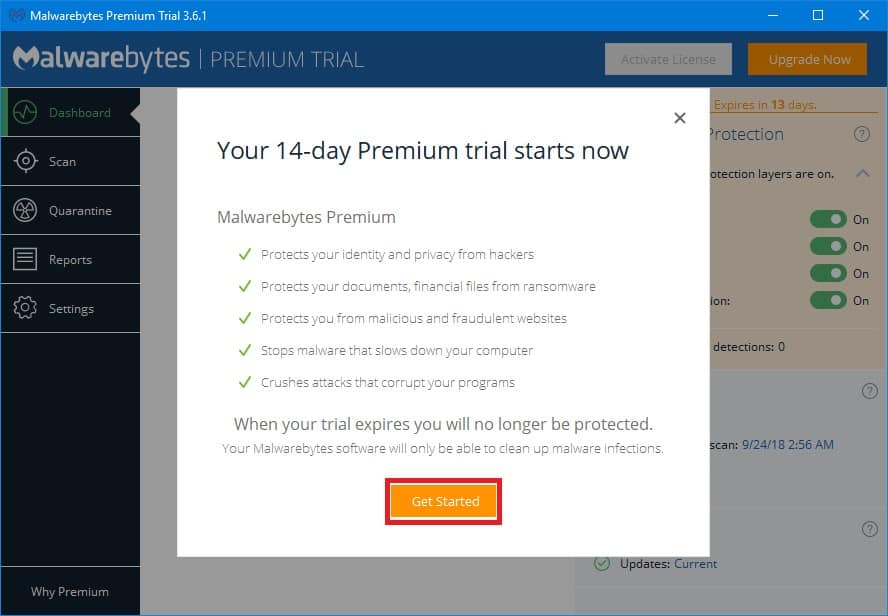
Antivirus software doesn’t always find everything, however. Other types of problem causing software known as malware could be what’s causing your internet to not work. You may need a free program like Malwarebytes to find and remove all potential malware. Programs like Malwarebytes can conflict with other antivirus/antimalware software, so you’ll want to temporarily disable or even remove them while using it.
Here’s how to run a scan with Malwarebytes:
- Follow the instructions on the Malwarebytes official support site on downloading and installing Malwarebytes. It will automatically open after installing it.
- A notification about a 14 day premium trial will come up. Don’t worry, you will still be able to scan for and remove malware after the trial ends. You don’t need the premium version. Click on Get Started.
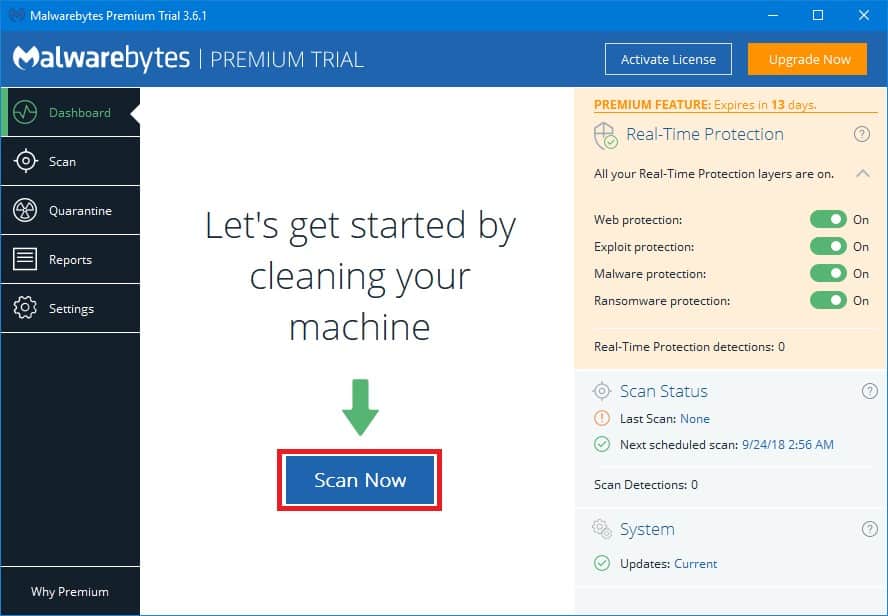
- Now click on Scan Now.
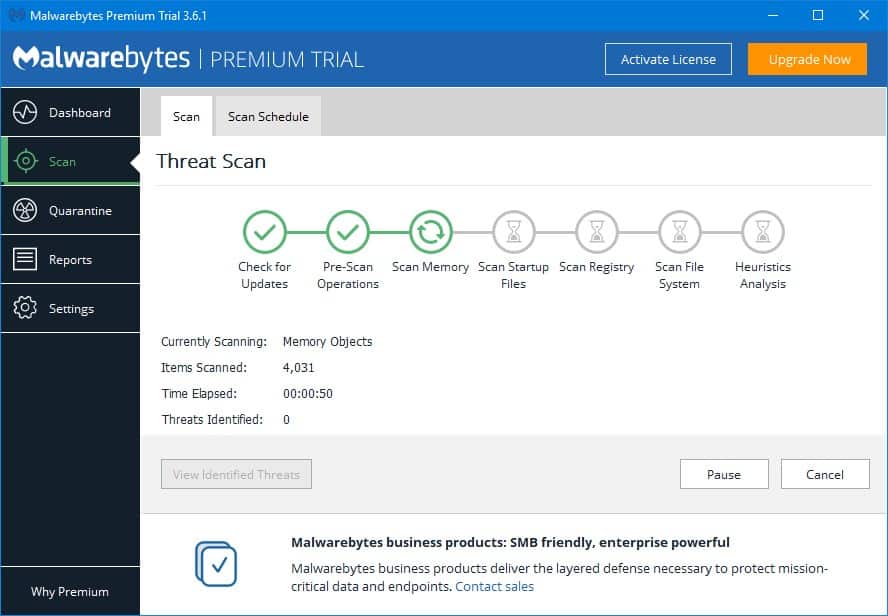
- It will check for updates and go through a series of scans. Wait for this to finish.
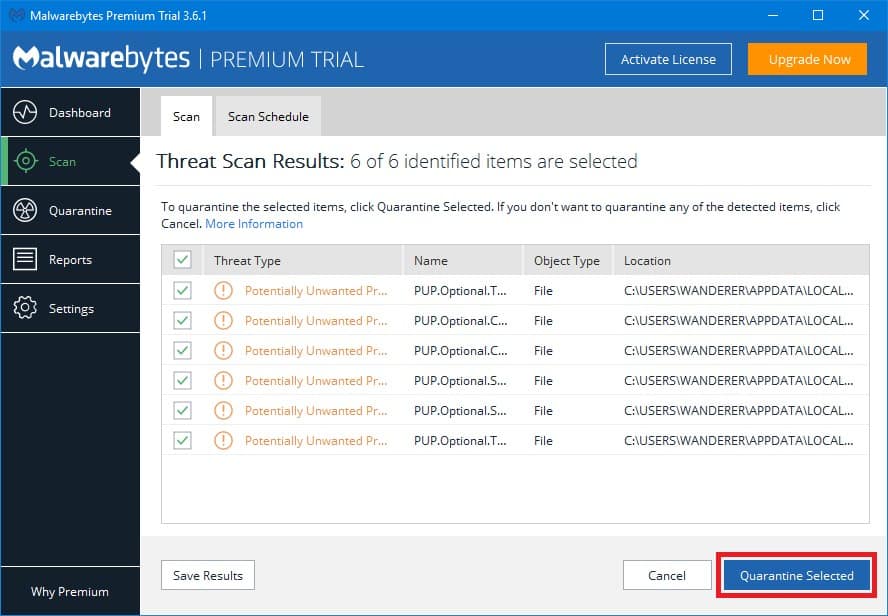
- When finished you’ll be presented with a list of detected threats. Leave all the items selected and click Quarantine Selected.
- A screen saying that the scan and quarantine is complete should come up. You can now close Malwarebytes.
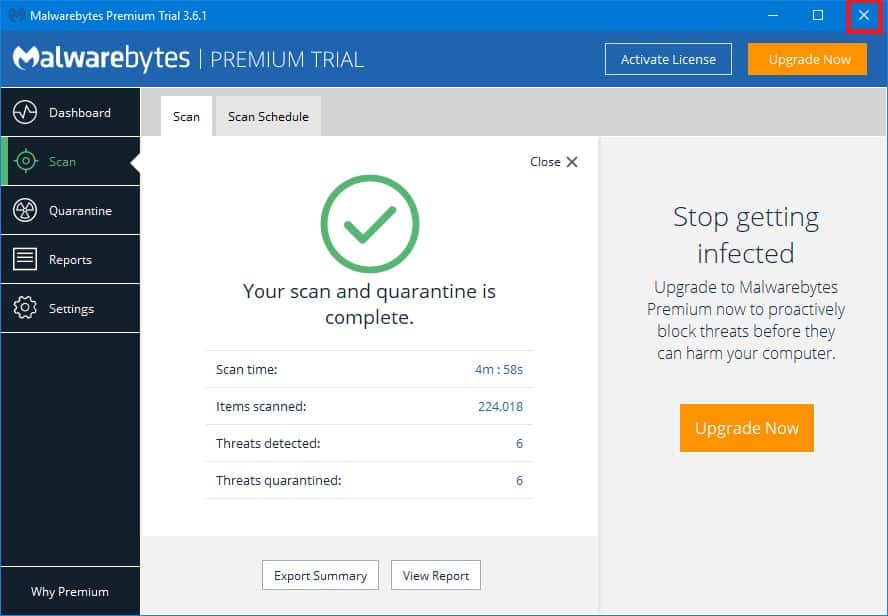
- You may need to restart your computer for the effects of the malware to be totally removed.
Fix #11: Removing issue causing antivirus software
On the other hand, antivirus software can sometimes be the cause of network problems. McAfee antivirus is particularly notorious for causing problems with the internet, as well as other issues. Other antivirus software can cause internet problems as well, especially their firewall programs. To see if this is the case, you’ll want to temporarily disable your antivirus and see if doing so allows you to access the internet again. How you do so will depend on the brand and version of antivirus software you use, so your best bet is to do an internet search for “temporarily disable *antivirus name here*” and follow the instructions you find for yours.
In some cases temporarily disabling may not be enough and you’ll need to remove your antivirus entirely. As this is risky, you should only do so if nothing else works. I’d recommend to try all the other fixes in this guide before this one. Even the the fixes meant for when your whole network has no internet access may end up working.
While your system won’t be entirely exposed after removing removing your antivirus because the built in Windows Defender antivirus will take over, you should still install another antivirus program as soon as possible after uninstalling the trouble causing one. Download either one of the recommended ones, or one of the many shown on the Microsoft site page linked above.
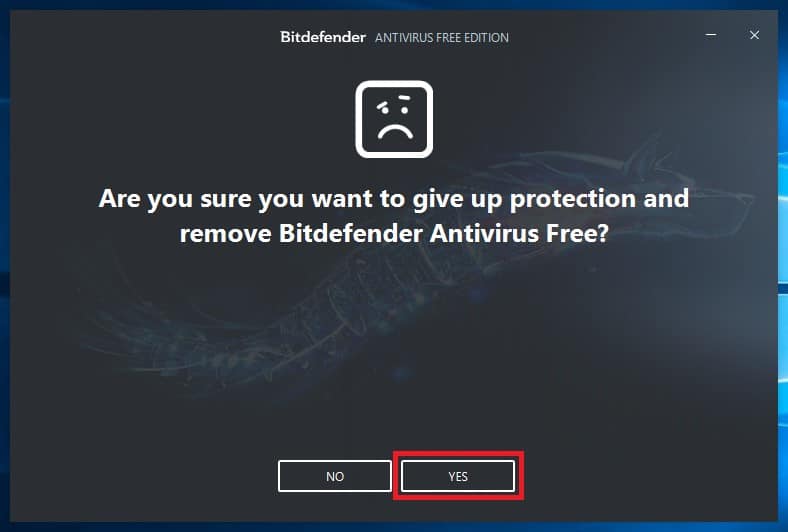
Usually the best way to do remove your antivirus is through the Apps & features section of Windows settings. Some software, like McAfee, may require additional steps, as shown here. Like when temporarily disabling your antivirus, for removing it you’ll want to do a search for either “remove *antivirus name here*” or “uninstall *antivirus name here*” for complete instructions. Even when using the normal method through Windows the exact steps will vary among software, but here’s some general directions using Bitdefender as an example:
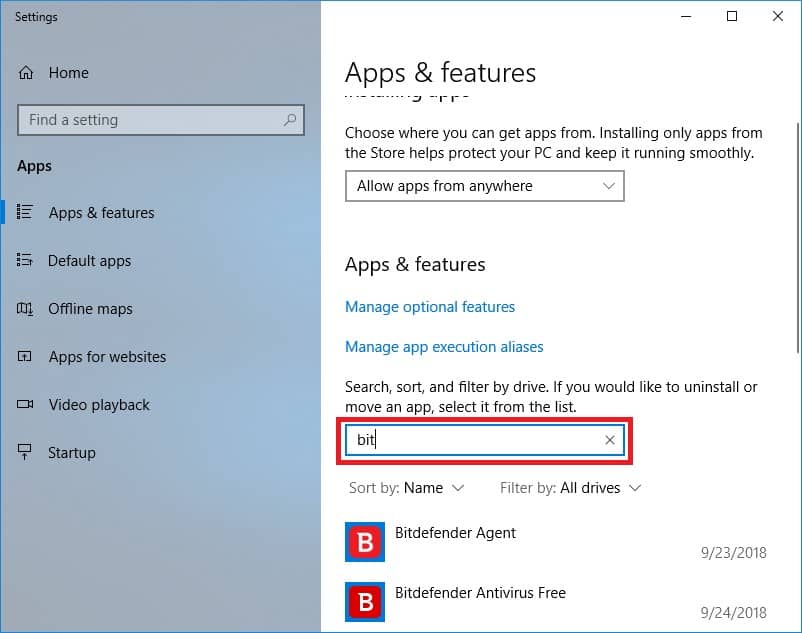
- Open windows search(click it or press Win + S) and begin typing “remove”, then click on Add or remove programs when it comes up.

- Now that you’re in the Apps & features window, scroll down and begin typing in the name of your antivirus software in the Search this list box.
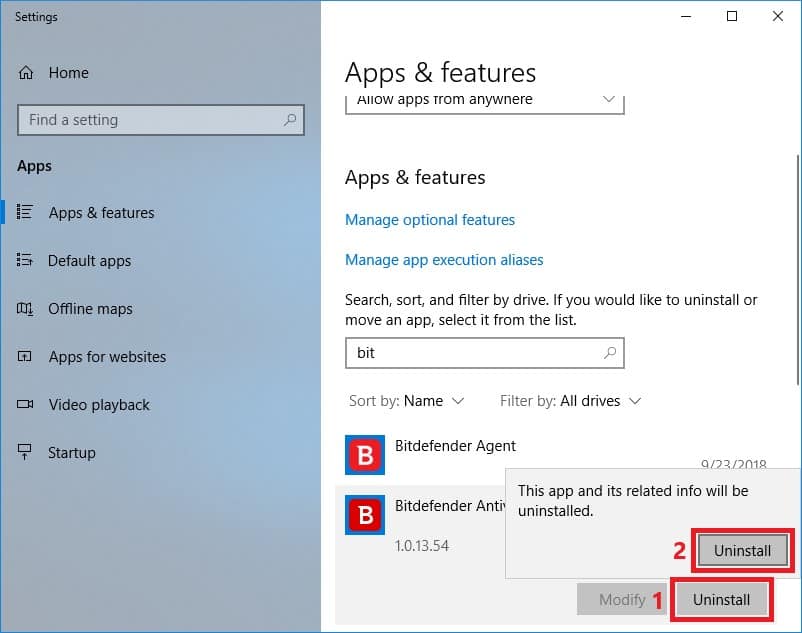
- When it comes up, click on it, click on Uninstall and then on Uninstall again.
- The window for uninstalling should come up. What it looks like will be different for each antivirus program. In the case of Bitdefender, click Yes. It may be Next, Confirm or something else for other software.
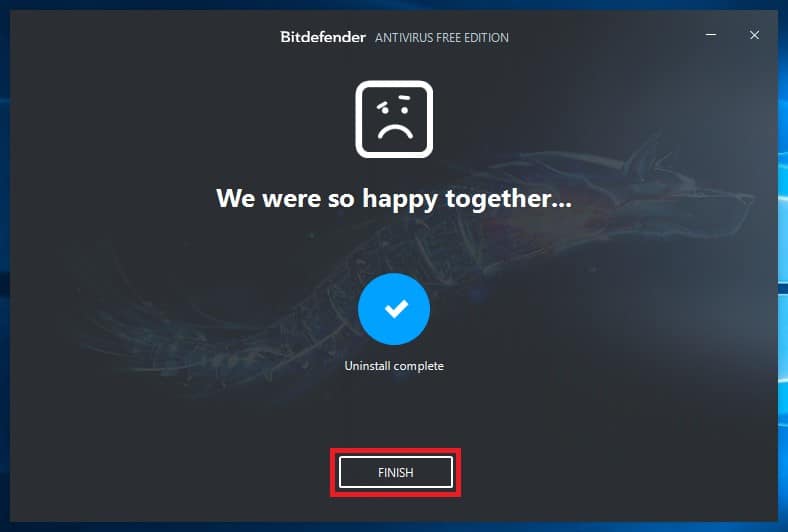
- It will begin uninstalling, and in the case of Bitdefender will also open your web browser to a survey page asking you about why you’re uninstalling. Other antivirus programs may do this as well. Feel free to close out of it.

- Wait for the uninstallation to finish.

- When it’s done you should be presented with a screen letting you know it’s complete. Click Finish. It may say Done, Close, or something else for other software.
- You may be prompted to restart by other antivirus software. Whether you are or not, you should restart your computer when done.
- You may need to repeat the above steps for each module of the antivirus software, or use special removal software, as with McAfee, to completely remove it.

Hopefully when your computer finishes restarting your internet will be working again. If so, you should install new antivirus software as soon as you are able to, as mentioned before.
If your internet is still not working, read on.
Fix #12: Network reset
Something you can try as somewhat of a last resort is a network reset. As the name implies, doing this resets all of your network settings and also removes and reinstalls all network adapters. You may end up needing to reinstall some network drivers manually if they are not automatically.
As with removing your antivirus software, you should only do this if nothing else has worked so far. You should try the modem and router related fixes as well before doing a network reset. Contacting your ISP for help is something that should also be considered.
With that covered, here’s how to start a network reset:
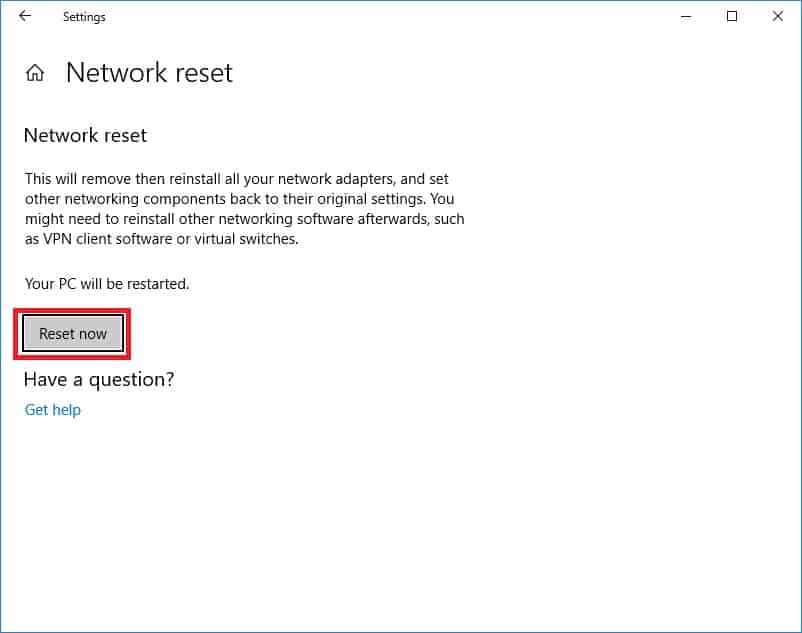
- Open windows search(click it or press Win + S), begin typing “network reset” and click on Network reset when it shows up.

- This will bring you to the Network reset page of Settings. Click on Reset now to begin.
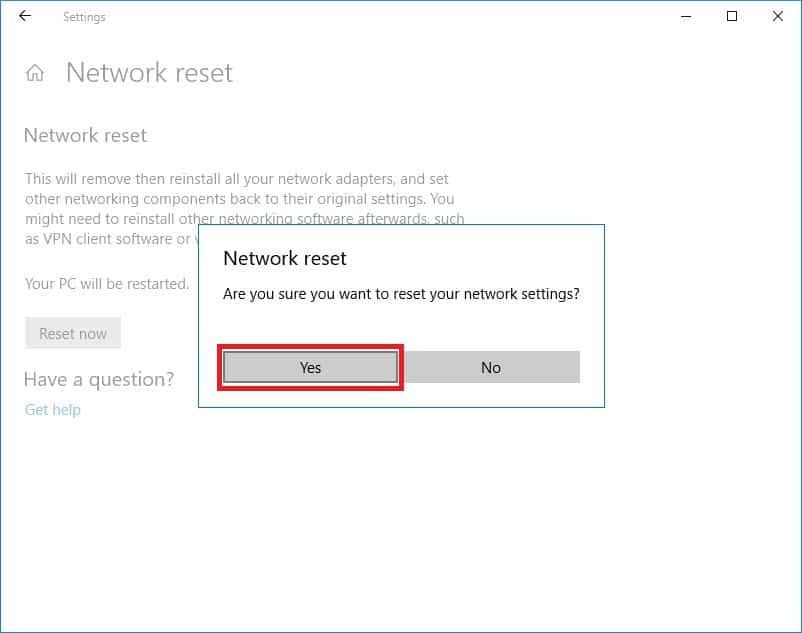
- A prompt asking if you’re sure will come up. Click on Yes.
- Shortly after a window telling you Windows will shut down in 5 minutes will come up. Click on Close.

- You can either wait for windows to shut down on it’s own, or restart manually.
Hopefully one of these fixes has worked and restored your internet connection. If not, one of the fixes for dealing with router and modem problems may end up helping.
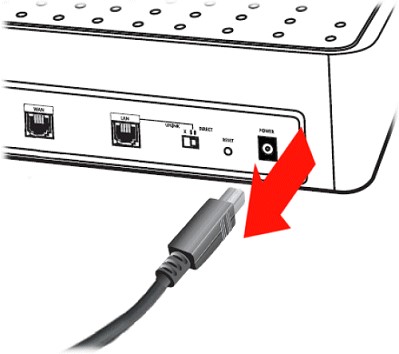
If none of your devices can access the internet, it’s likely an issue with your modem or router:
As mentioned near the beginning of this article, most modems should have indicator lights on the front of them. Checking these lights, if your modem has them, will help you figure out what the problem is. You’ll know your modem has a working internet connection when the power, downstream, upstream and connection lights are lit and steady and the activity light is blinking. Combo devices will likely have similar indicator lights as well. If any of the lights besides the activity light remain blinking or are unlit, it likely means the connection is broken somewhere between the modem and your ISP. Sometimes this connection can be easy to restore, other times it can be a problem that requires you to contact your ISP.
If your modem’s indicator lights show that all is working as it should, the fault is probably with your router. There may be temporarily corrupted data, a problem with settings or even firmware problems. Most temporary issues, for both modems and routers, can often be solved by restarting your modem and router.
More specifically, doing what’s known as power cycling, or rebooting them is a method that can often fix things. Basically, you unplug the devices, wait for a certain amount of time and then plug them back in. This is not the same as resetting, which erases all settings and restores the device to factory defaults. Do not press a button labeled reset on your device if you don’t want this to happen.
As modem and router issues can be often be interconnected, we’ll be doing this for both devices. The order in which they are plugged back in is important as well for the devices to work properly. If you have any other network devices, like switches or secondary routers connected to your modem and/or router, you’ll want to include them as well. If you only have a modem/router combo device, then you’ll of course only be rebooting that device.
Fix #12: Power cycling your network devices
- Unplug the power cable from the backs of all of your network devices.
- Now wait for at least 30 seconds.
- After waiting, plug only your modem’s power back in.(Just plug in your modem/router combo if that’s what you have.)
- Now you’ll need to wait at least 60 seconds(1 minute) while the modem boots up and establishes itself with your ISP. As mentioned before, pay attention to the indicator lights to tell when it’s ready. After a while you can try power cycling it again, or try another method if it doesn’t connect.
- After your modem has established an internet connection, it’s time to plug your router back in. Also plug in any other network devices if you have them. You’ll again want to wait at least 60 seconds, often longer, for the router to connect to the modem, your computer and all of your other devices. Your router may also have indicator lights you can look at to see if it’s connecting properly. How’s these lights look and what they indicate will of course vary from router to router. Checking the documentation that came with it or the manufacturer’s website will be the best way to find out what they mean if it’s not clear.
Once your router(or modem/router comb0) has finished starting up and connected properly, you can now check on your computer and other devices if you have internet access. If not, there’s more you can try.
Fix #13: Updating your router and/or modem’s firmware
Firmware is what runs devices at the most basic level. You may not be able to access the internet on any of your devices because of corrupted or outdated firmware in your modem or router. Many routers can be updated fairly easily through their web interface. This is accessed by entering the IP address of your router into your web browser.
To find your router’s IP address and directions on updating the firmware, you should consult your router’s manual, or look on the manufacturer’s official support website. On some routers this process can be complicated and risky, so you may want to to either contact your ISP or the router manufacturer’s support team for help.
There are many different router manufacturer’s out there, but here are some links to several of the more popular router manufacturer’s support websites:
On their websites you should be able to enter the model number of your router and find information help for various issues with that model of router and links to digital versions of the manual. Either the support website itself or the manual should provide directions on updating your router’s firmware.
For modems and modem/router combos, things can be a bit trickier. Both of these devices are often provided by your ISP and may need to be updated by them. If your device is provided by your ISP you should check with their website for information on updating the firmware, or contact them directly about it.
For devices that you purchased yourself, as before you’ll want to check the manufacturer’s website for information on updating the firmware. Most of the previously linked sites for routers also make modems and combo devices. Other popular modem manufacturer’s include Motorola and ARRIS.
Fix #14: Resetting your router or modem
If updating firmware didn’t restore your internet, or you weren’t able to update it, resetting your devices may help. As with doing a network reset in Windows, resetting your modem and/or router is a bit of a last resort. All settings will be set back to default and you’ll have to configure your device as if it were brand new. You may want to contact your ISP before doing this, especially of you have hardware provided by them that may rely on specific settings in order to work properly. If you end up resetting your device and still not being able to access the internet at all, then you’ll need to contact them anyway.
If you decide to try resetting your device, there are two ways to go about it. Most modems, routers and combo devices have a reset button on them. Often this button can only be reached with a paper clip or similar item and needs to be held down for a certain amount of time.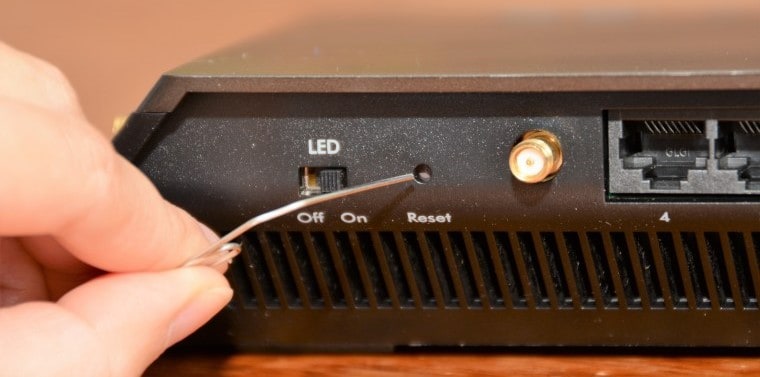
Many devices also can have a reset initiated from the web interface through their IP address. Which one you choose will depend on your device. You’ll again want to consult the manual or the manufacturer’s or your ISP’s support website for instructions on resetting your device.
Check the links in the previous section to see if one of them is the company that made your network device. If not, or if it’s an ISP provided device, doing an internet search for either “*router name* reset” or “*company name* router/modem reset” should help you find the information you need.
When all else fails, contact your ISP:
While nobody enjoys having to call up a company and wait on hold, when you aren’t able to fix something on your own you need professional assistance. You also don’t necessarily have to talk to them on the phone, some companies have live chat and email support available. Check their website to see if these services are available.
As there are literally thousands of ISPs all over the world, it wouldn’t really be practical to have of a list of even the most popular ones, so I’ll leave it to you to find yours. Many people pay their bill through their ISP’s website, so you’ve likely visited it before. If you receive the bill through the mail, their phone number and website should be on the bill.
Frequently Asked Questions
Why can’t my laptop connect to Wi-Fi but my phone can?
Well, PCs, especially those running Windows 10 or Windows 11, have a different way of handling an internet connection than a regular Android or iOS device. Since PCs are so varied, they may have different network adapters and your version of Windows might get them “confused.”
In any case, once you try all of the methods in this article, you will definitely find one that works and you’ll be able to connect your laptop to the internet once again.
Can you use a modern laptop without an internet connection?
Unless it’s a Chromebook or a laptop with an operating system that’s highly dependant on an internet connection to do even some of the most basic tasks, then it should work just fine without internet.
Even newer versions of Windows, despite how online-oriented they are, still give you the option of activating your computer’s license without an internet connection and configure a local-only profile so that you can still do stuff outside of the web. Your local files and applications won’t be affected at all by doing so.
What else can I do with my laptop until I get internet access back?
There are loads of hobbies you can undertake if your internet is down for, let’s say, a week. You can start reading those ebooks that you have already downloaded, play some of the games that you have installed but haven’t gotten to playing, write a movie script or a story using your already-installed office tools, and so much more.
Outside of your laptop, there’s also a whole world waiting to be explored. Staying away from the internet for a while can be quite beneficial.
Final Thoughts
I hope that one of these fixes has worked for you and got your internet working again. Feel free to leave a comment if you have any questions. I would also kindly appreciate it if you could share this article on Facebook, Twitter, Linkedin, and other similar social platforms so that more people will be able to solve their problem, much like you have right now.
I hope that one of these fixes has worked for you and got your internet working again. Feel free to leave a comment if you have any questions.
Make sure that the ethernet cable is properly connected, if it still doesn’t resolves the issue contact the ISP( Internet Service Provider), update the network adapter drivers if the issue persists.