PFN_LIST_CORRUPT is another blue screen error or Blue Screen Of Death (BSOD) error as we sometimes call it. In general, blue screens show up when some serious error occurs and Windows can no longer keep running and it needs to be rebooted.
But what is PFN List exactly?
PFN stands for Page Frame Number. It is a list used by the Hard Drive to locate every file on the physical disk. The list can be corrupted for many reasons, some of them may happen once in a lifetime and others can be persistent and need to be fixed. Here are some reasons that we will be covering:
- Virus and Antivirus issues.
- Your OneDrive app and service need to be shut down.
- You Windows version needs to be updated.
- Hard disk issue.
- Some drivers got old or faulty and need to be updated.
Before explaining the different solutions, we’ll explain how to get your computer out of the blue screen, if it’s stuck on it, and then we can go for the solutions.
How to escape the Blue Screen suspension
First of all, the blue screen is meant to gather information about the error that caused it and then reboot the computer. So it’s recommended that you wait and see the percentage go from 0 to 100% and after a while, the system should reboot itself. However if this doesn’t happen for like 10 minutes, then you can intervene manually by pressing and holding the power button for a few seconds until your computer is completely shut. Then you can start it up again and head for the solutions.
Now that we’re no longer stuck, let’s try some solutions so this doesn’t happen again. I recommend that you go through all the methods that are relevant to you in order one by one until the problem get solved (some may not be applicable to you: like removing double anti-virus software if you have more than one). Follow us!
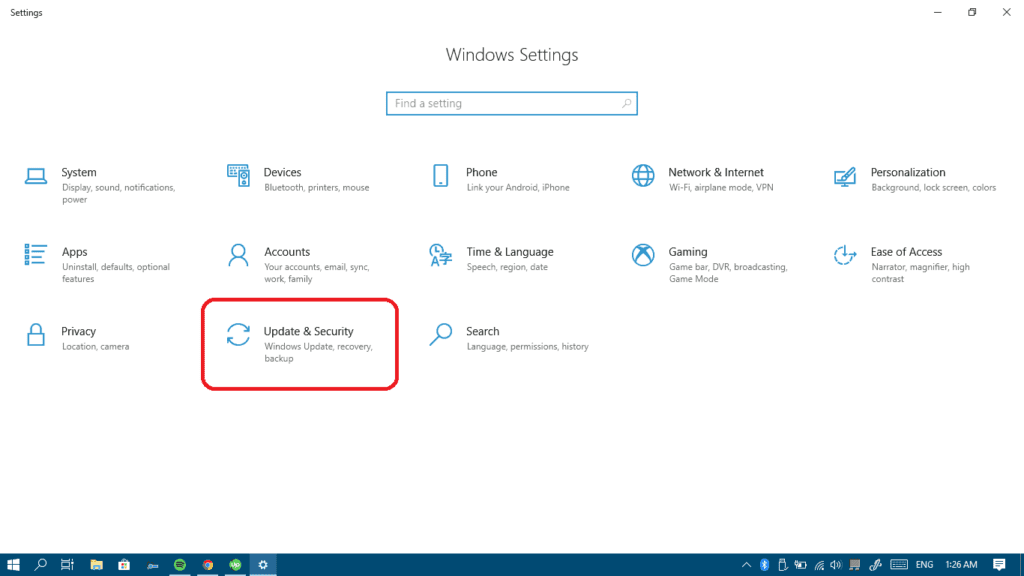
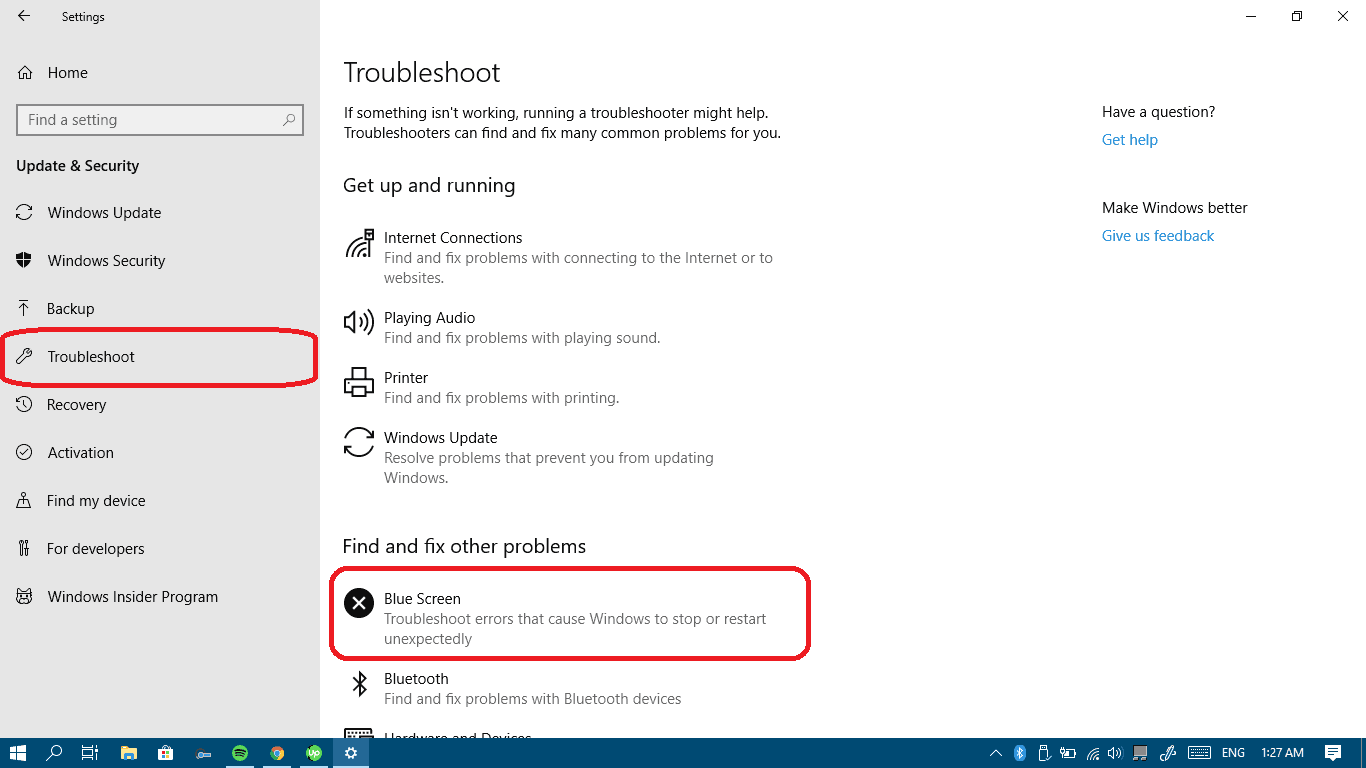
Method I: Use the Windows 10 blue screen troubleshooter
Microsoft has released a troubleshooter specifically for blue screens in the last two versions of Win 10. It’s worth a shot! Here’s how to use it:
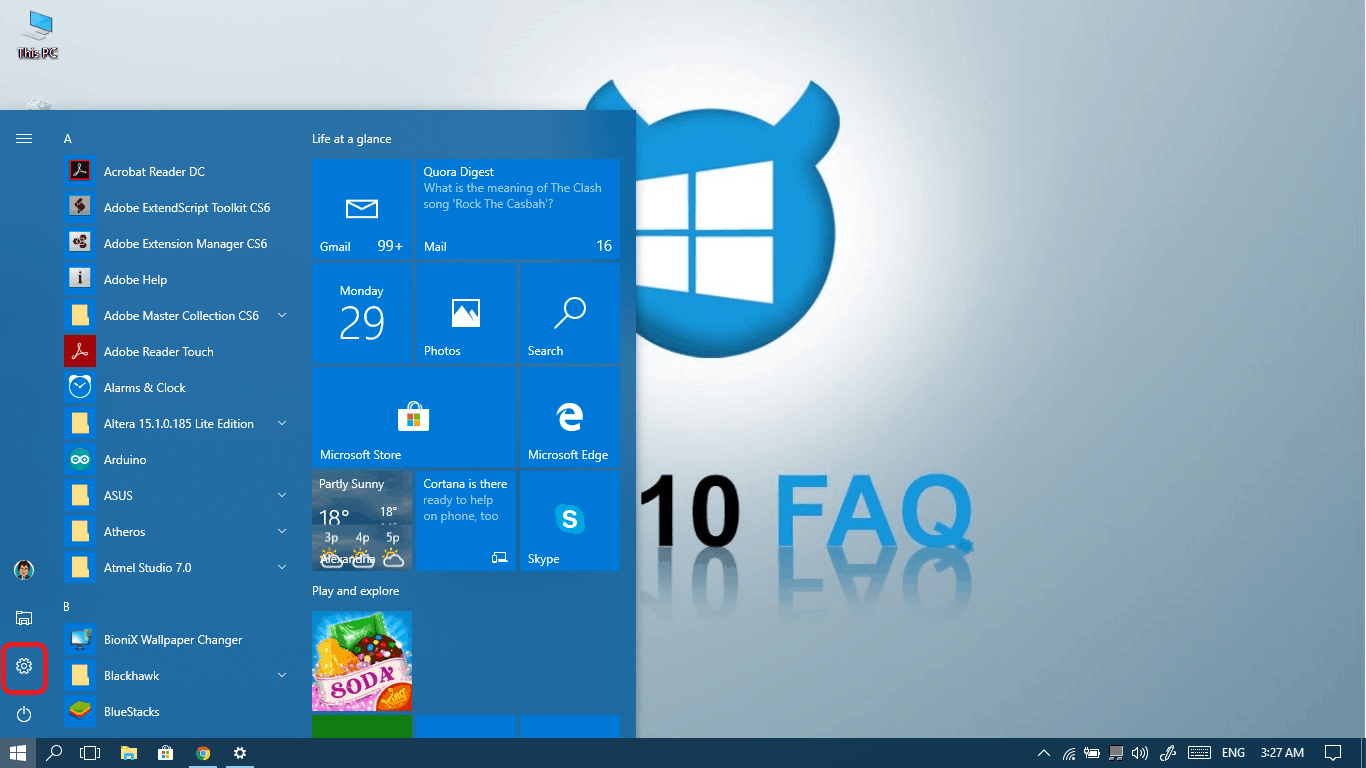
- Open Settings from your start menu.
- Click on Update & Security.
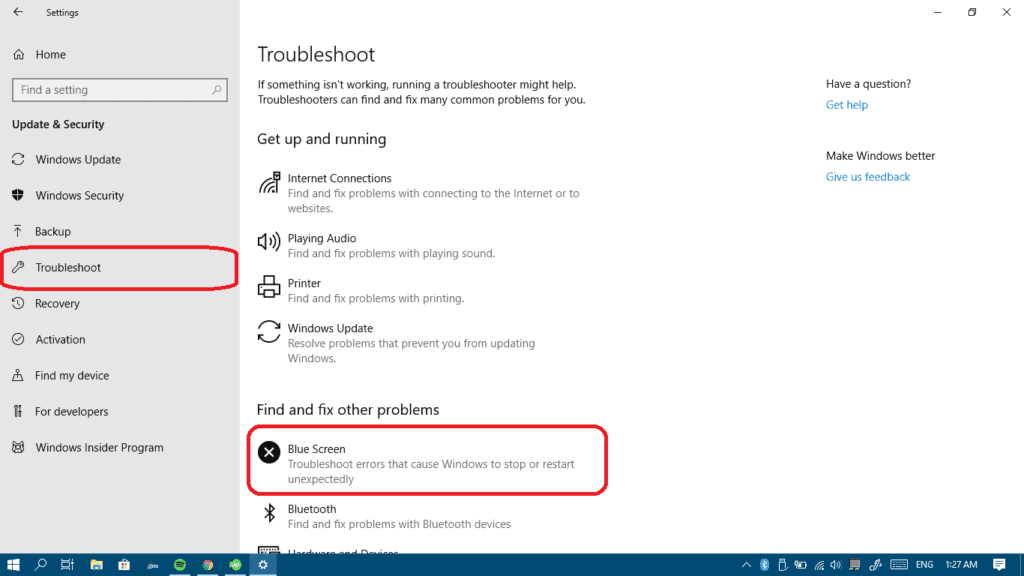
- Select Troubleshoot from the left pane and then click on the Blue Screen troubleshooter.
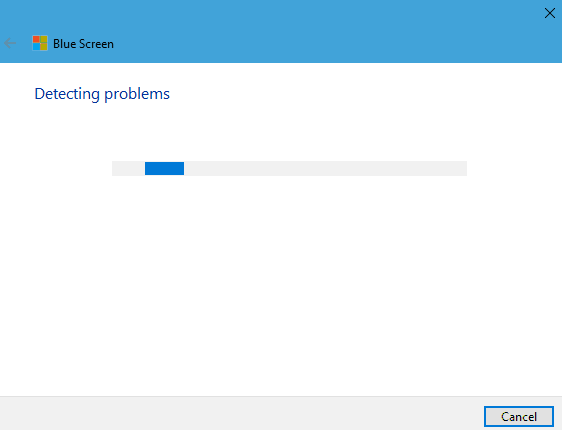
- Click Run Troubleshooter to start using it.
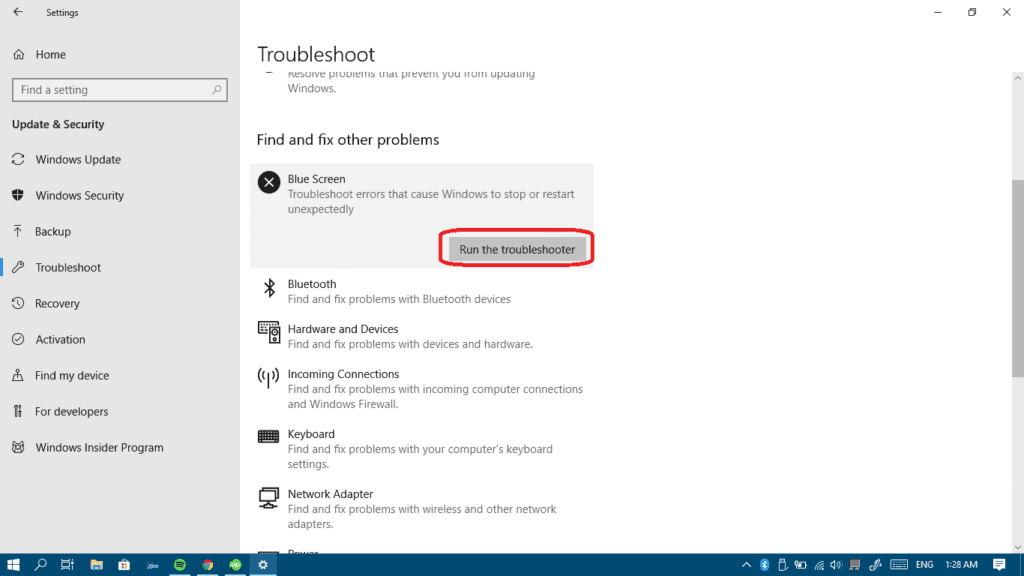
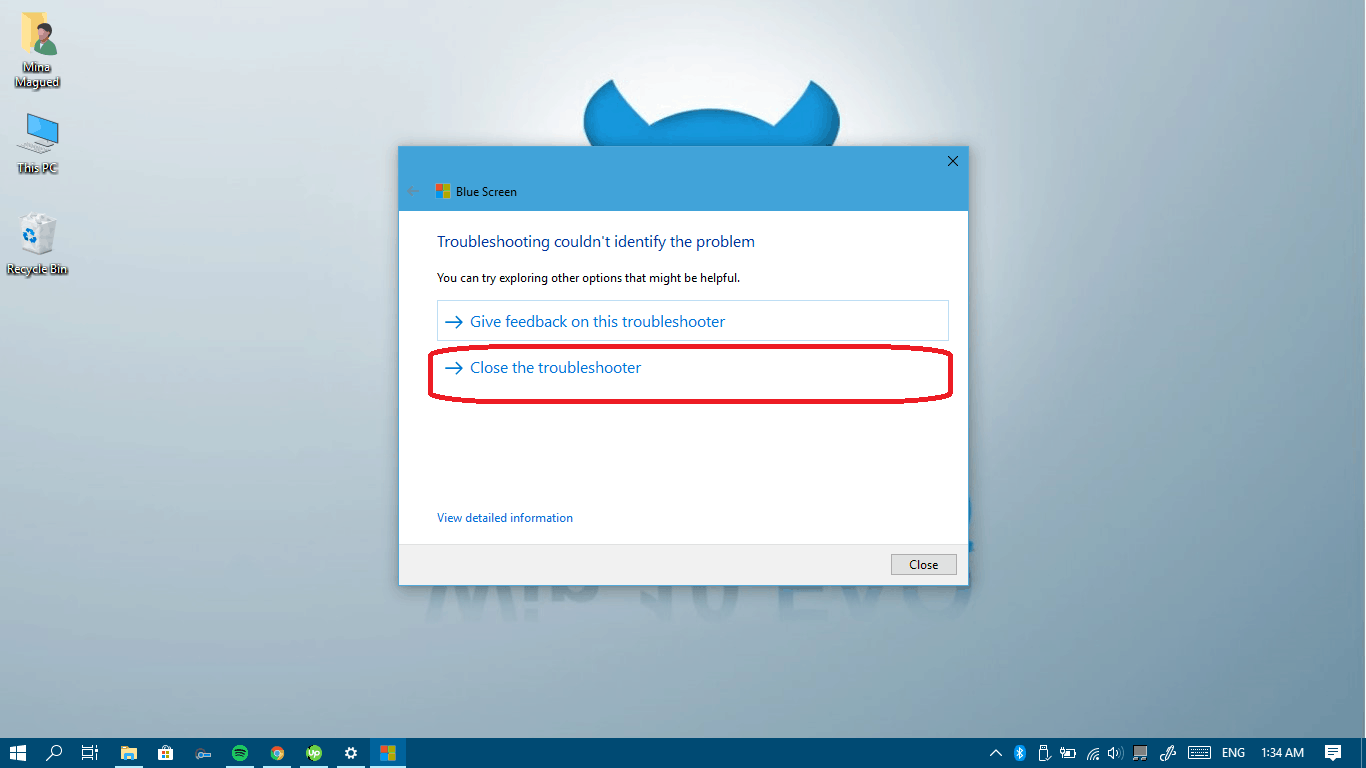
- Give it some time to detects your problem.
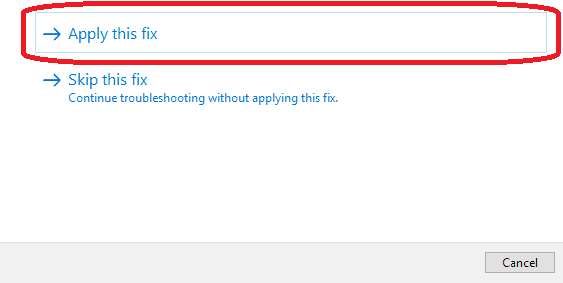
- If the troubleshooter manages to find any issues, then click on Apply this fix.
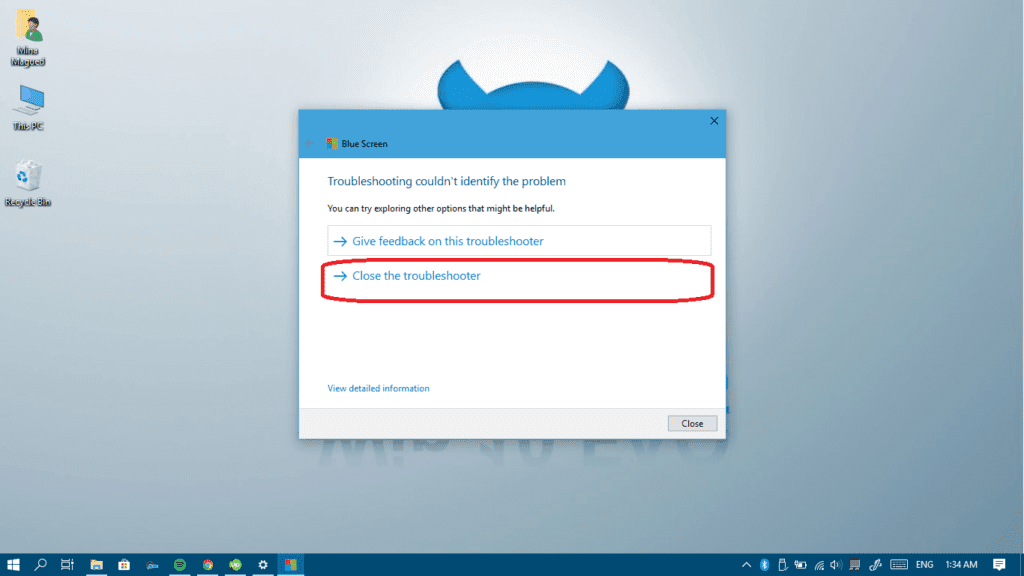
- After it finishes fixing the problem just click Close the troubleshooter and restart your computer.
- If you see that no issues were detected by the troubleshooter, click Close the troubleshooter and follow the next steps in order to fix it manually.


Method II: Run a system scan
System scan is a great command which scans all the system files and checks if something is corrupt or missing and immediately fixes it. It really saved me lots of time and effort through my work and I really recommend that you keep it in mind and use it at any situation. Here’s how to apply it:
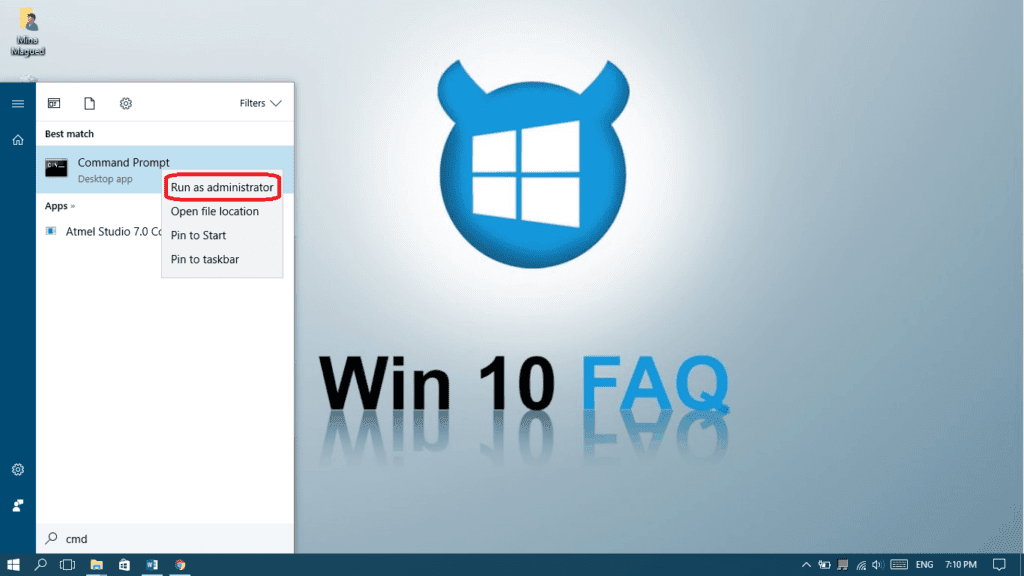
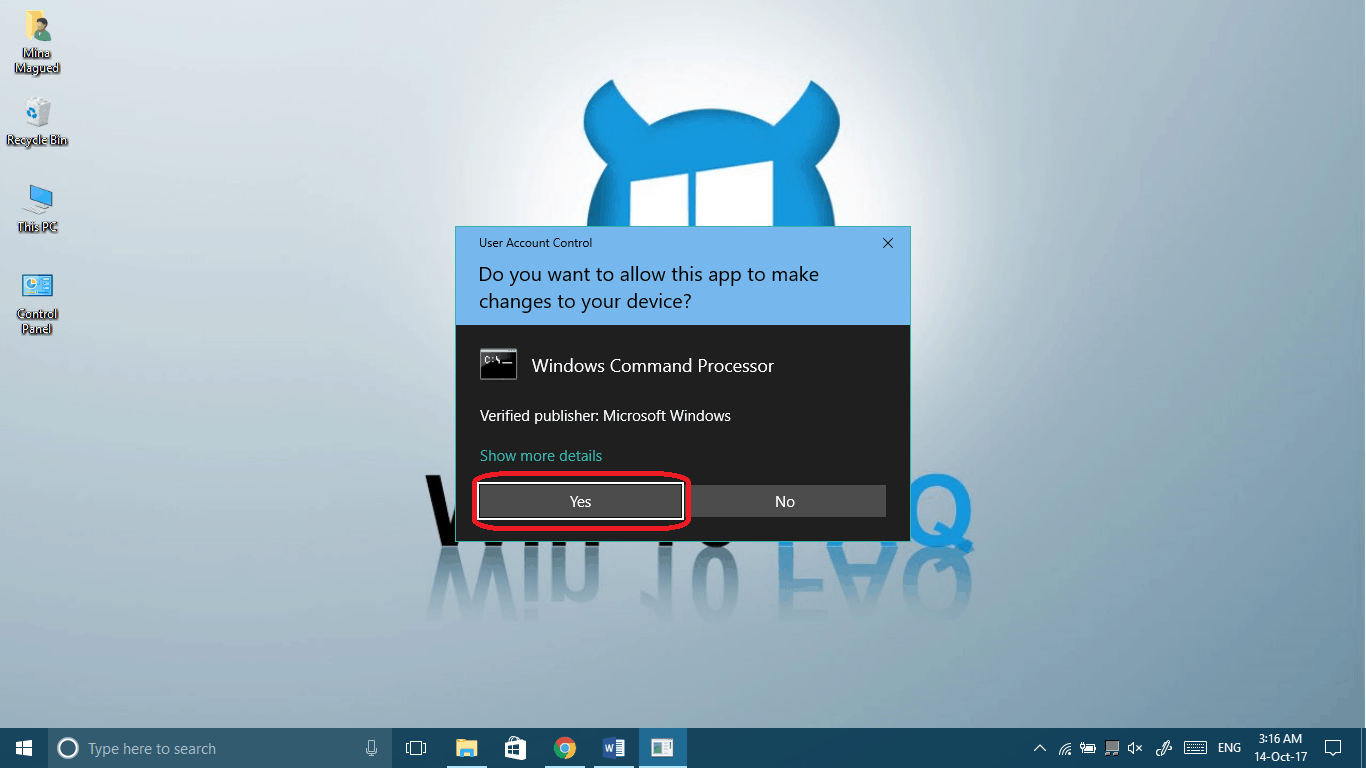
- Type “cmd” in your start menu, right-click on Command Prompt and choose Run as administrator.
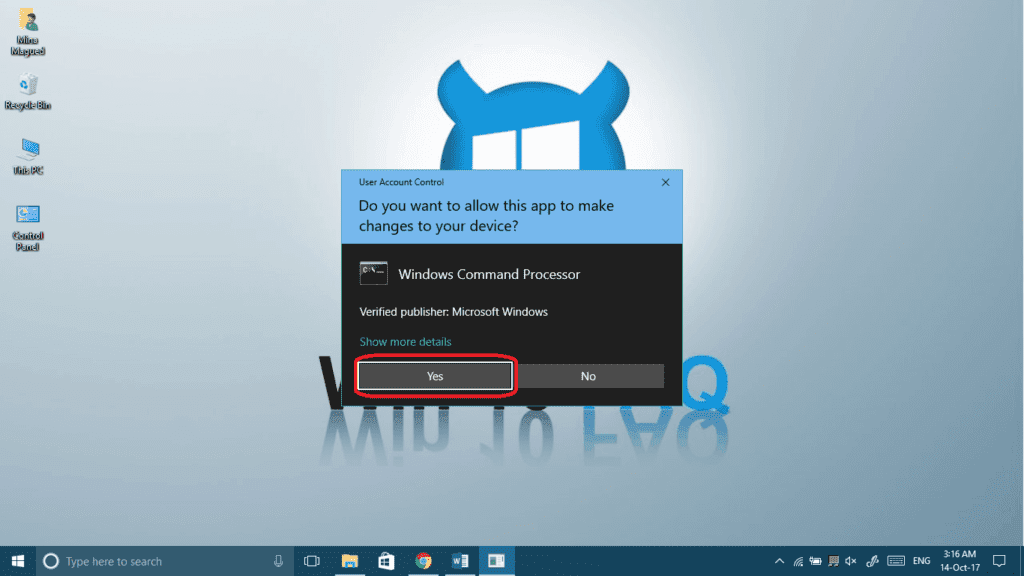
- Click Yes to give it permission.
- Type the following command then press enter:
sfc /scannow
(make sure you put a space between “sfc” and “/scannow”)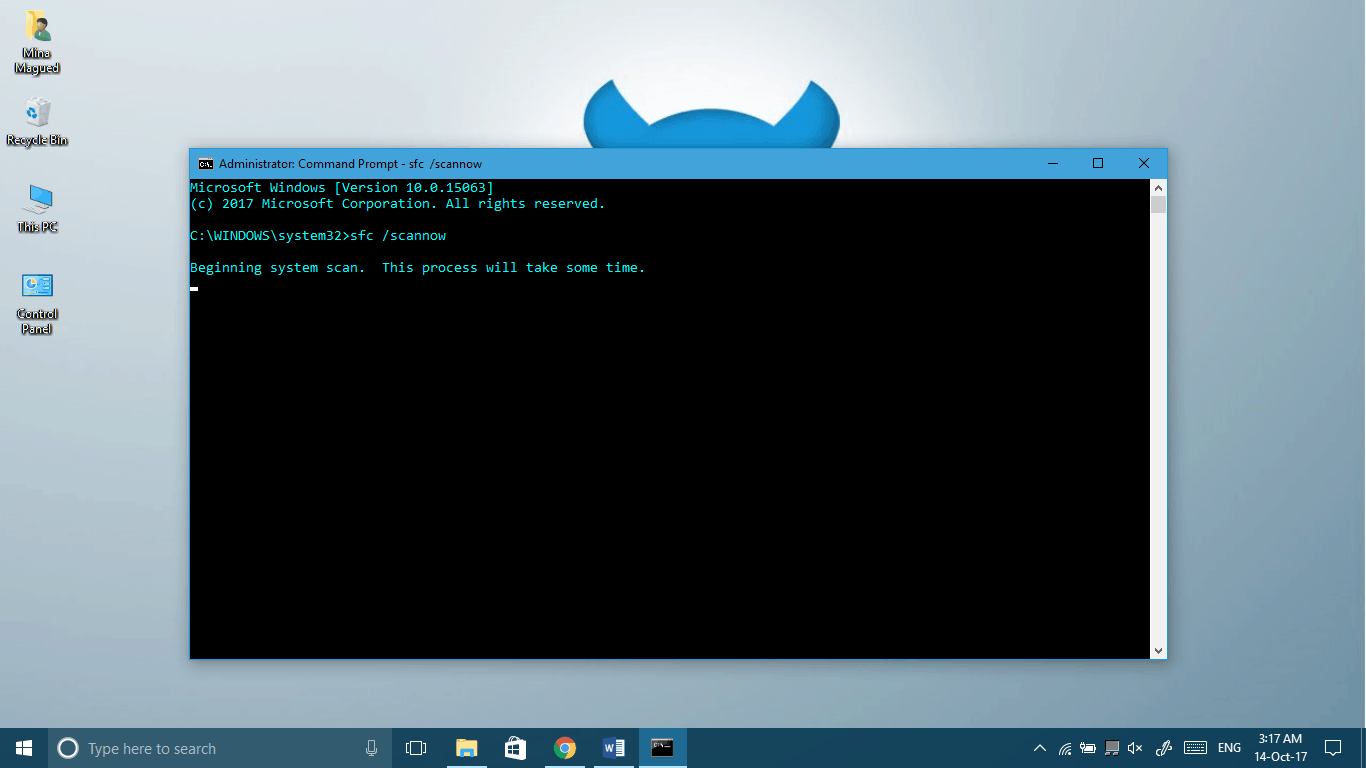
- Wait until the scanning and the fixing are done and that’s when you should restart your computer and see if you still encounter the Blue screen.
Don’t stop here, run for a couple of steps more to make sure you solved the issue.
Method III: Check for virus and antivirus issues
First all, make sure you only have one antivirus software running on your computer, because two or more antivirus programs could cause many problems including the PFN_LIST error. So let’s just begin by uninstalling the secondary one(s) and make sure to keep the one you like best. Here’s how you do it:
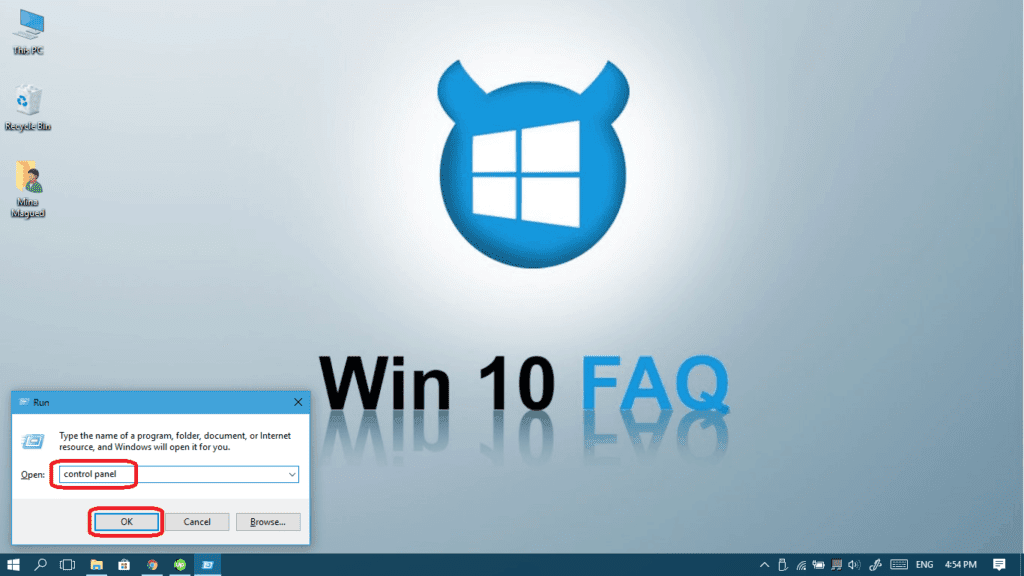
- Press your Windows logo Key + R to launch your Run app and then type control panel then press Enter or click Ok.
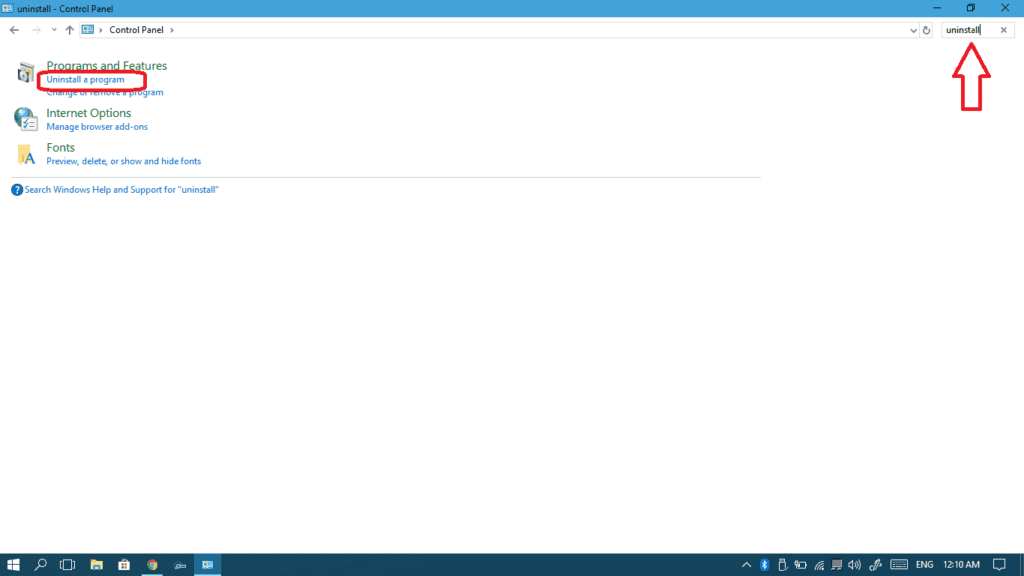
- Search for uninstall and then choose Uninstall a program at the Programs and Features section.
- Go through the list and select the Antivirus program you want to remove and then click Uninstall or Change if there’s no uninstall button.
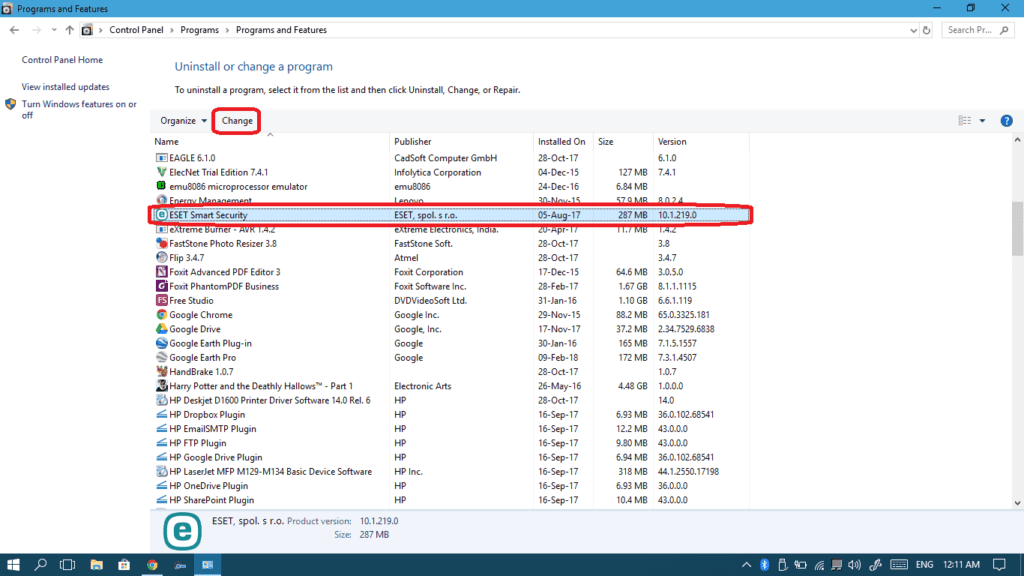
- Go through the un-installation process and restart your computer after it’s done for the changes to take effect.


Now let’s use the anti-virus that you have left to make a complete scan and remove any virus or malware on your computer, this can be done through your antivirus interface, it’s usually a one click operation. And once the scan is done, perform a restart.
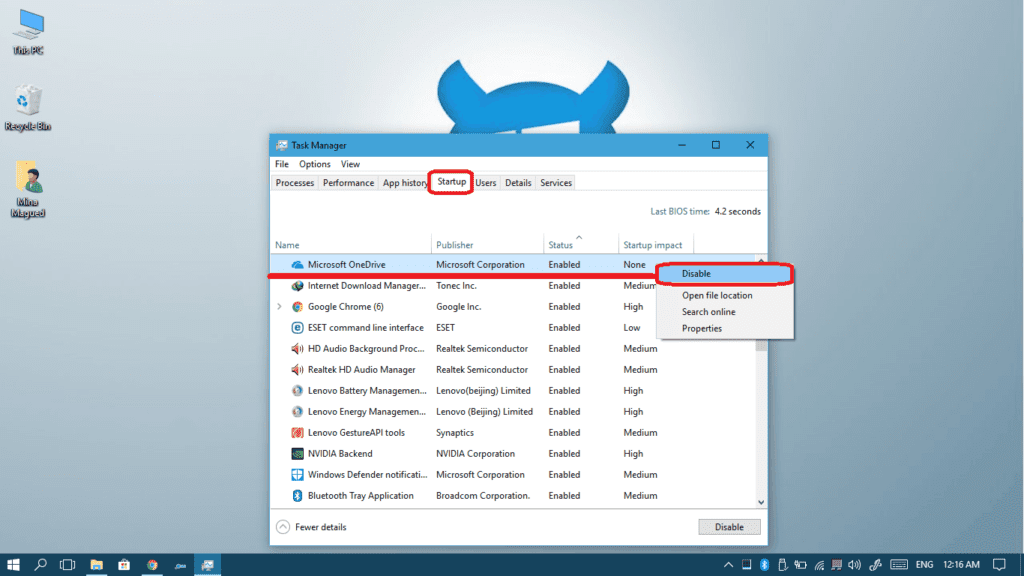
Method IV: Disable OneDrive
After lots of digging, many forum users have found that the cause of their PFN_LIST_CORRUPT error was the OneDrive application and service. For most people – this is the method that solves the problem. This service is pre-installed with Windows 10 because Microsoft offers you to backup your files and sync these files and some others settings to the cloud. But if disabling it will solve the problem then you should do it and find another alternative for it like Google Drive. Let’s disable it:
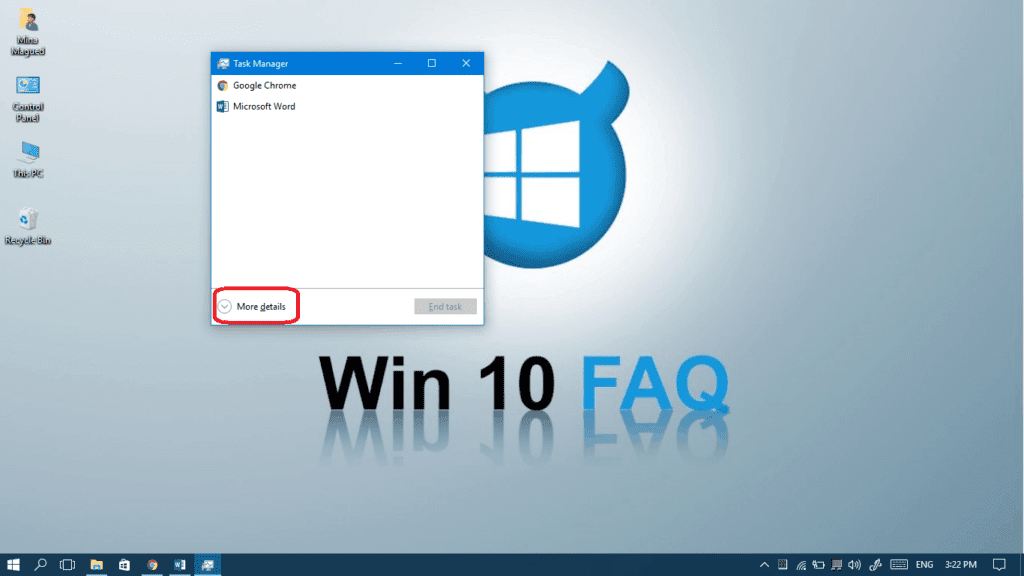
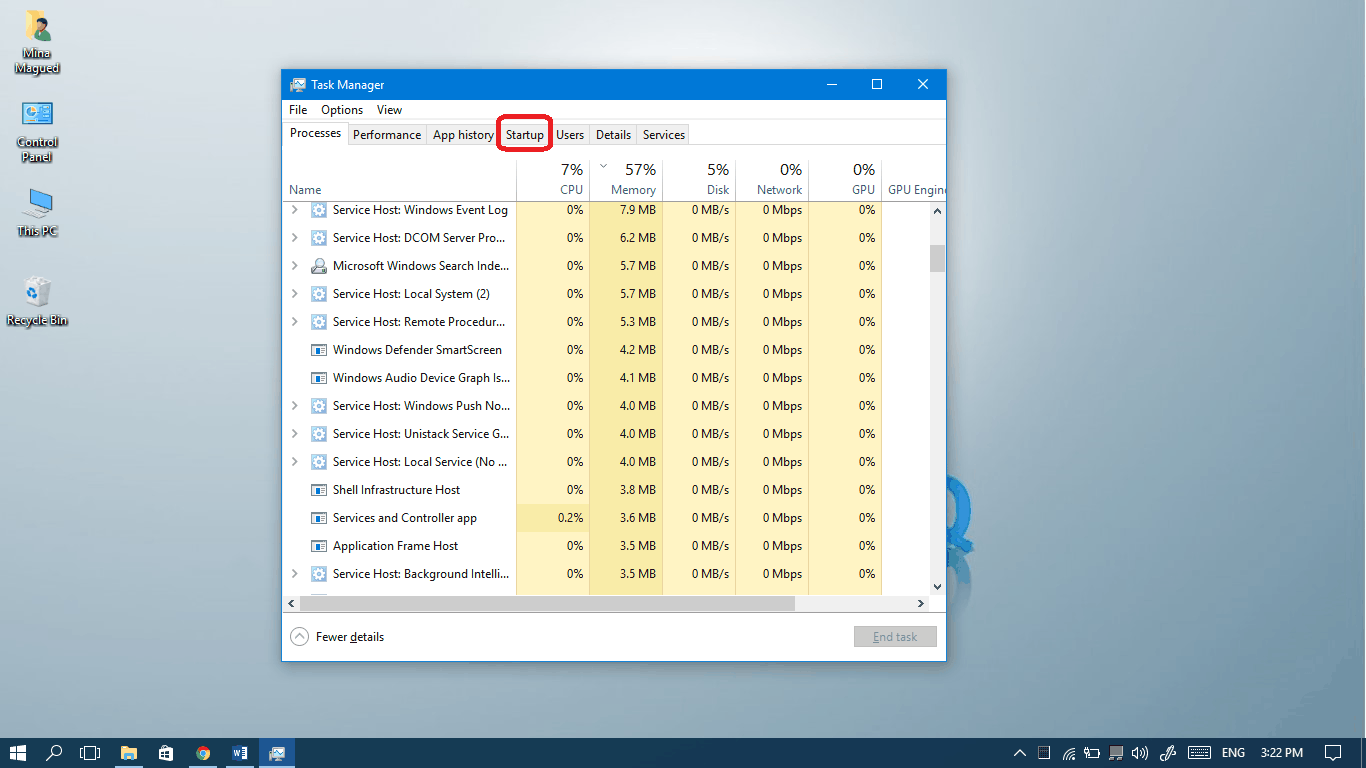
- Open task manager from your taskbar or by pressing Ctrl + Shift + Esc.

- If you see the small panel, click More details to switch to the big panel.
- Open the Startup tab.

- Look for Microsoft OneDrive, right-click on it and select Disable.


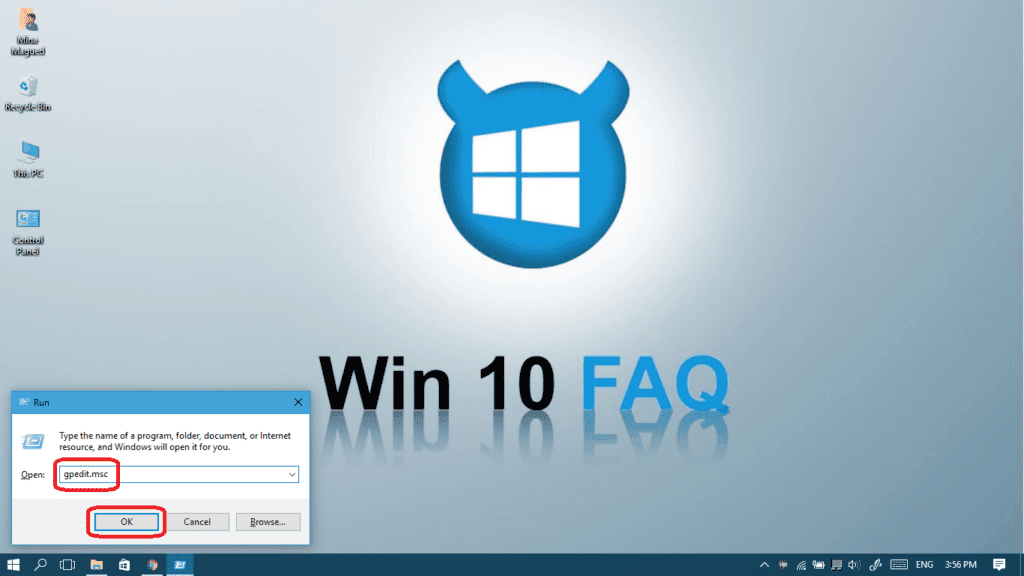
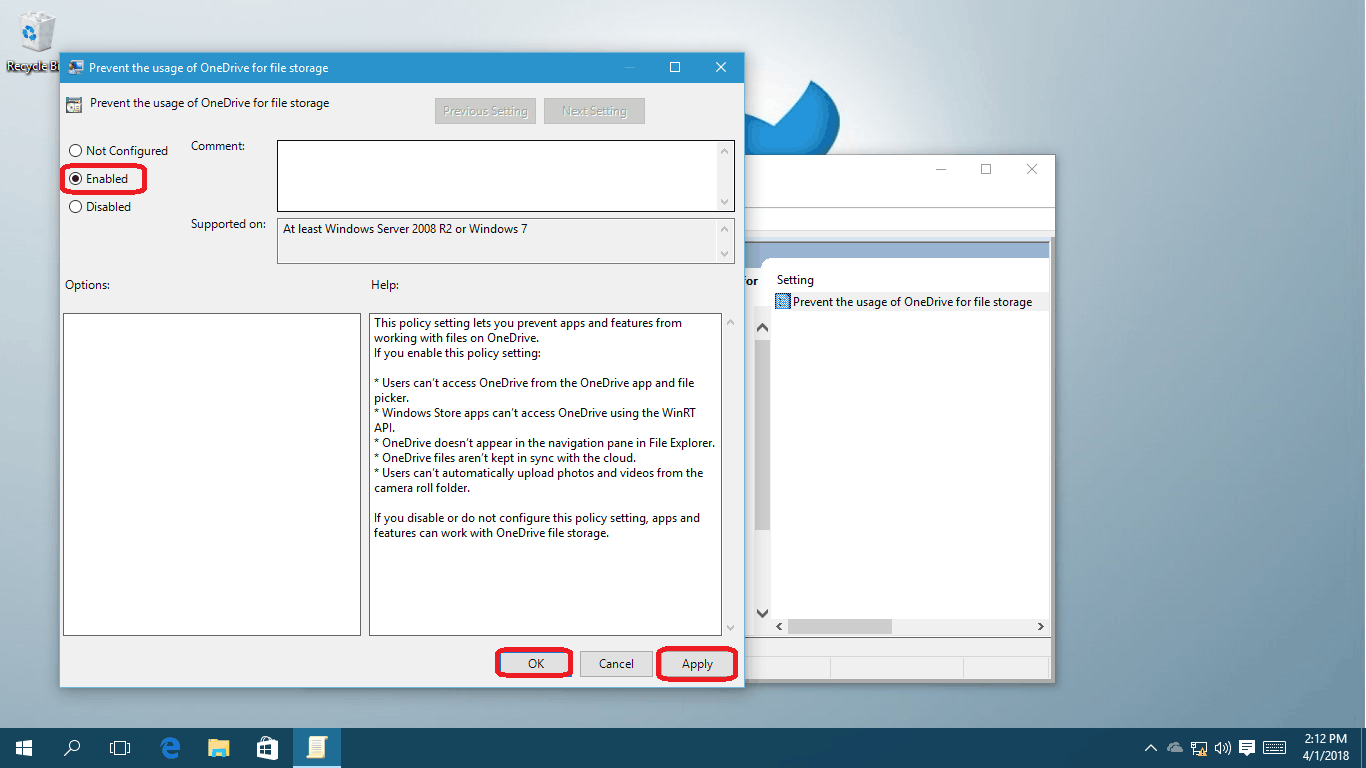
If you are using Windows 10 Pro, Enterprise or Education, then you will need to make sure it’s disabled at the group policy. Follow this steps:
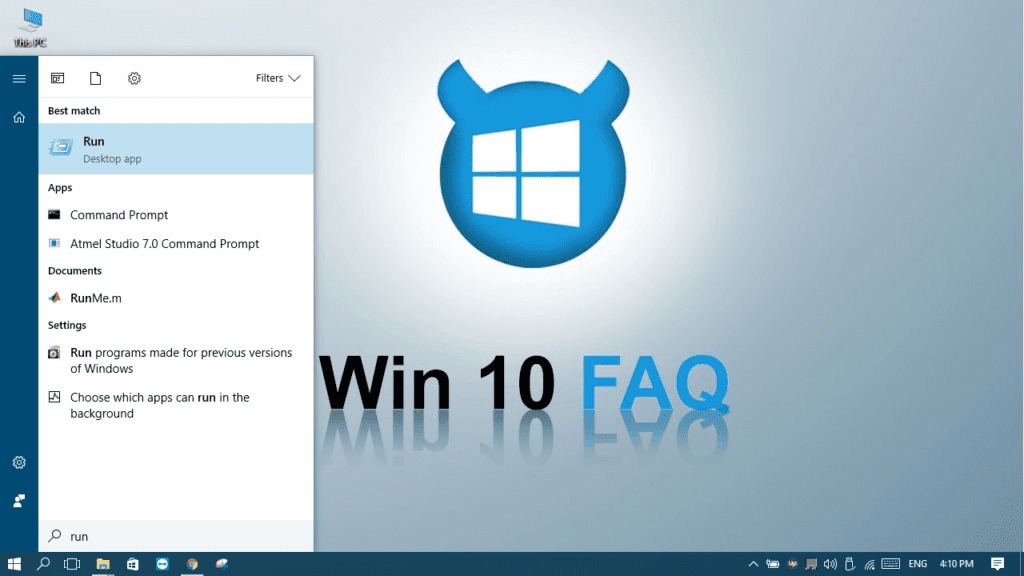
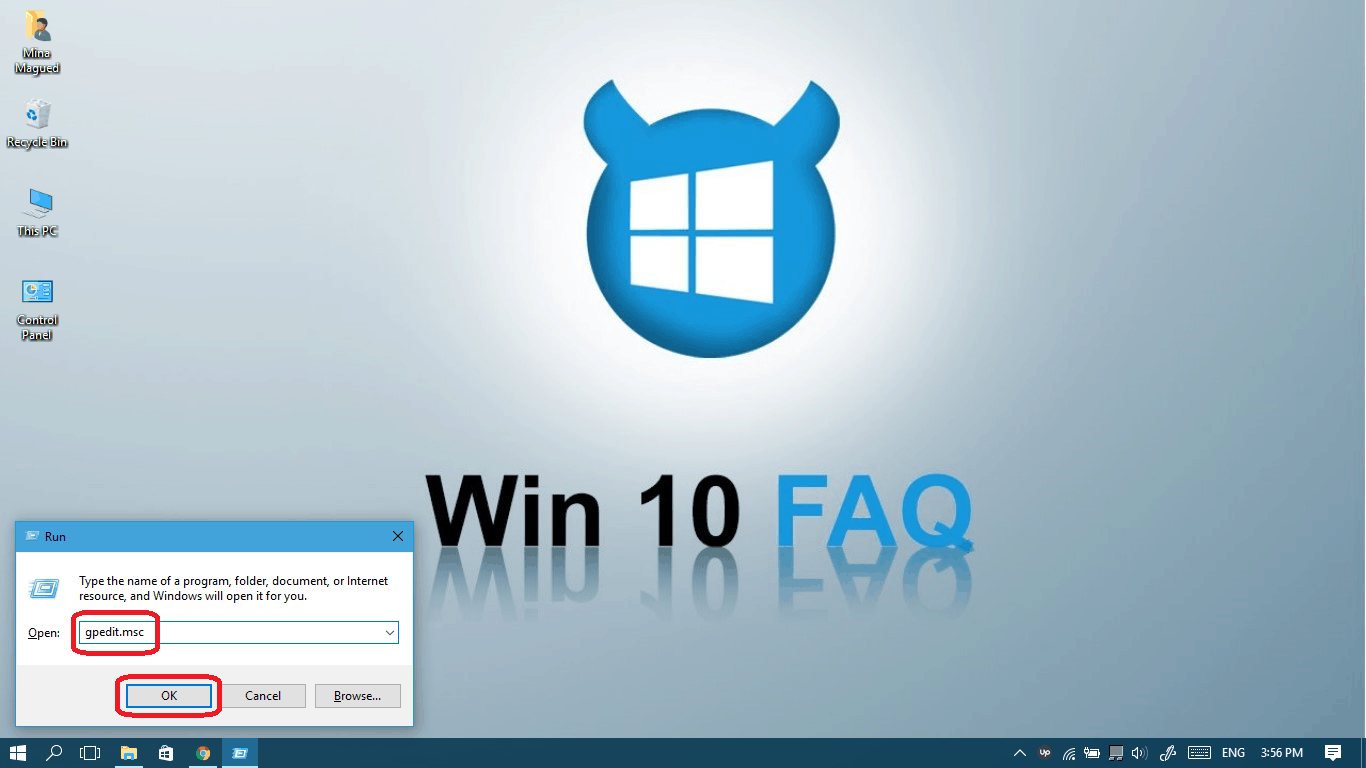
- Press the Windows key + R or type Run in your start menu and choose Run.
- Type “ gpedit.msc “ and click Ok.
- Navigate to this path: Computer Configuration > Administrative Templates > Windows Components > OneDrive and double-click on Prevent the usage of OneDrive for file storage.
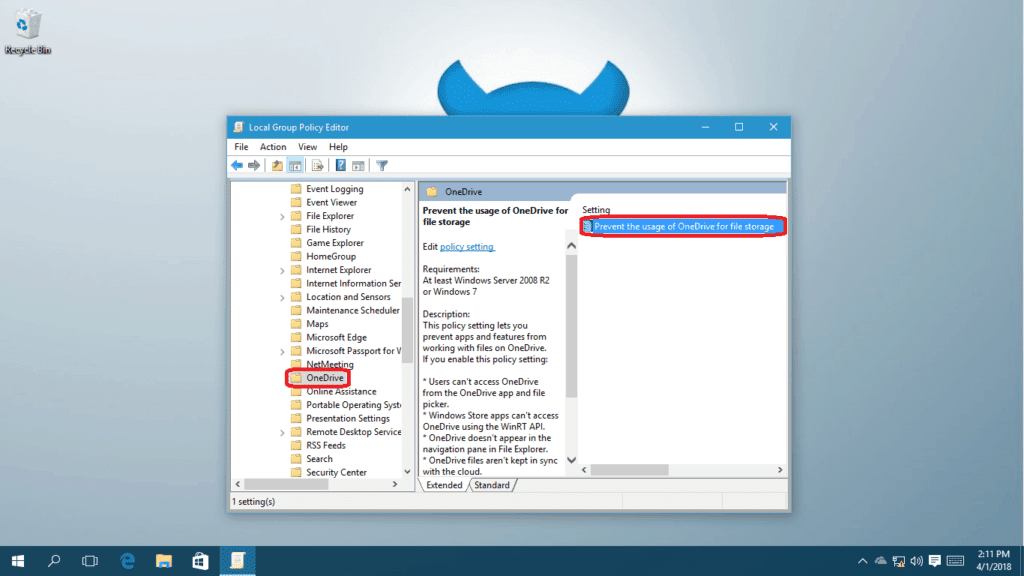
- In the dialog box that appeared, select the Enabled button then click Apply followed by Ok.
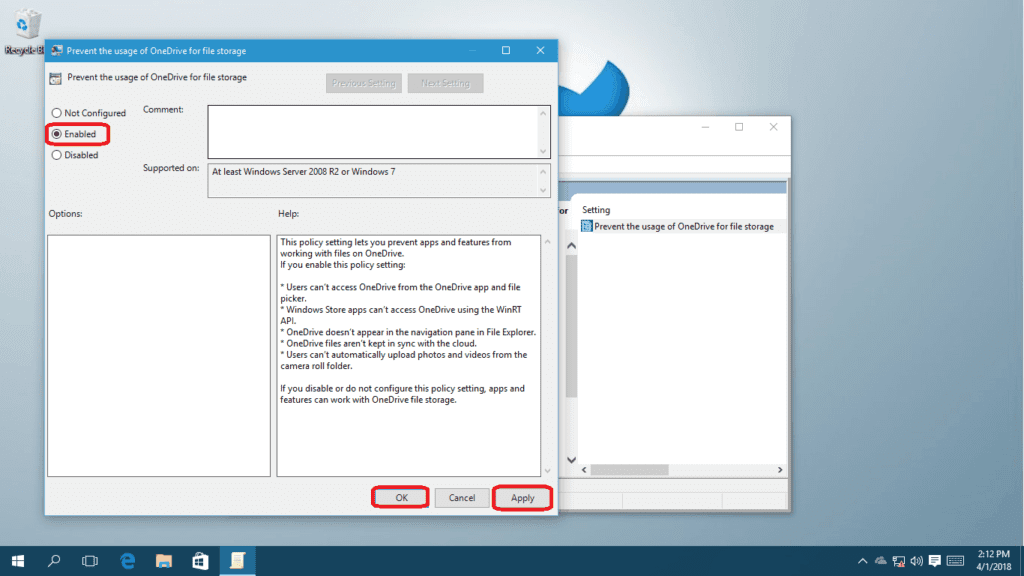
- Give the computer a restart now and you will see that OneDrive service is gone and so will your problem if OneDrive was the reason behind it.

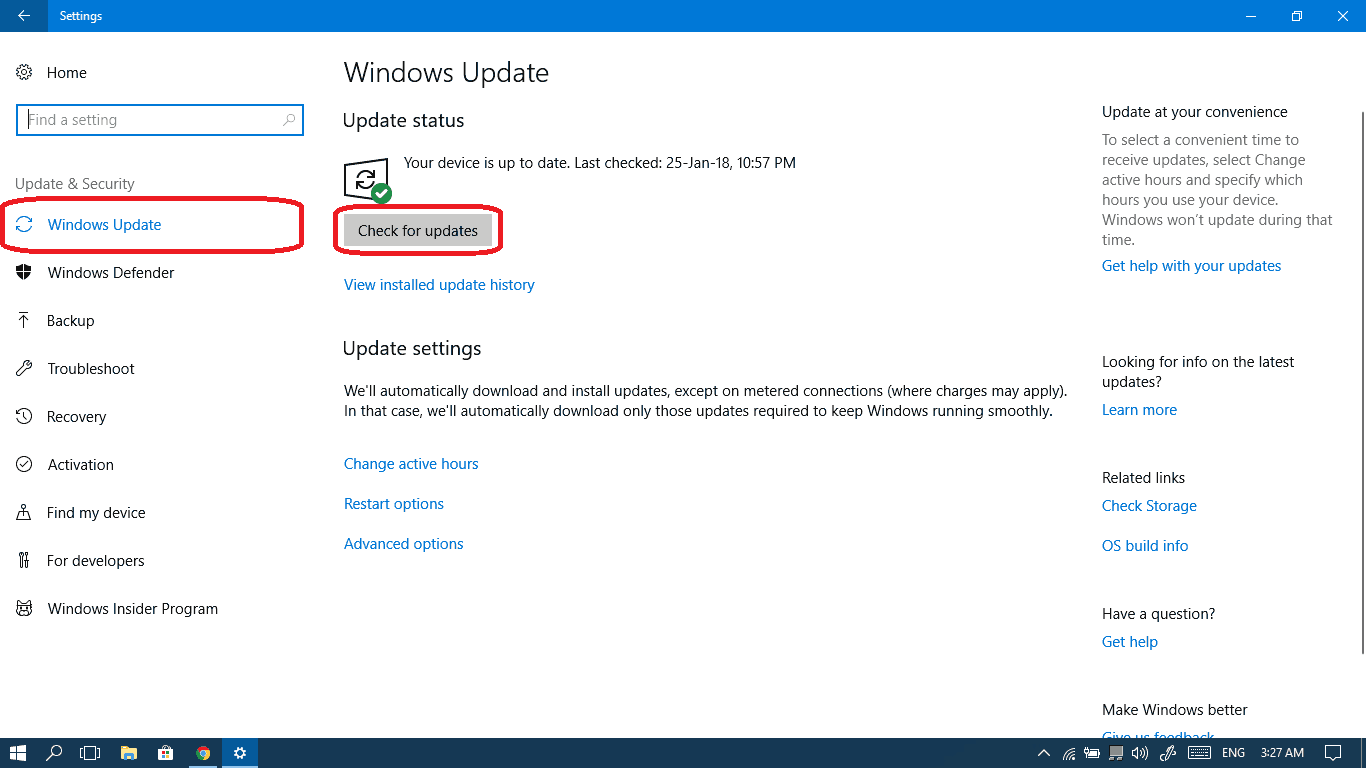
Method V: Update your Windows 10
As we were saying, the reason behind the error might be one of Windows 10 components like OneDrive or any other one component, and that includes the drivers for these components. So, one of the precautions we may take to prevent the Blue Screen is to check for Windows 10 updates. Follow these steps to keep your version up-to-date:
- Open Settings from your start menu.
- Click on Updates & Security.
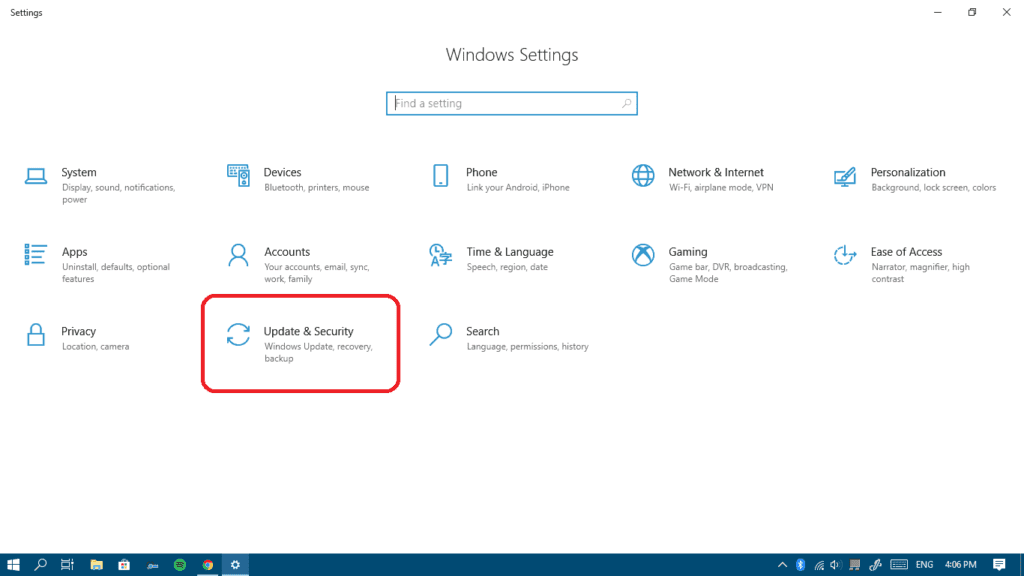
- Click on the Check for updates button: your computer will then check for, download and install any updates found.


If you want to know more about what new features you got with the latest update, here’s our friendly and up-to-date guide.
Method VI: Run a Hard Disk scan
This one is similar to the System scan (sfc) but it scans your hard drive for any problems and will fix them immediately. This is also a step that helped many so consider trying it even if you made a system scan already:
- Type “cmd” in your start menu, right-click on Command Prompt and choose Run as administrator.
- Click Yes to give it permission.
- Type the following command then press enter:
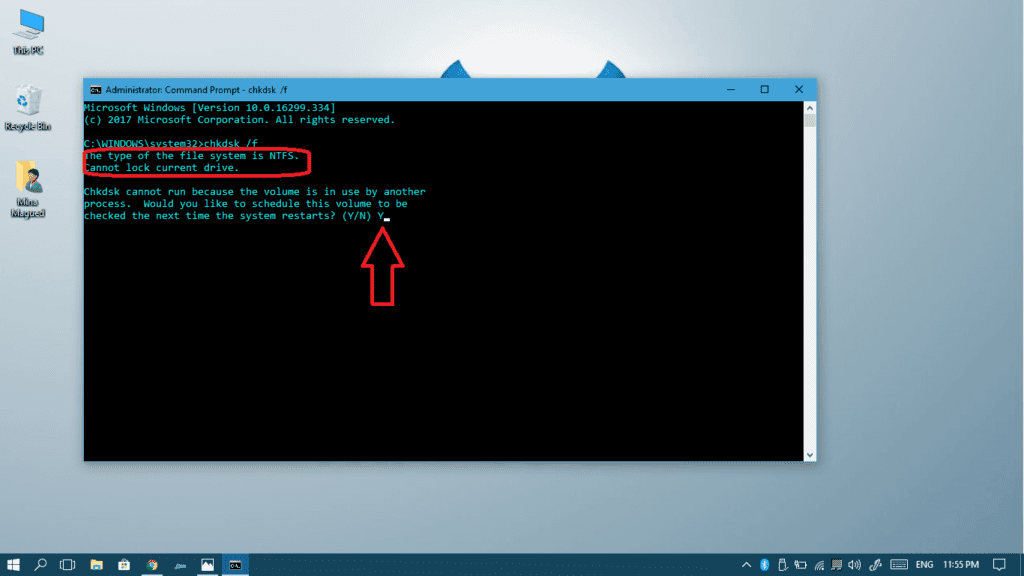
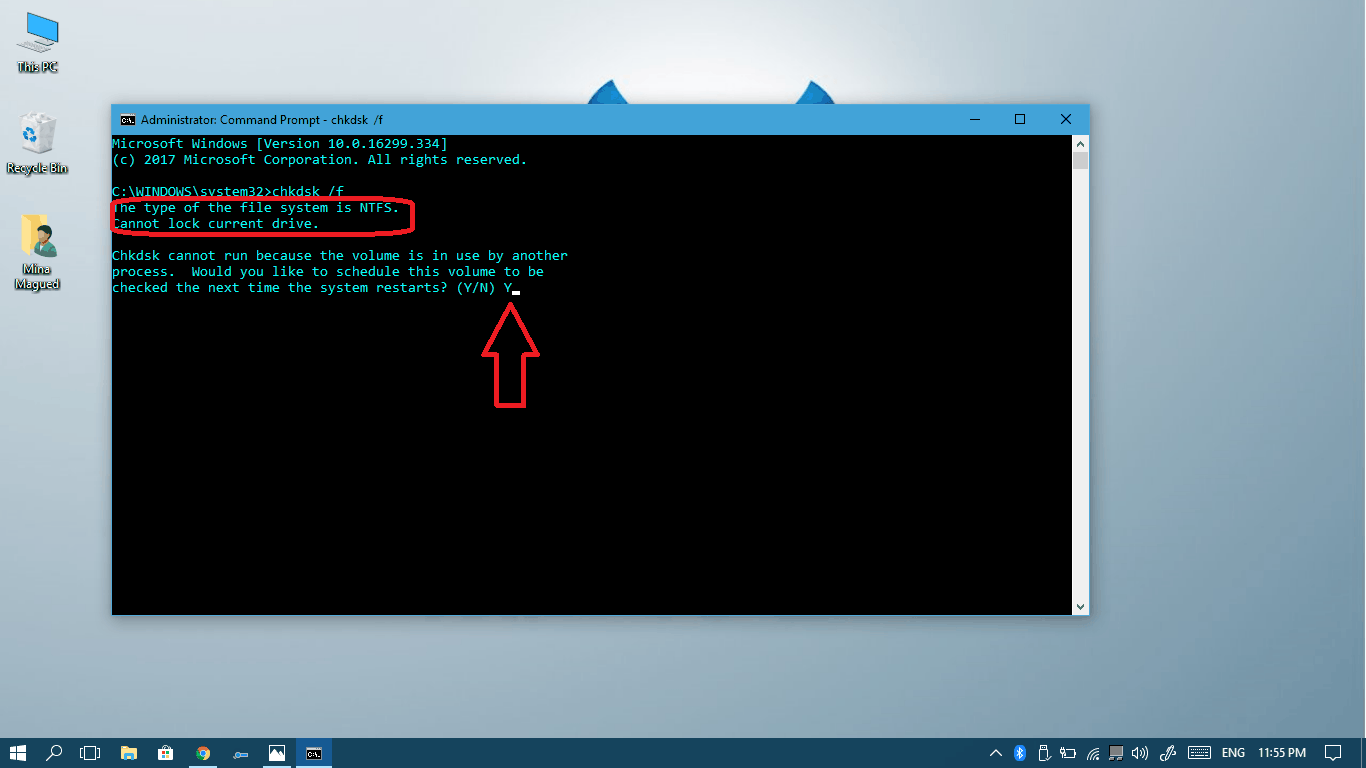
chkdsk /f
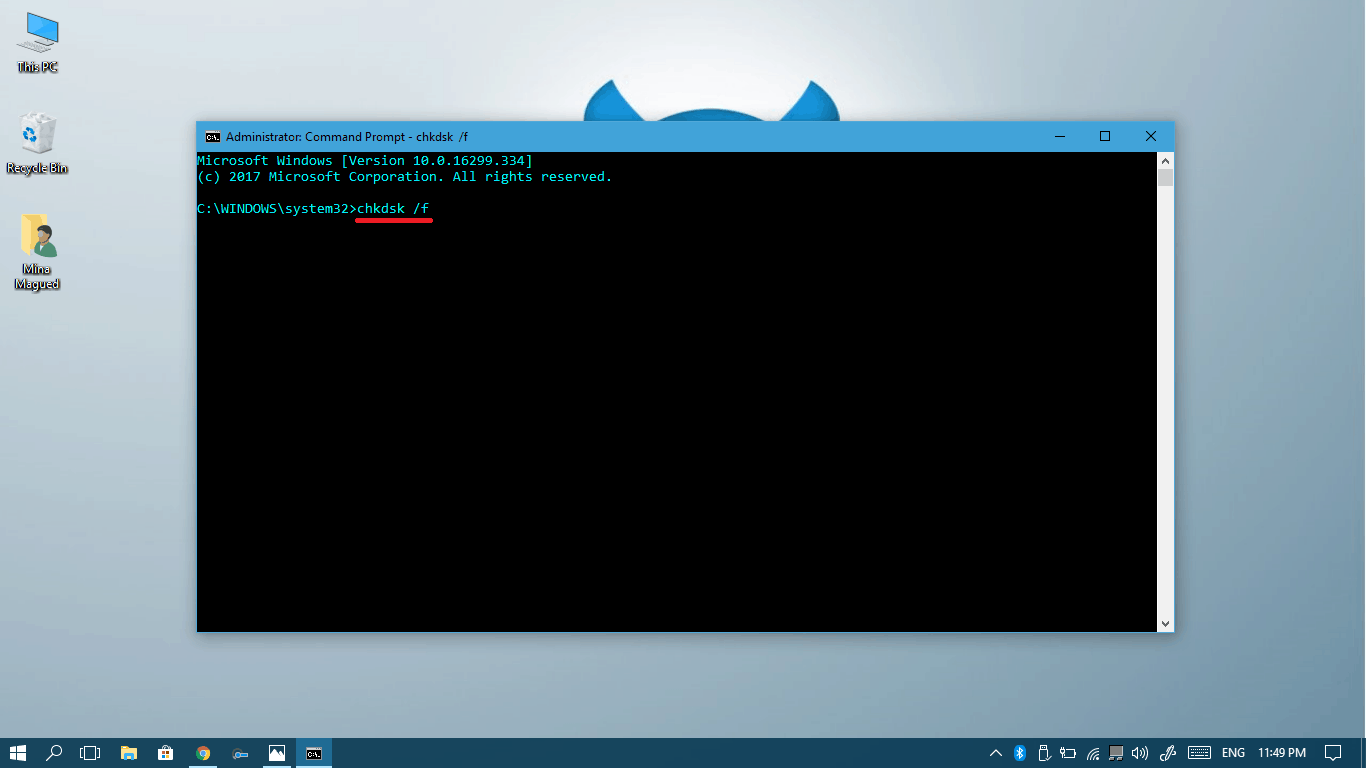
(make sure you put a space between “chkdsk” and “/f”)
- Wait until the scanning and the fixing are done and that’s when you should restart your computer and see if you still encounter the Blue screen.
- If you get a problem performing a disk check like this one, then your Hard Drive is busy right now and can’t be checked and it’s better that you do it after a clear restart. To do that, you can type Y then hit enter, and your computer will run this scan right after the next restart automatically (see image).
Method VII: Free some space and clean temporary files
Your computer’s performance will be really affected if you have a little free space in your Windows installation directory (it’s C: drive by default). So, if you have any important files stored in it (here’s a hint: check your Desktop and Downloads folder) please move them to another drive or maybe to an external storage device.
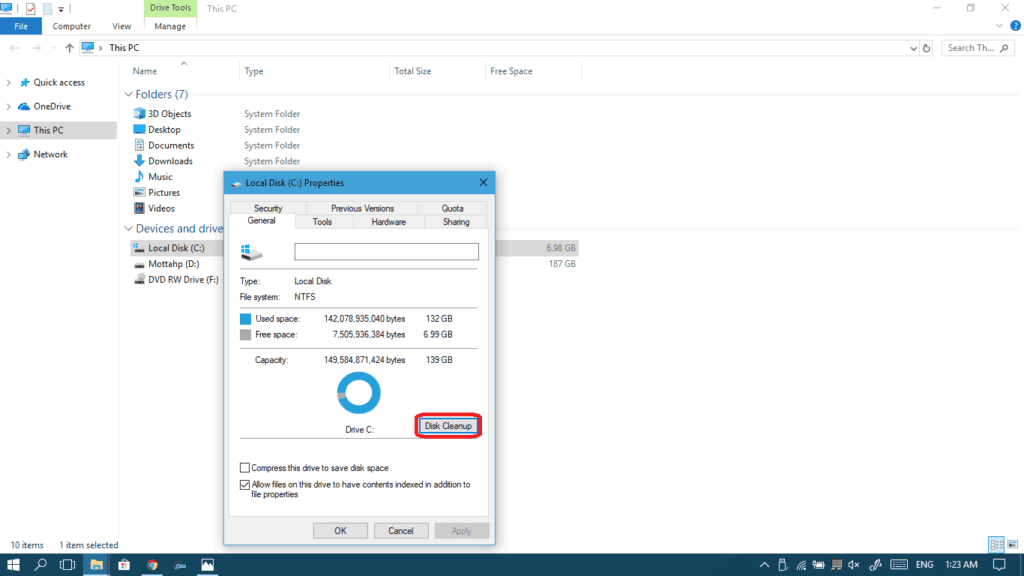
- Open the This PC page where all your drives lie, right-click on your C: drive and choose Properties.

- Click the Disk cleanup button.
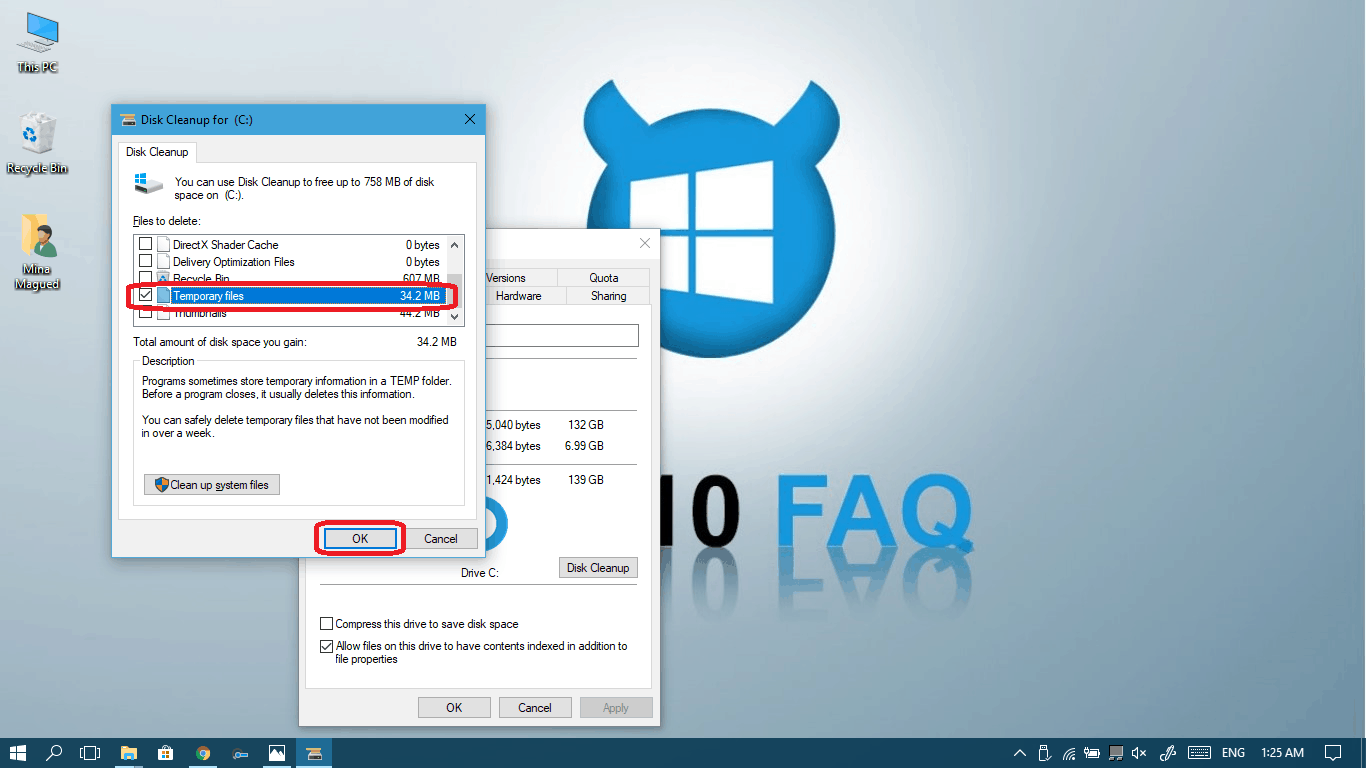
- Select only Temporary files and Old Windows files if found then click Ok.

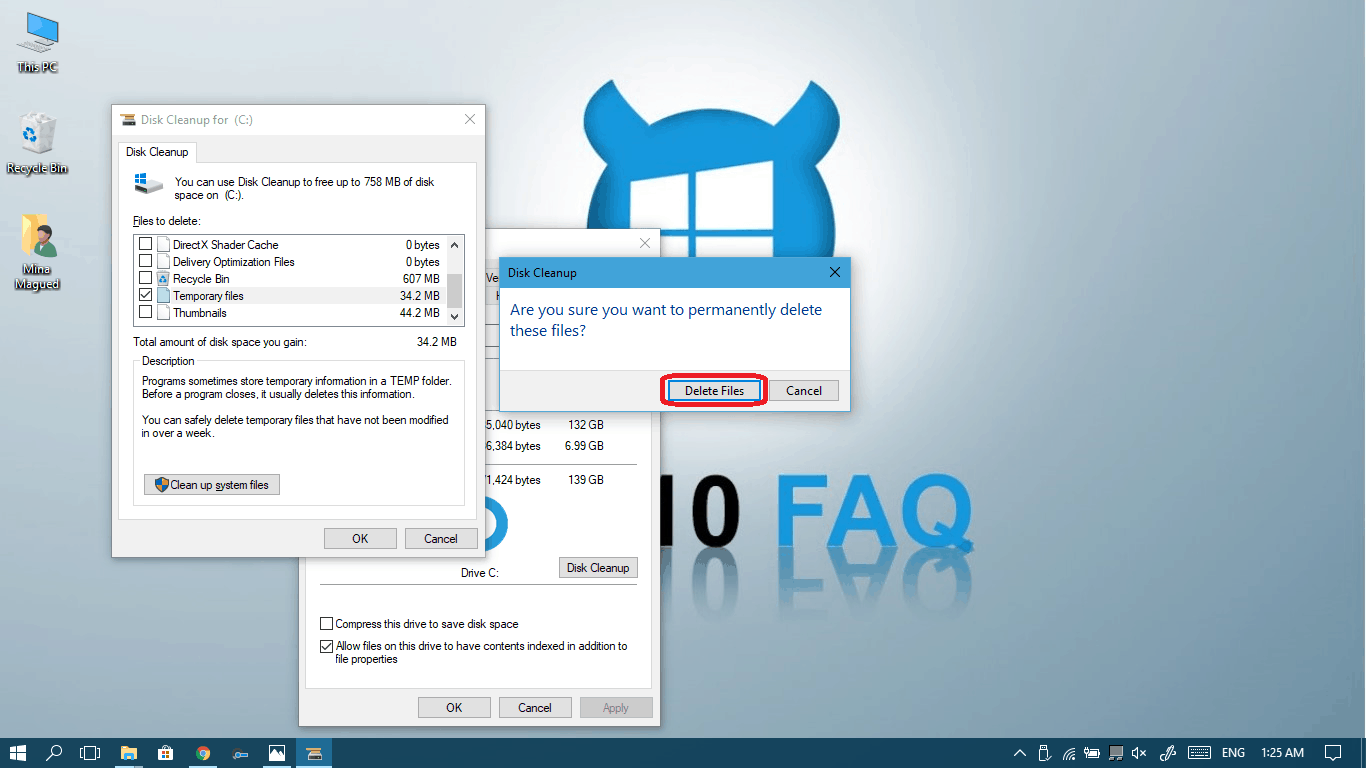
- Click Delete files to begin the cleaning process.

- Now reboot your computer.


Method VIII: Update your drivers
If all the previous solutions didn’t work for you, don’t lost faith – try this one. We’ve got a guide on how to update and fix your drivers so take a look at it.
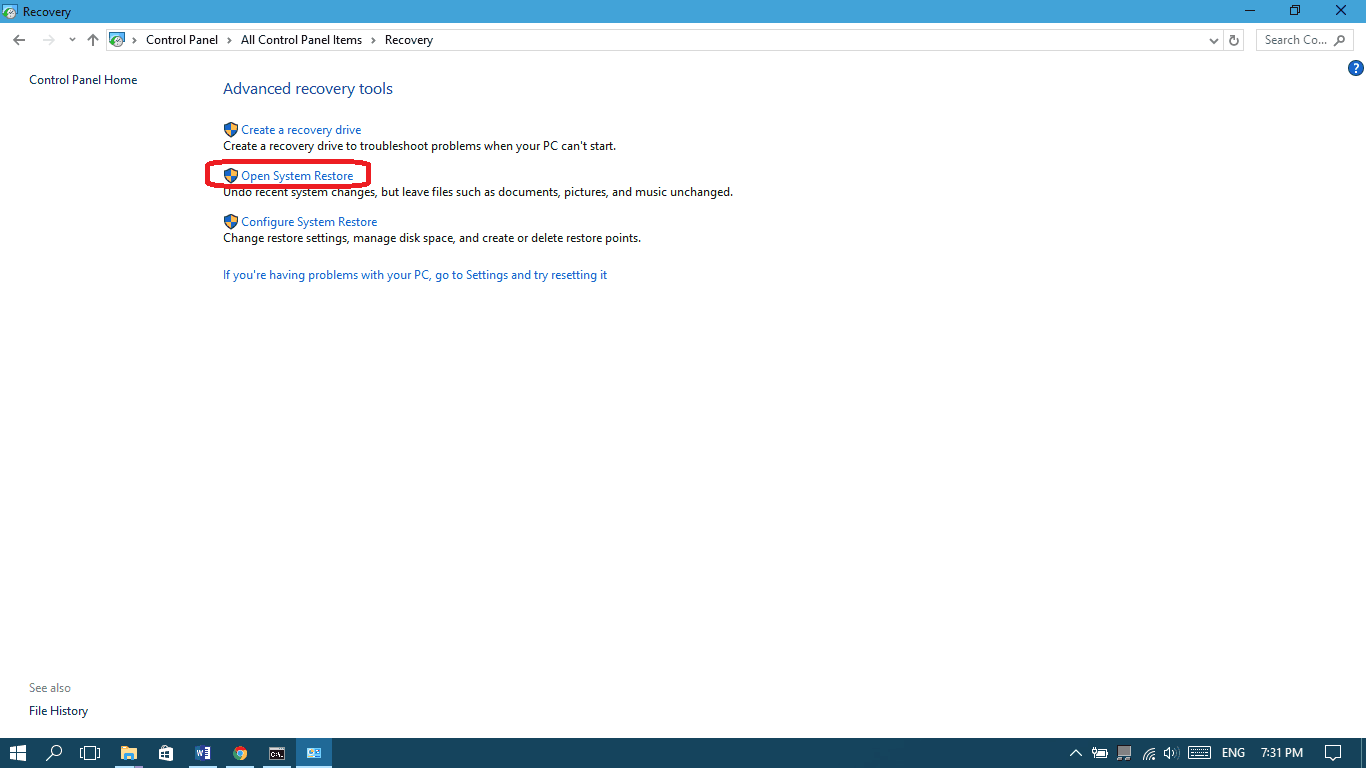
Method IX: Restore your computer to a previous point
This will bring back your computer to a previous state which may help avoid any error that happened recently:
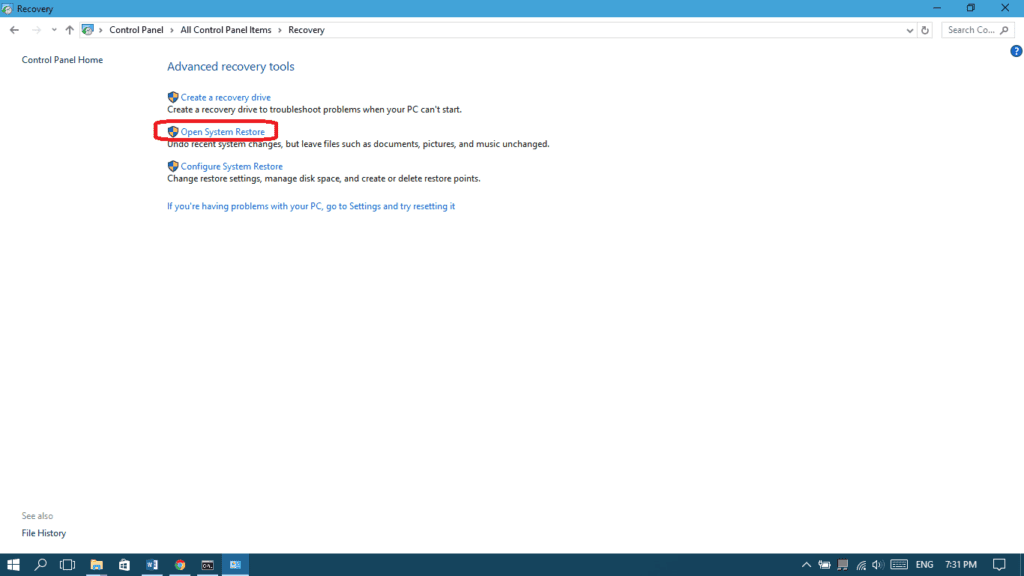
- Open Control Panel and search for recovery.
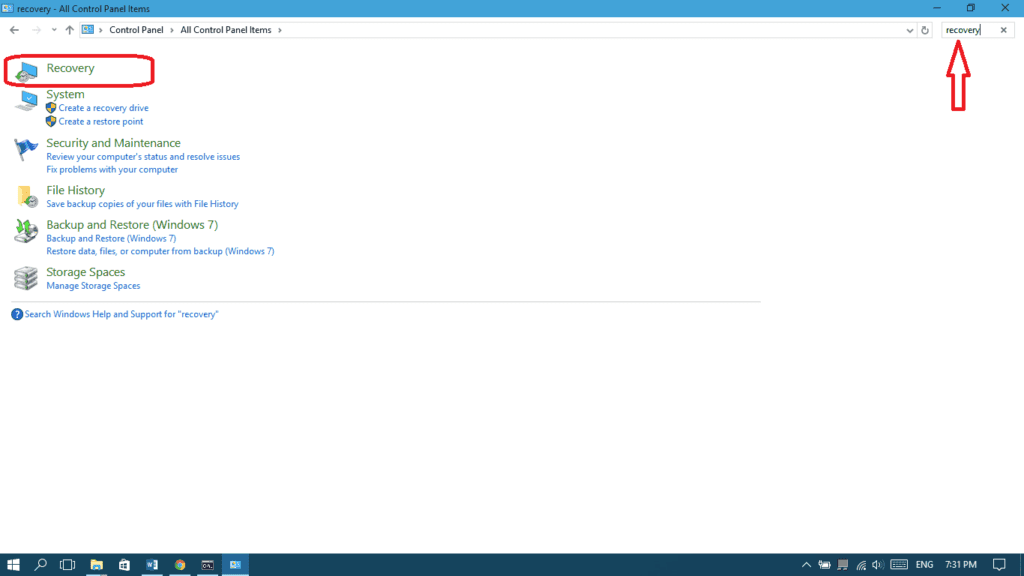
- Open System restore.
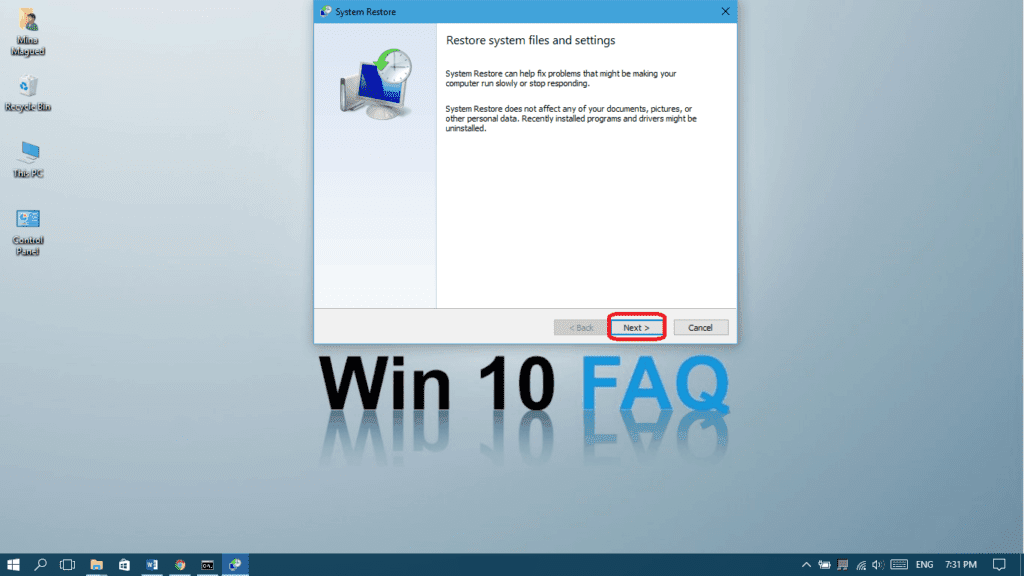
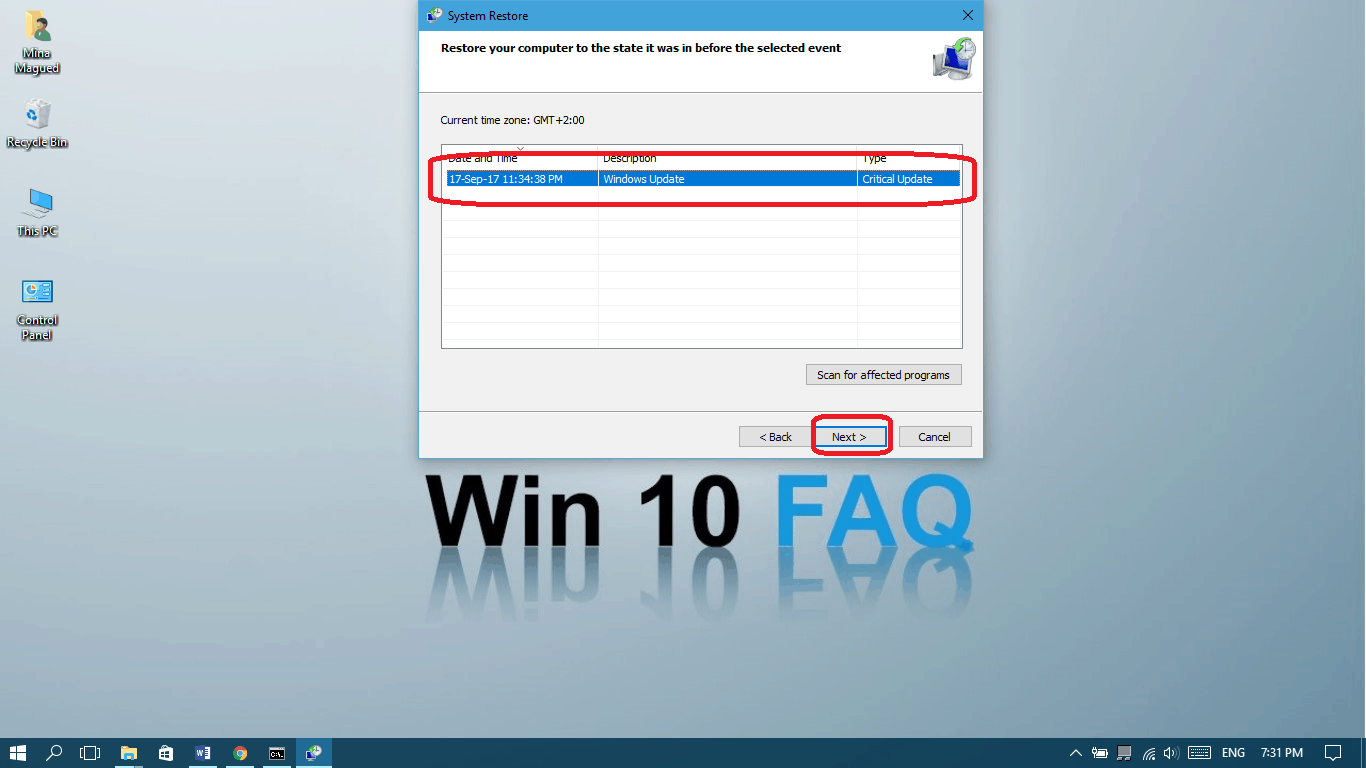
- Click Next.
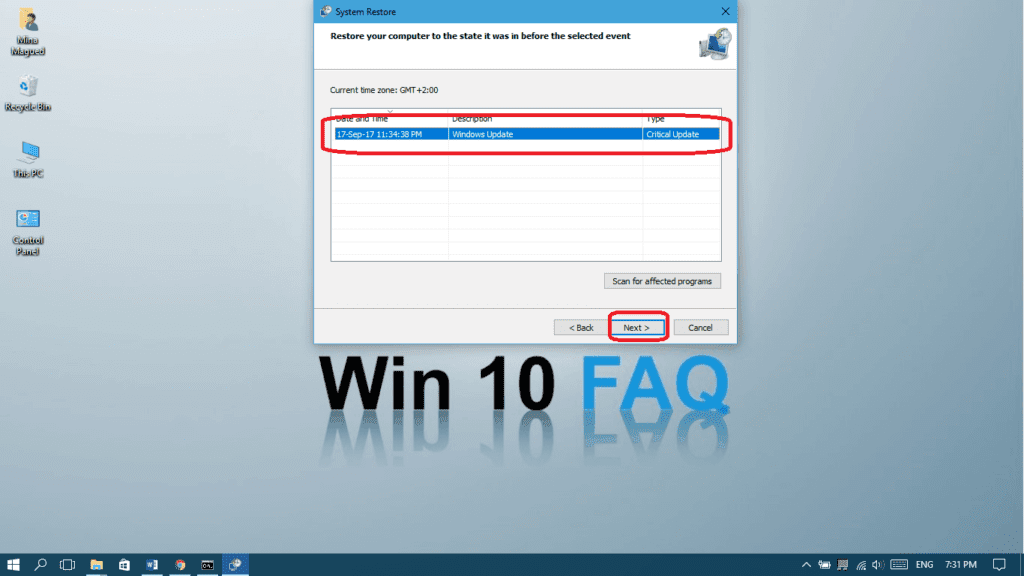
- Choose a previous restore point and click Next.
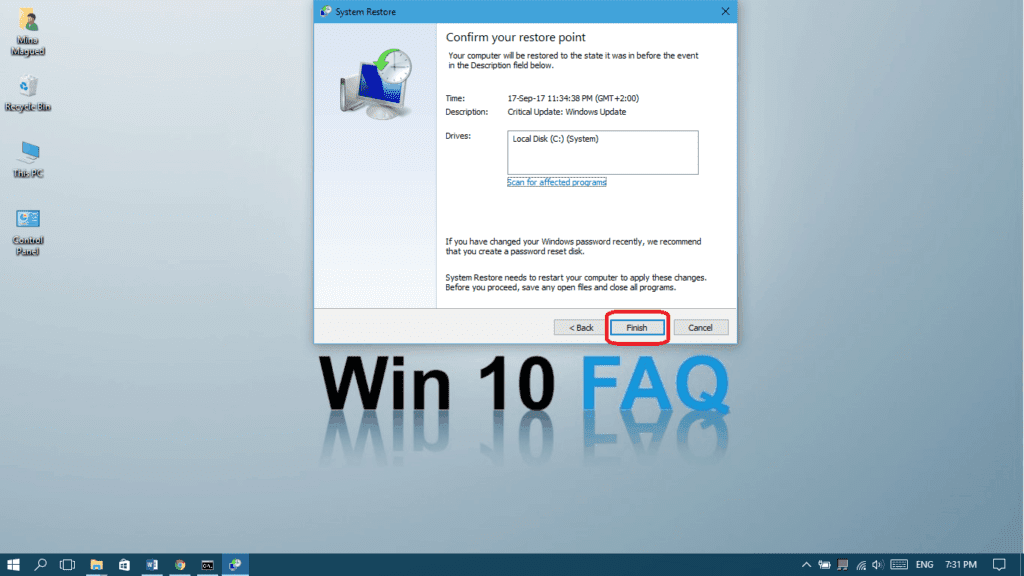
- Click Finish.


Method X: Perform a clean installation of Windows 10
Nothing worked? Yeah, re-installing Windows can suck sometimes. But a fresh installation of Windows 10 may enhance your experience in case yours is severely damaged. Head to Microsoft’s website to download the final version of Windows 10 and install it on your computer. It’s right here.