And today’s error is “VCRUNTIME140.dll is missing”. This is the reason why you are here and we have worked on solving it to help you. But first, read this if you want to know more about what a DLL file even is.
Quick Jump
- What’s a DLL file?
- Method 1: Run System File Scan
- Method 2: Repair Microsoft Visual C++ Redistributable
- Method 3: Reinstall Microsoft Visual C++ Redistributable
- Method 4: Download and place the missing DLL file yourself
What’s a DLL file?
DLL stands for Dynamic Link Library, these kind of files have useful instructions that other programs need to call to all the time. Most of the programs you install and the games you play on your Windows computer are in need of DLLs. If they wanted to make a whole independent program or a computer game that needs no help from these Windows resources, the size of any of them would have been double. That’s why every Microsoft Windows has a huge library of DLL files to help those third party apps and games.
Now let’s talk about our problem!
We are targeting one DLL file that sometimes causes panic, it’s the VCRUNTIME140.dll. It is possible that your program can’t start because VCRUNTIME140.dll is missing. This file gets missing when your computer fails to update one of its components: its Microsoft Visual C++ Redistributable. But it’s okay, we have plenty of methods that will help you recover this DLL file.
Note that during the fixing process, you will have to know whether you are running Windows 10 32-bit or 64-bit, we have a full guide that will help you get this piece of information:
How do I find out if my Windows 10 is 32-bit or 64-bit
Method 1: Run System File Scan
As I always say in my guides, this is the first shelter from the rain. This incredible tool starts scanning your system files and fixes whatever needs to be fixed. I really can’t tell how many times this helped to fix my problems but believe me it’s a huge number. Here’s how to do it:
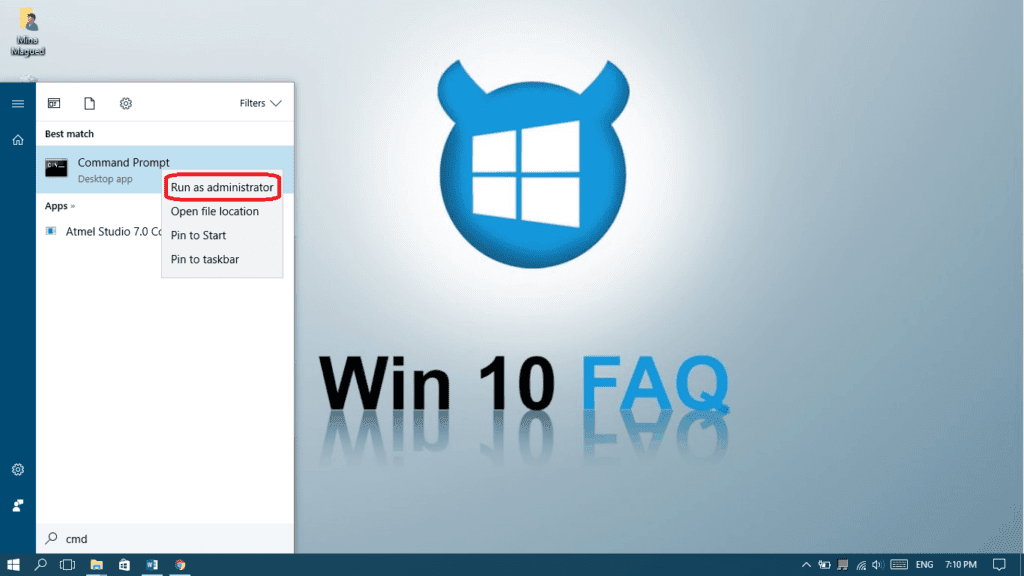
- Type “cmd” in your start menu, right-click on Command Prompt and choose Run as administrator.
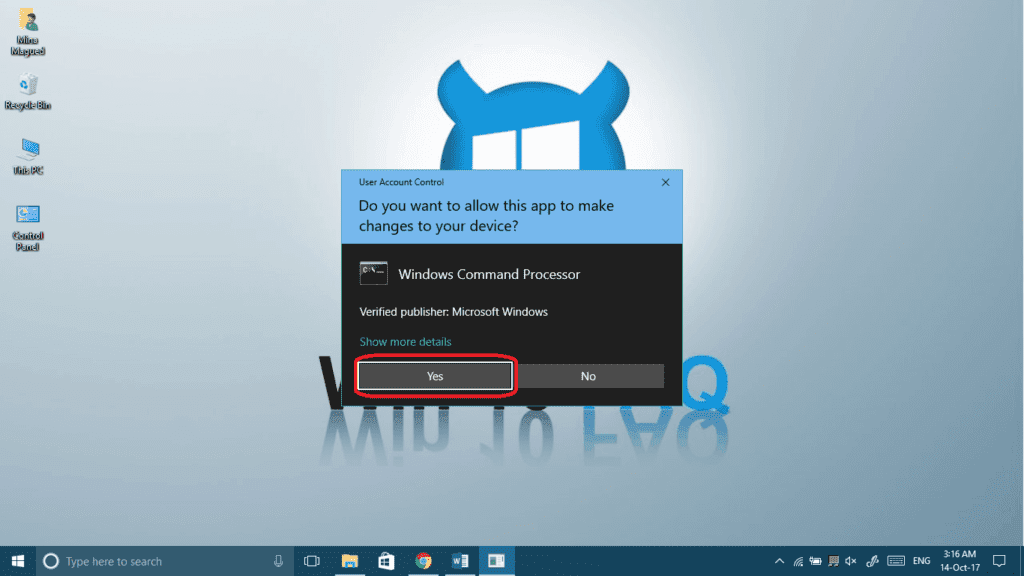
- Click Yes to give it permission.
- Type the following command then press enter:
sfc /scannow
- (make sure you put a space between “sfc” and “/scannow”)
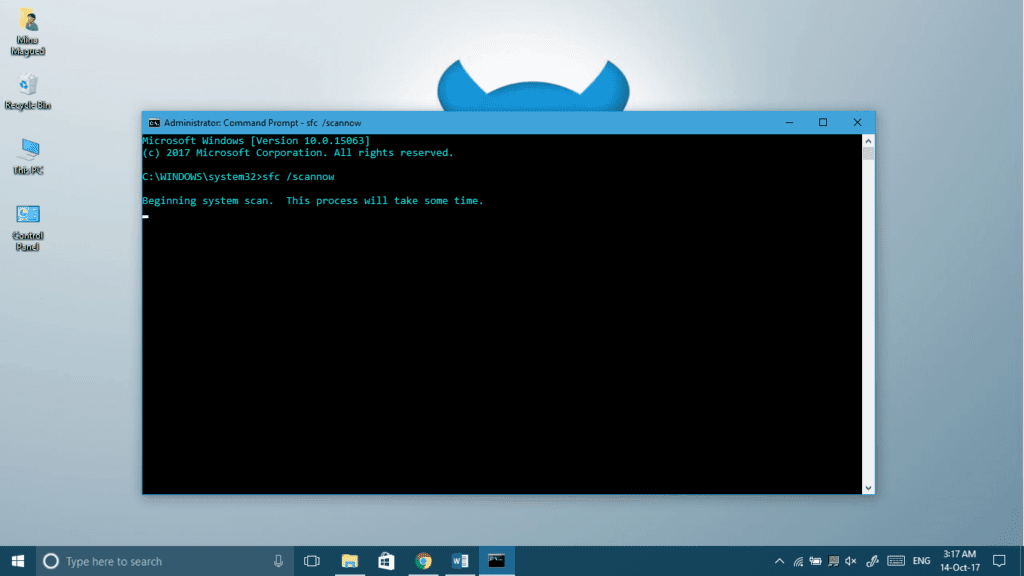
- Wait until the scanning and the fixing are done and that’s when you should restart your computer and see if the problem is solved. Isn’t it? No problem, just go ahead and try the following method.

Method 2: Repair Microsoft Visual C++ Redistributable
We will begin by repairing the Microsoft Visual C++ ourselves and see if this fixes the problem. If it doesn’t, we will be reinstalling it from scratch.
- Press your Windows logo Key + R to launch your Run app and then type control panel then press Enter or click Ok.
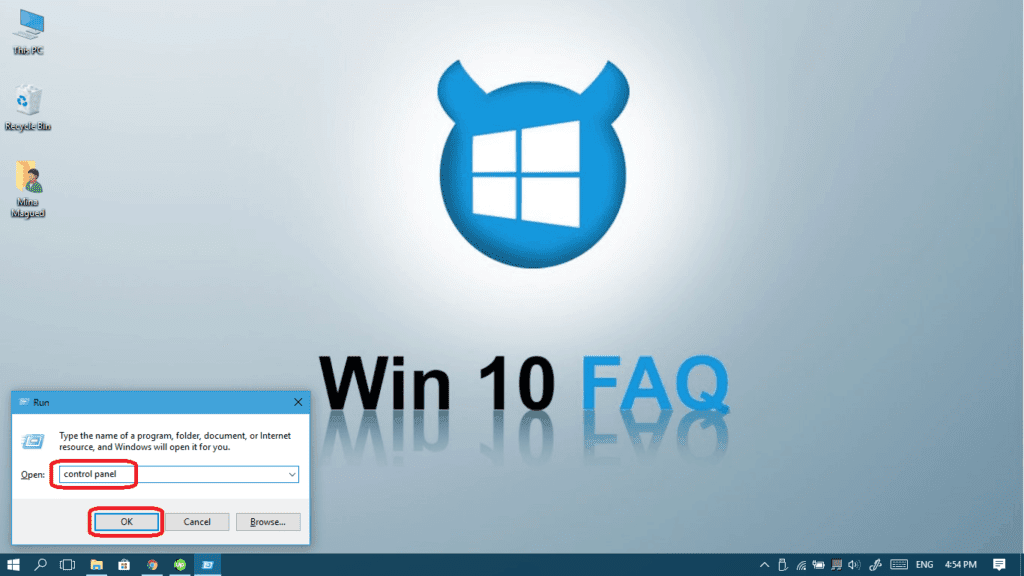
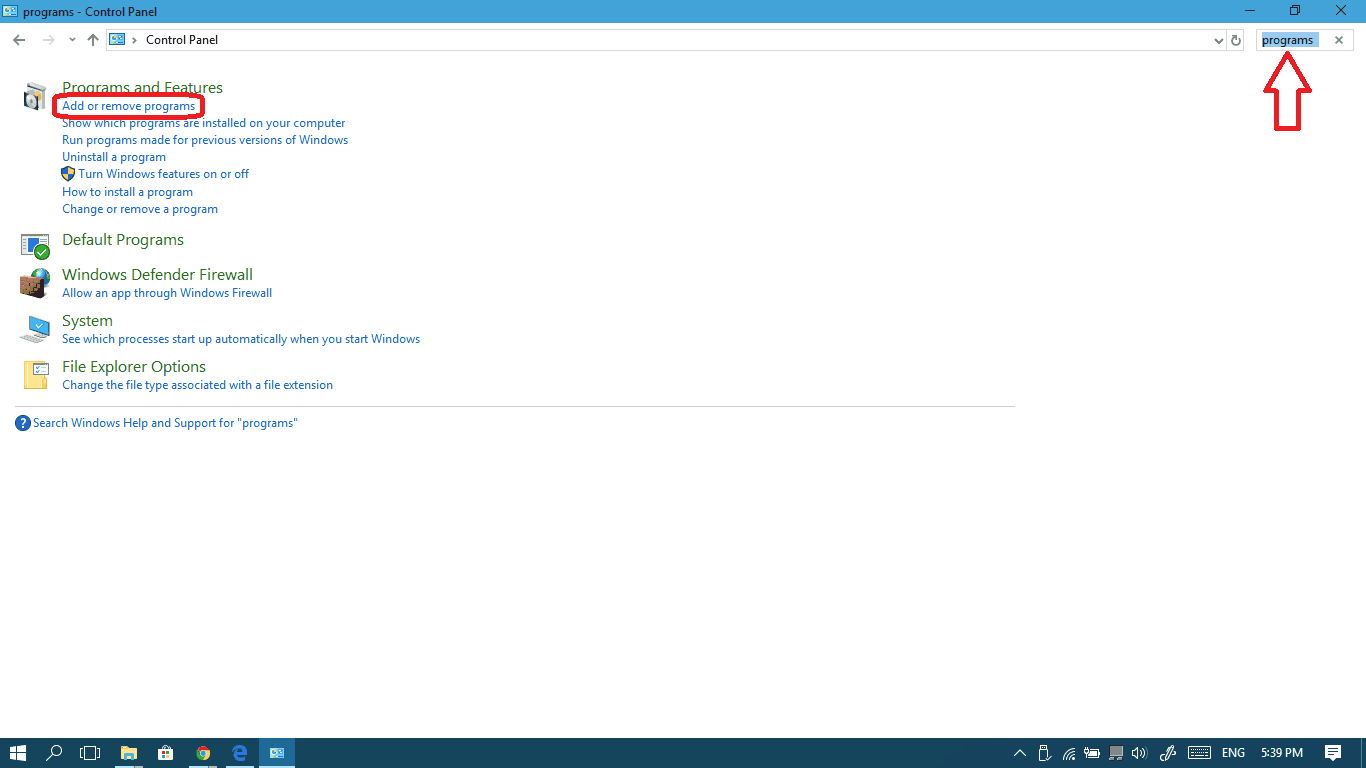
- Search for programs and then click on Add or remove programs.

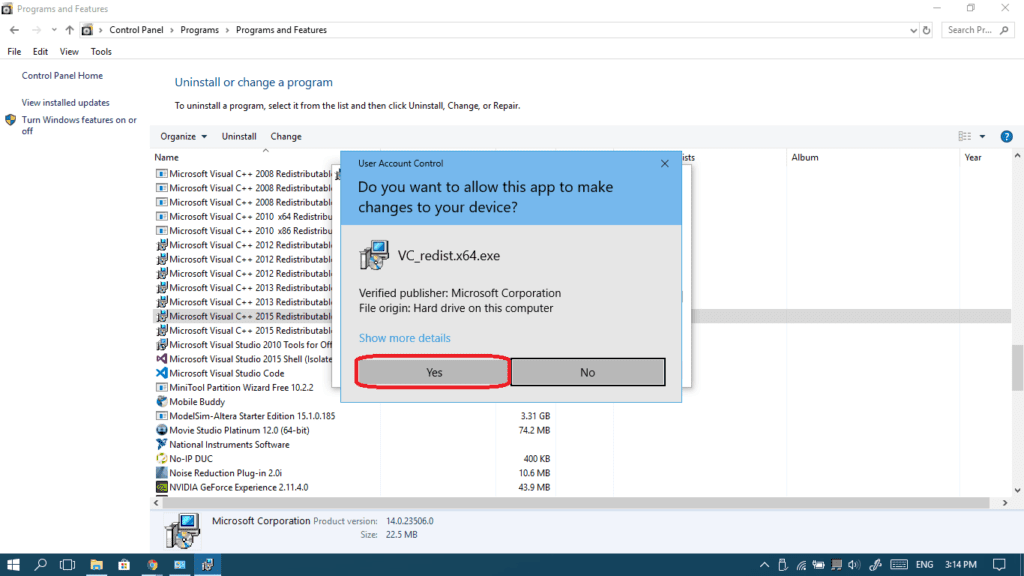
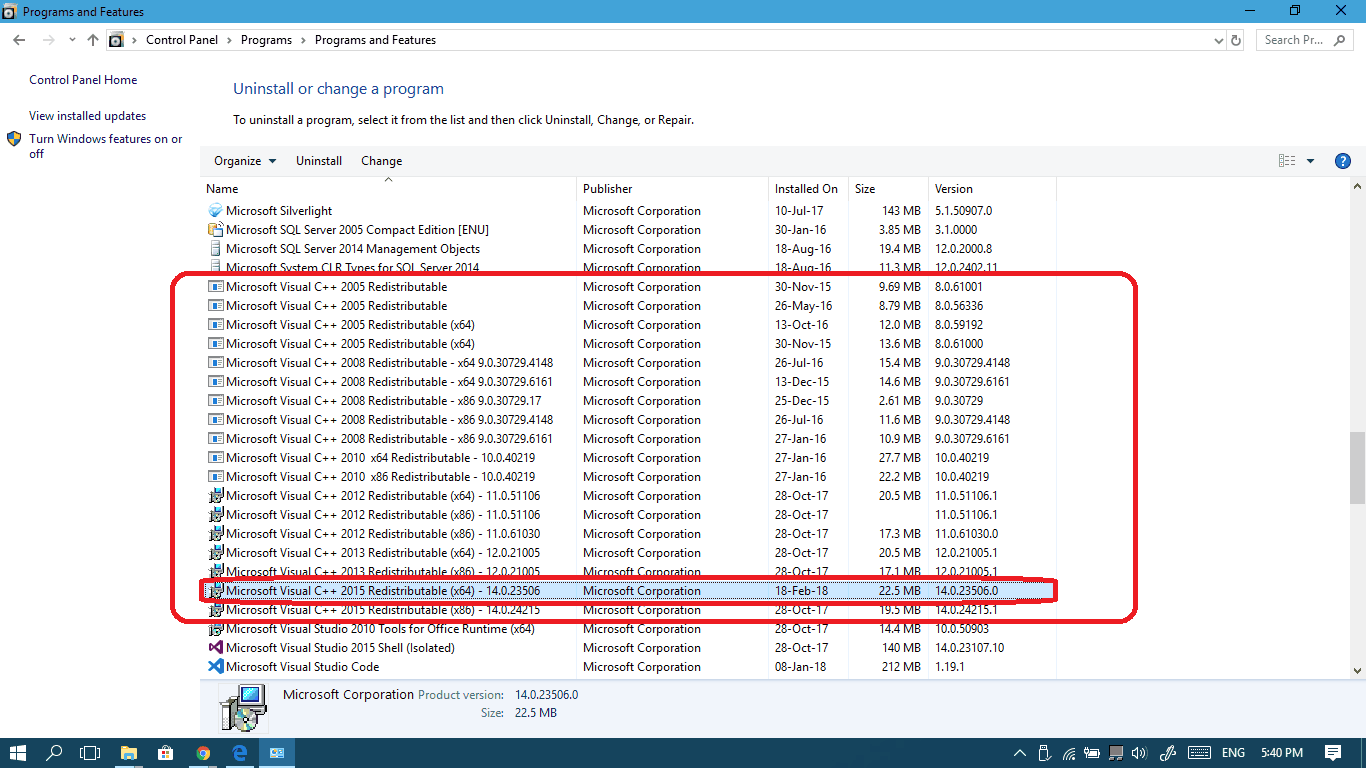
- Now, you will have to click on every Microsoft Visual C++ XXXX Redistributable you have and then click Change (I have plenty of those … 2005, 2008, 2010, 2012, 2013 and 2015). You have to start with the latest one first (2015) with the Windows version you got (x86 for 32-bit or x64 for 64-bit) and see if it works.

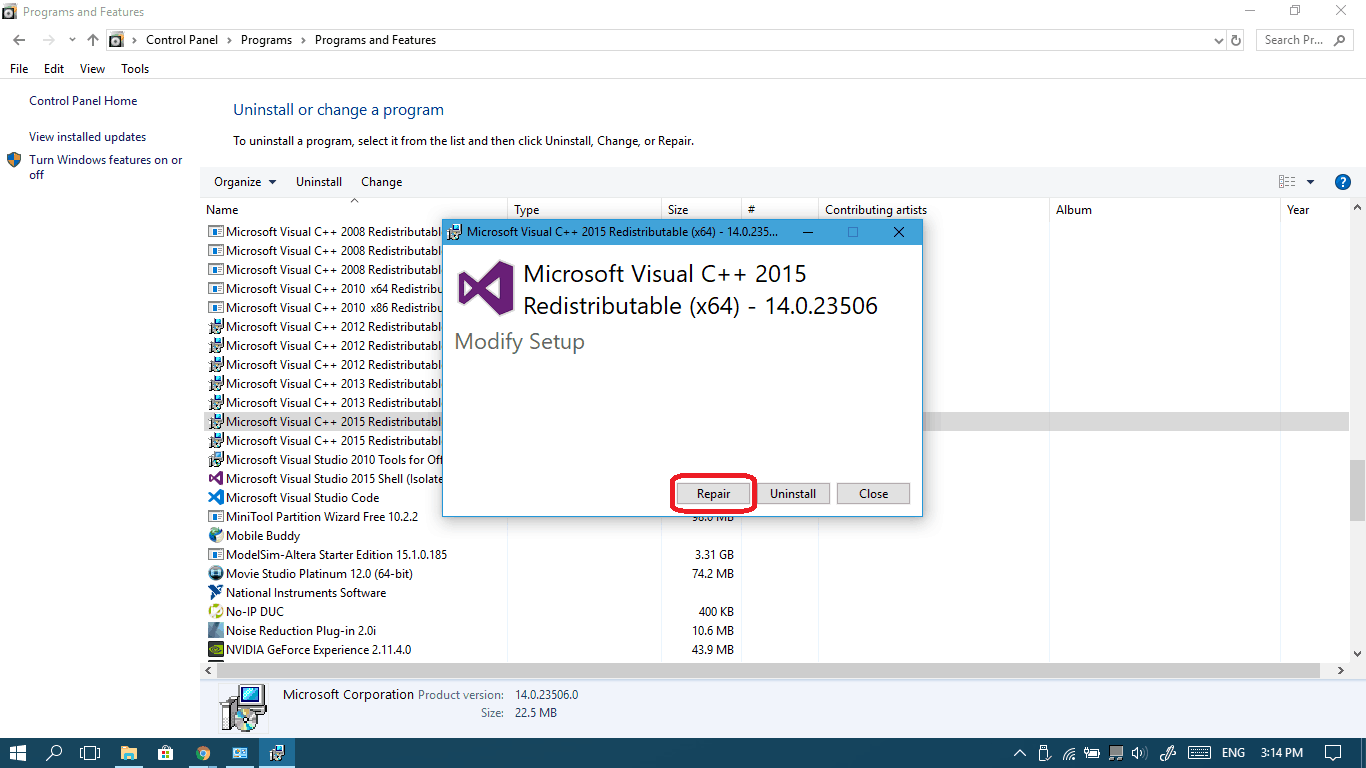
- Now, click Repair.

- Click Yes to give it permissions.
- Wait until the repair process ends and then you can click the Close button.
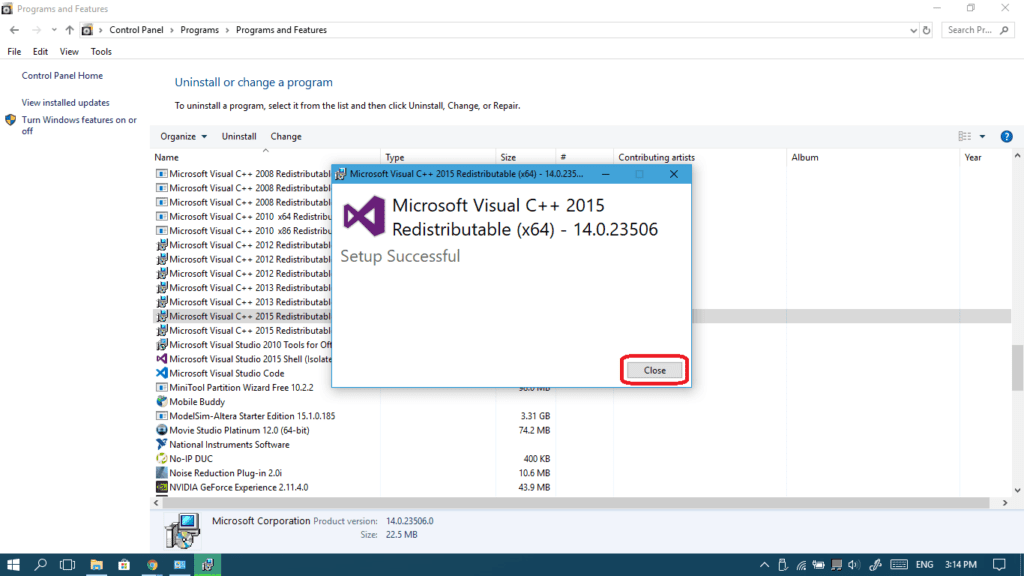
- Now restart your computer and see if the error message is gone.


Method 3: Reinstall Microsoft Visual C++ Redistributable
If you didn’t get any success with the last method, let’s just make a new beginning by reinstalling Microsoft Visual c++ Redistributable. Here’s how we do it:
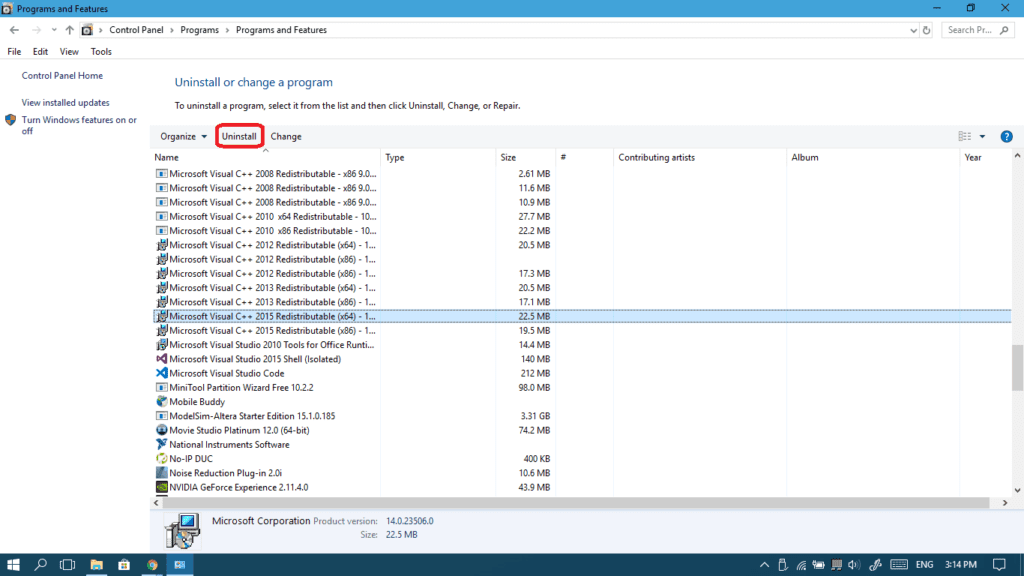
- Before you reinstall it, you actually need to uninstall all previous versions from your computer. You can do this by clicking on the Uninstall button in your Programs and Features page (Do this for all the versions from all the different years).
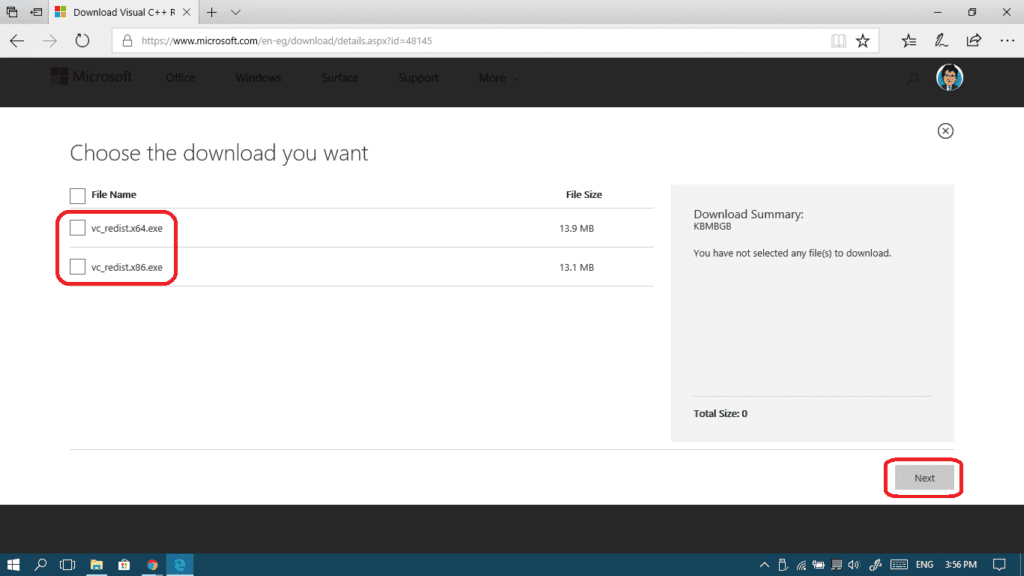
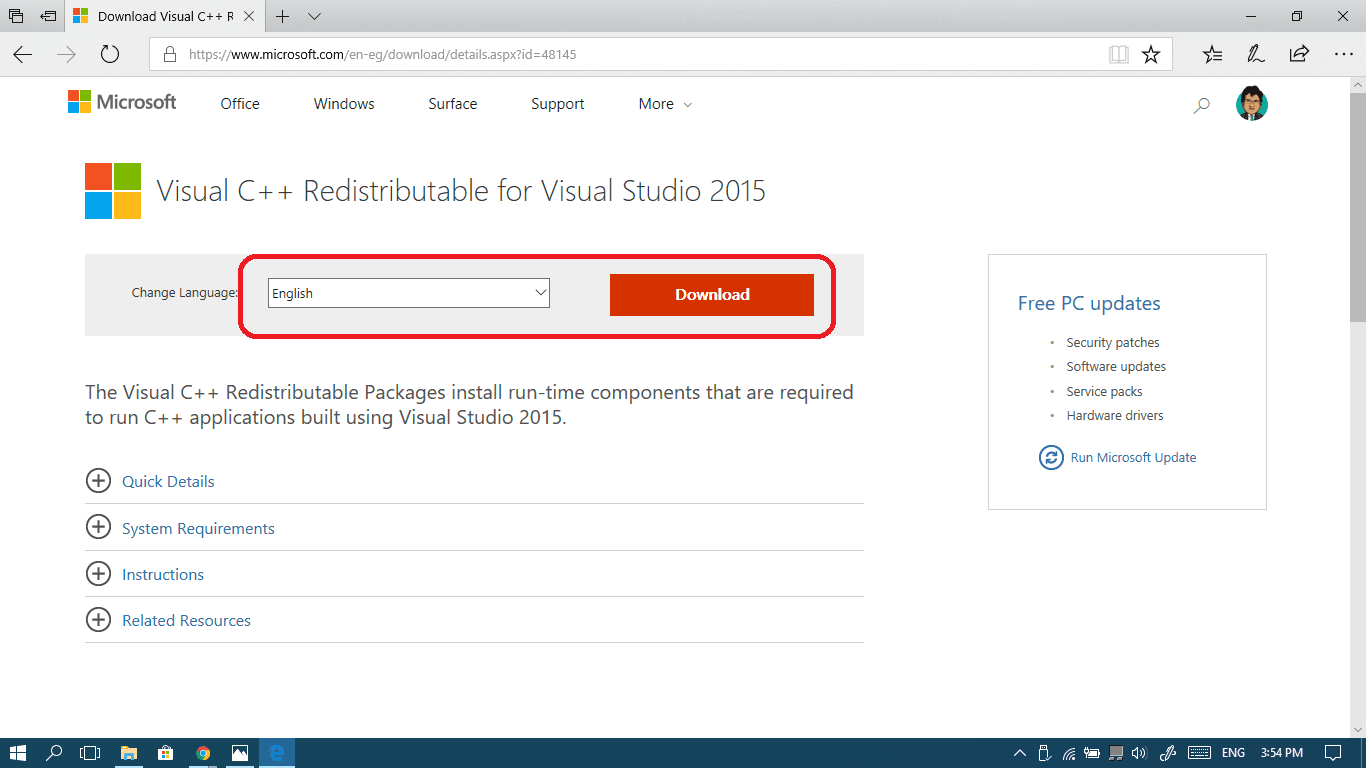
- Now go to https://www.microsoft.com/en-eg/download/details.aspx?id=48145 where you will have to choose your language from the list and then click Download.

- Check the file you need to download based on your Windows version and then click Next (if you don’t know whether your Windows is 32 or 64 bit, check this guide):
- vc_redist.x64.exe is for 64-bit.
- vc_redist.x86.exe is for 32-bit.
- Now launch the setup file once downloaded by double clicking on it.
- Check the I agree to the license terms and conditions checkbox and then click Install.
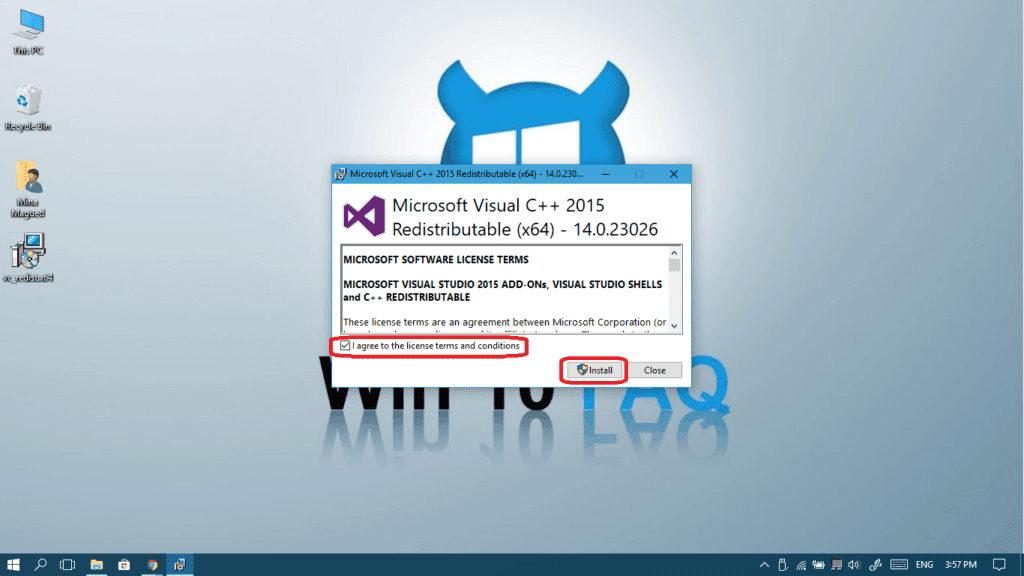
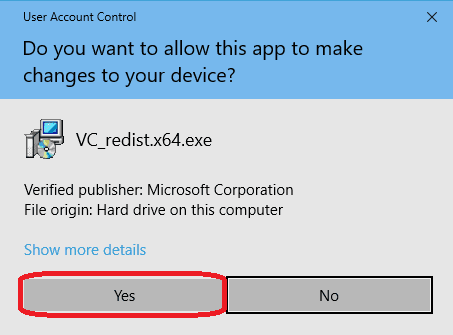
- Click Yes to give it permissions and proceed with the installation.
- Now once the installation is done, make sure you restart your computer so that the changes can take effect.


Method 4: Download and place the missing DLL file yourself
I would only recommend this solution as the final solution. I repeat, don’t go through this unless the past three methods failed you. Be careful with the directory we are going to deal with because it’s the core of your operating system and if you delete any file by mistake it may lead to a software break. Ready? Let’s do this!
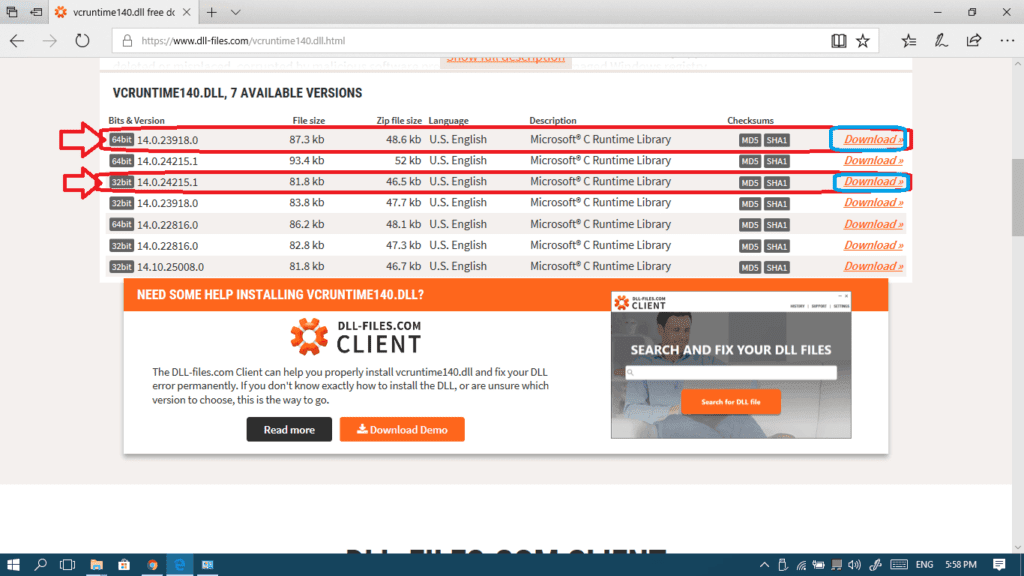
- Go to https://www.dll-files.com/vcruntime140.dll.html and scroll down a little and choose the latest build of the DLL file corresponding to the Windows version you have (remember the 32 bit and the 64 bit thing?).
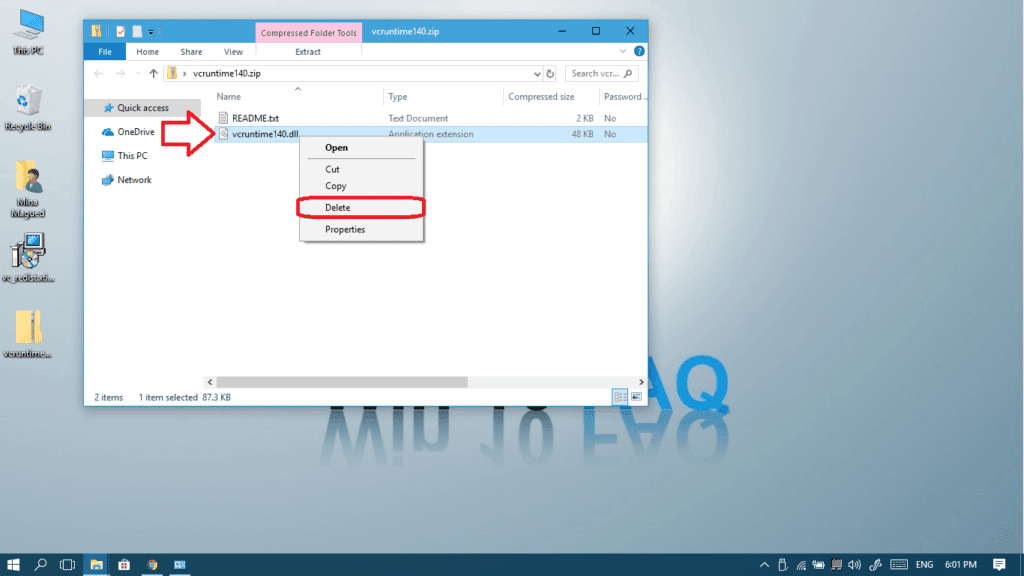
- Once downloaded, open the zipped file.
- Right-click on the vcruntime140.dll file and select Copy.
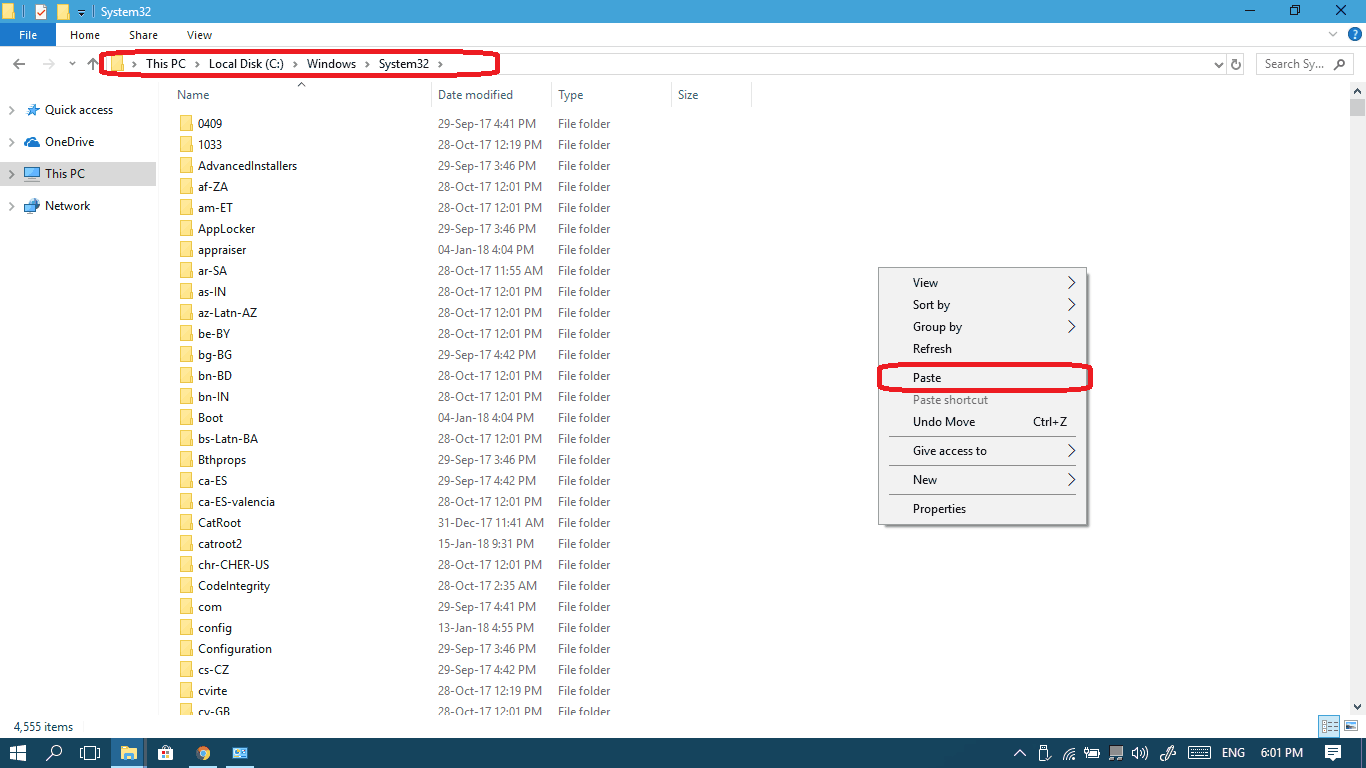
- Now go to this directory, right-click on any blank area and then go for Paste.


C:\Windows\System32
Here your go, now restart your computer and give it another shot. We hope one of the above proven solutions will resolve your “VCRUNTIME140.dll is missing” error. Let us know how it went down in the comments below. Cheers!
Frequently Asked Question
What’s up with the “VCRUNTIME140_1.dll not found” I have just received?
The VCRUNTIME140_1.dll file comes from the Microsoft Visual C++ Redistributable package and should be initially installed directly on your operating system. However, in time, due to registry error, other installs, and numerous other reasons, the file can either go missing or get corrupted.
You can fix this by either installing all available Windows updates, reinstalling Microsoft Visual C++, or redownloading the missing file from a reputable source (such as Microsoft directly).
How do I install a DLL file?
To install a DLL file, all you need to do is download the specific DLL file that’s missing, and then place it in its appropriate folder depending on the version of the OS that you are running:
C:\Windows\System32\ (32 bit)
C:\Windows\SysWOW64\ (64 bit)
This is a great blog post! I was having the same issue with my VCRUNTIME140.dll file not being found. I followed the instructions and it worked like a charm!