Are you clicking on icons at the taskbar but nothing happens?
Or are the icons not shown on your taskbar? Or even worse, is the taskbar not there at all?
Follow one of the 5 simple methods below to fix your issues if your Windows 10 taskbar is not working, and get right back to doing more enjoyable things 🙂
Quick Jump
- Method 1: Restart Windows Explorer using Task Manager
- Method 2: Restart Windows Explorer using CMD
- Method 3: Disable some startup programs
- Method 4: Make sure you have the latest Windows 10 version
- Method 5: Check for old restore points
Method I: Restart Windows Explorer using Task Manager
Windows explorer is responsible for all the Windows User Interface, and since your taskbar is a part of it, then restarting Windows Explorer solves the problem in most cases. Follow me in order to do it:
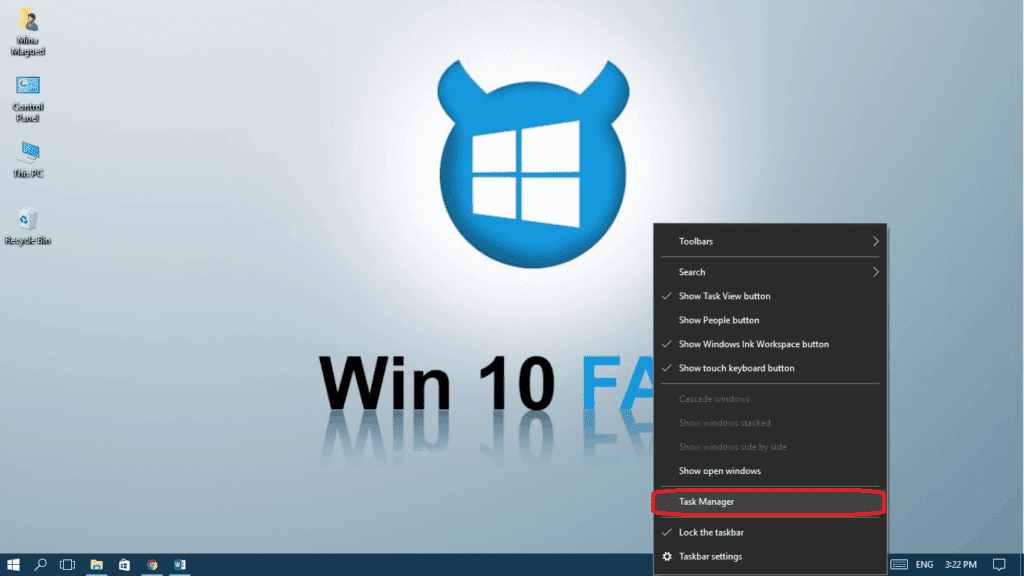
- Press Ctrl + Shift + ESC buttons or right-click on your task bar and select Task manager to launch it.

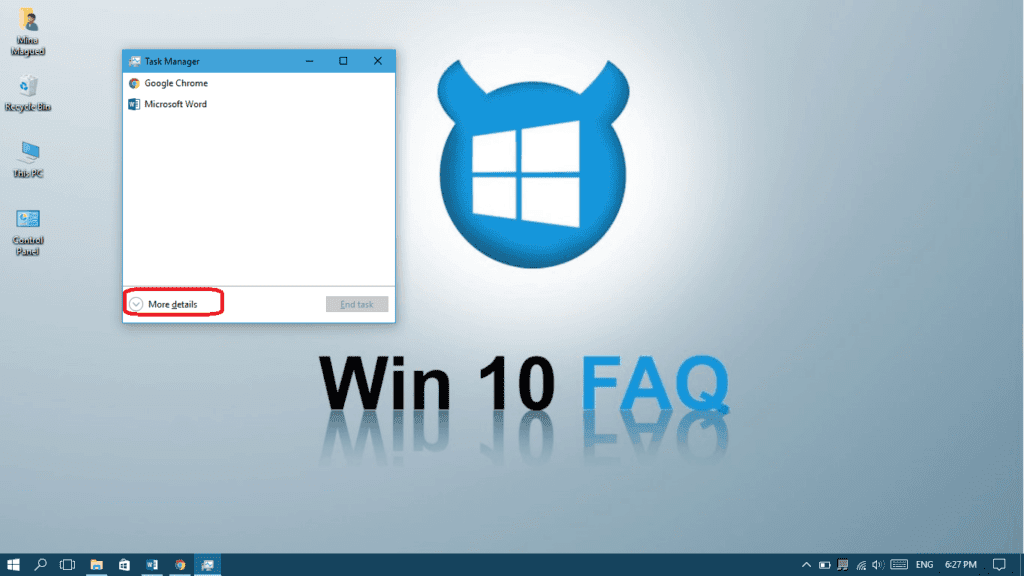
- Click More details if you’re not seeing the big panel (see picture).

- In the Processes tab, right-click on Windows Explorer and then select Restart.

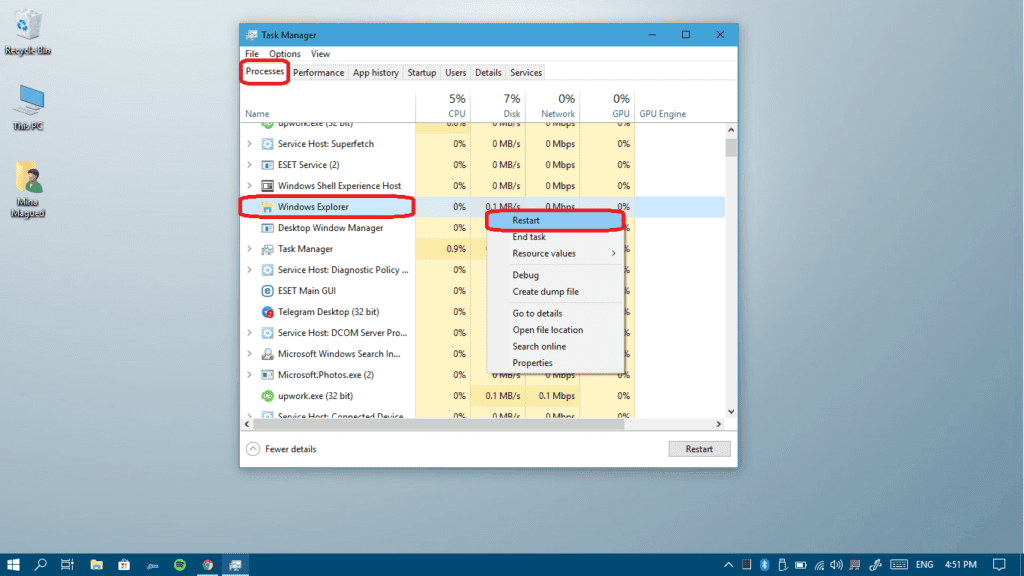
Once your screen refreshes, try to your taskbar again and see if it works. If you can’t restart it using Task manager, here is another method to restart it using CMD.
Method II: Restart Windows Explorer using CMD
All process can be killed and run using CMD, we will do this to Explorer.exe which is Windows Explorer’s process. Here is how to do it:
- Press Windows logo key + X and then choose Command Prompt (Admin).

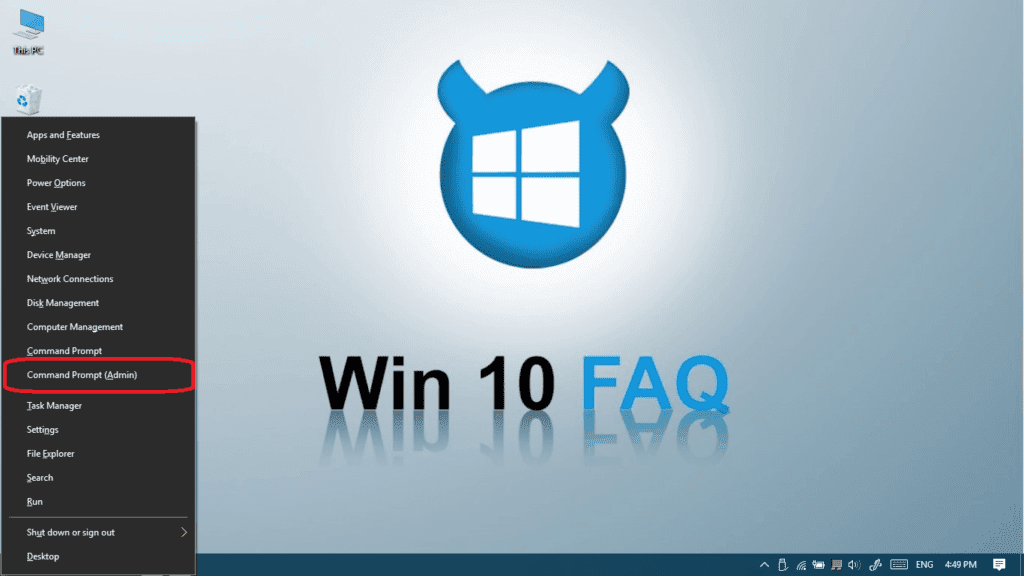
- Click Yes to give permissions to it.

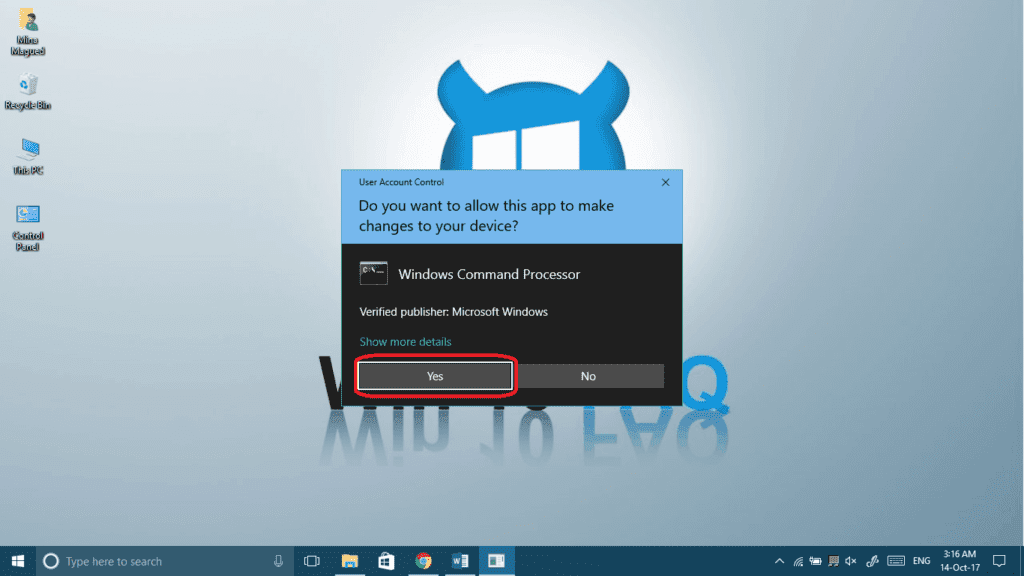
- Once CMD is launched, type this command to terminate the Windows Explorer process: taskkill /f /im explorer.exe and then press Enter.
- The taskbar, the background and the desktop icons are gone, right? It’s time to get them back, type explorer.exe and then press Enter.

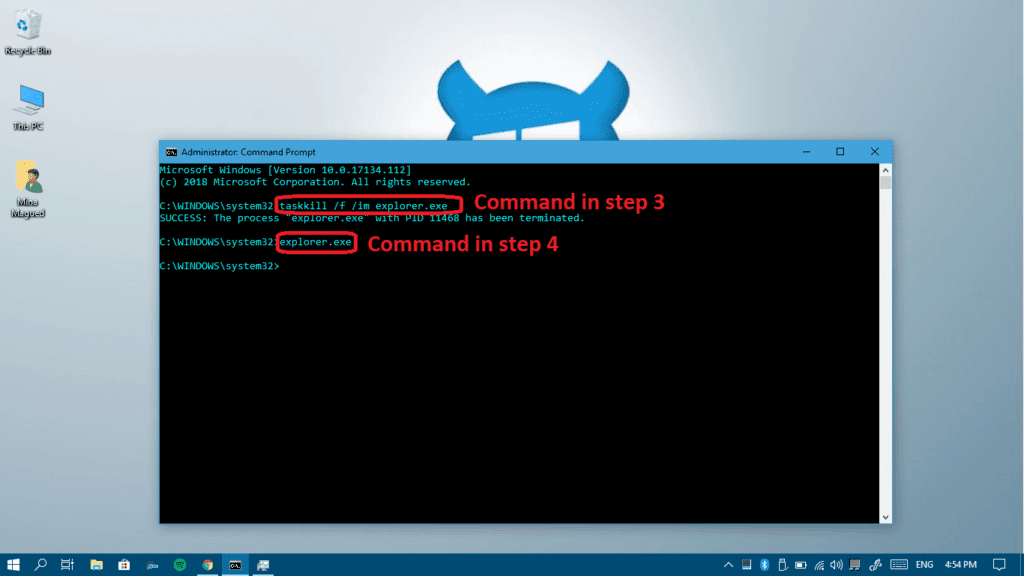
Everything should be okay now, check it now and if you’re still facing some troubles, continue reading for more methods.
Explorer” Method III: Disable some startup programs
Maybe the reason behind the issue is an outsider app that launches at startup. Therefore, we will have to disable all non-Microsoft programs from startup.
Luckily, we have a full guide about disabling and enabling startup programs right here, follow it to disable all non-Microsoft apps as we said and restart your computer and see if it works.
Method IV: Make sure you have the latest Windows 10 version
Checking for updates is one of the greatest keys to solve any Windows problem. Every update comes with tons of solutions for bugs that show up. Some users reported having the taskbar issue from time to time until they updated their Windows to the latest version. It’s then recommended to give it a shot:
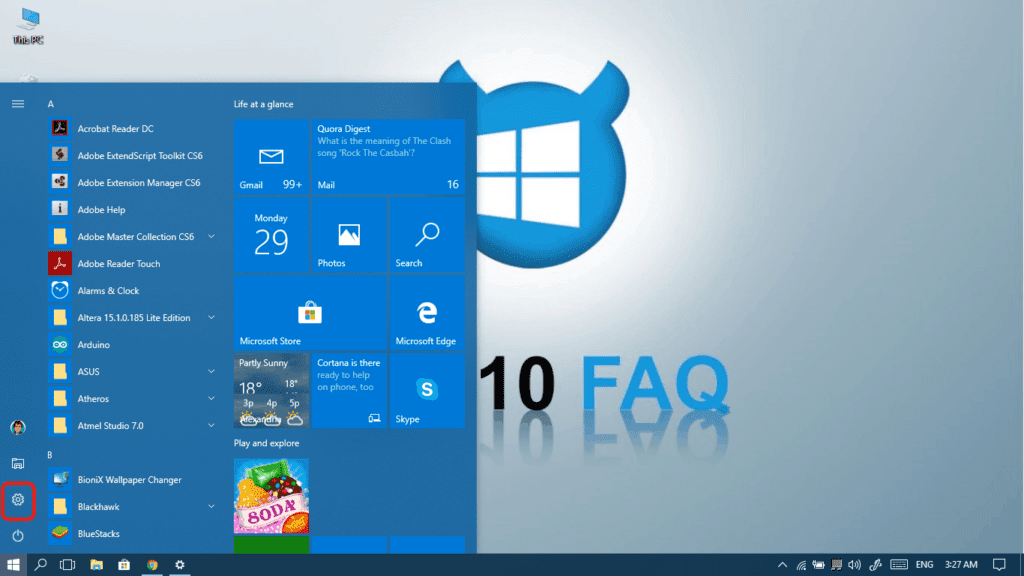
- Open Settings from your start menu.

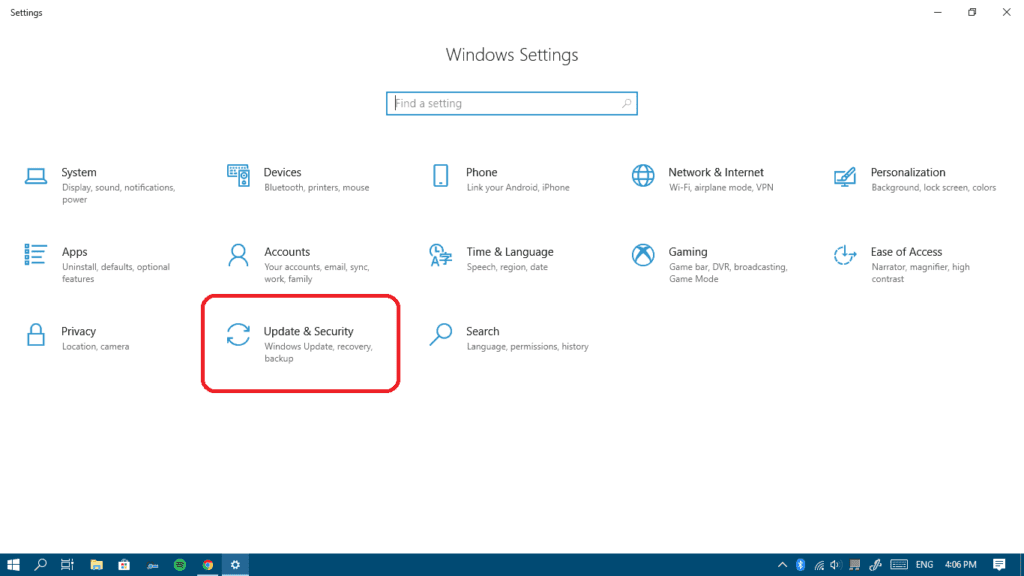
- Click on Updates & Security.

- Click on the Check for updates button, your computer will then check for, download and install any updates found.

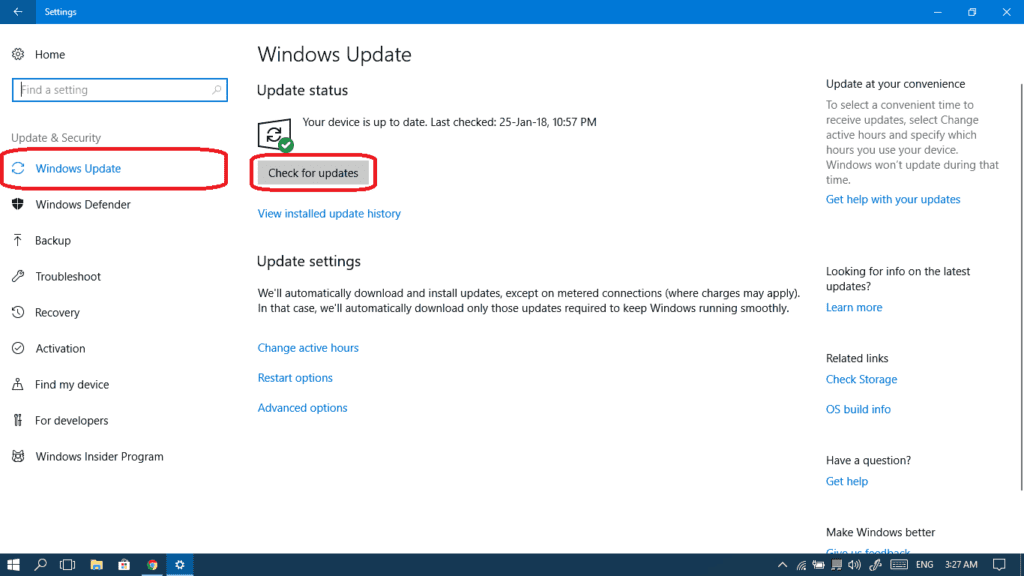
After downloading and installing the new updates (click here if you want to read about what the latest update changed in your computer), your computer should restart. Now, see if the taskbar is back to work and if it doesn’t, here’s another method to fix it.
Method V: Check for old restore points
A good solution is to go back in time and avoid the reason behind a problem, no? That’s why if all the solutions above fail, you got to try this one:
- Open Control Panel and search for recovery.

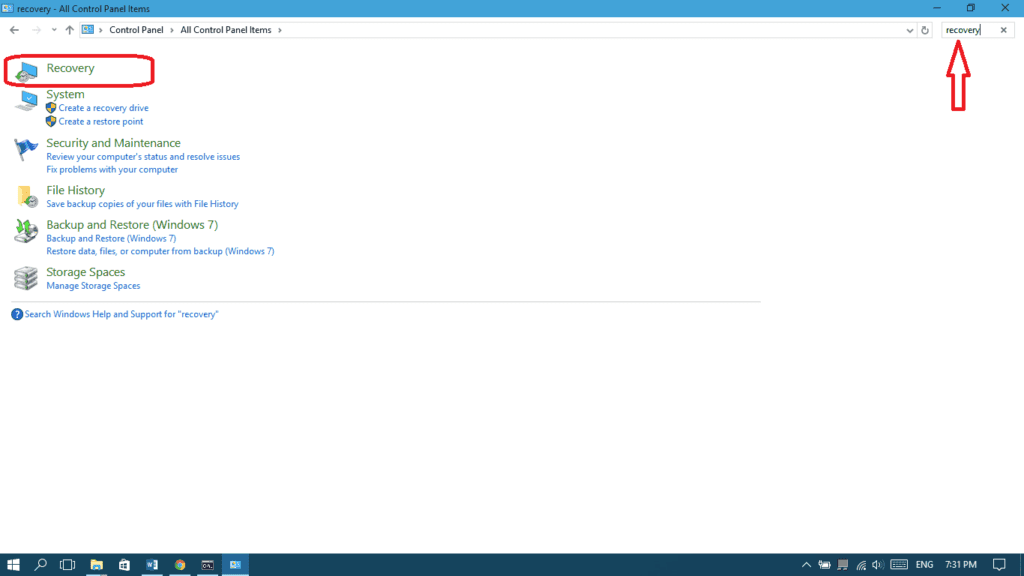
- Open System restore.

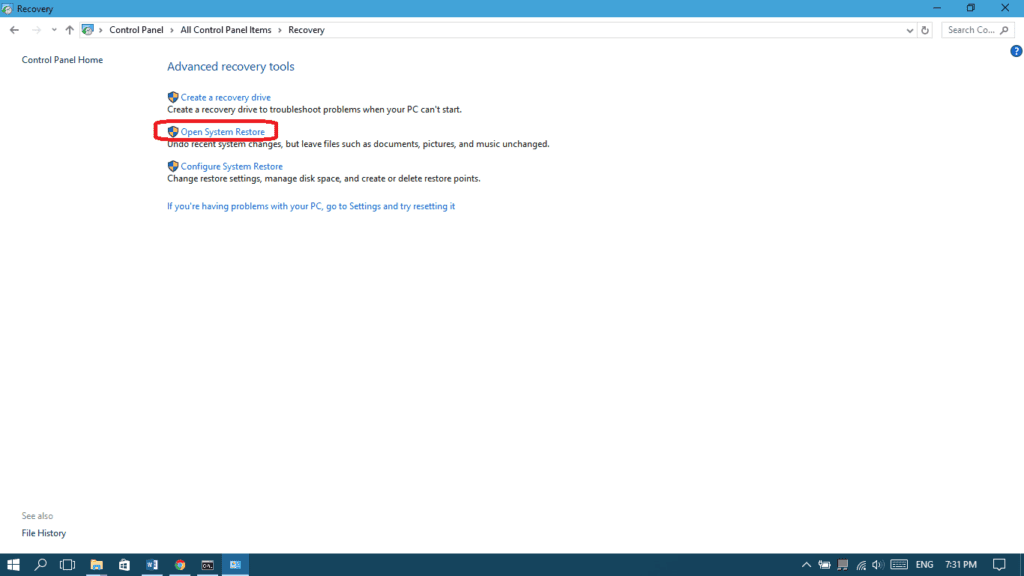
- Click Next.

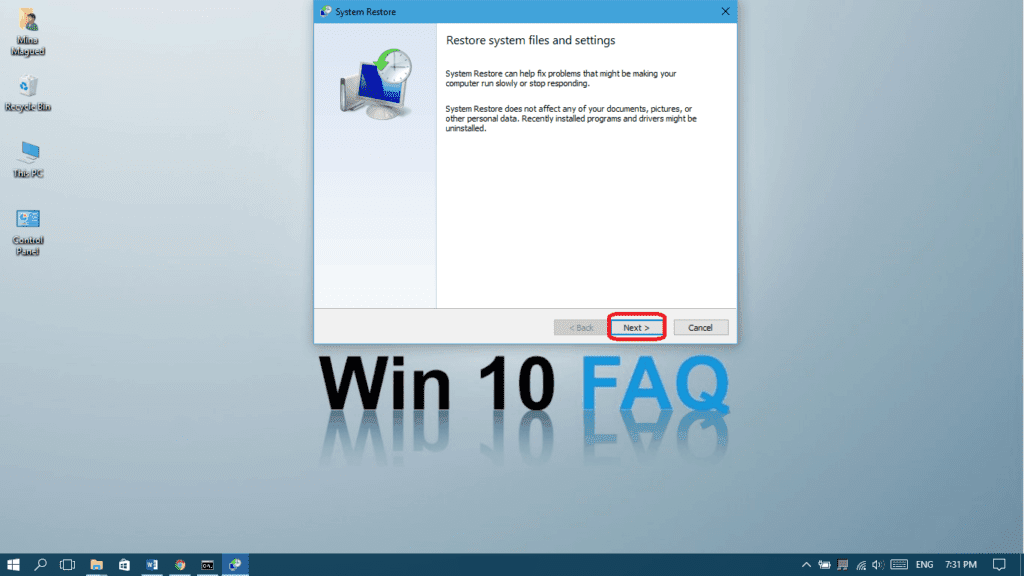
- Choose a previous restore point at a time where the problem wasn’t there yet and click Next.

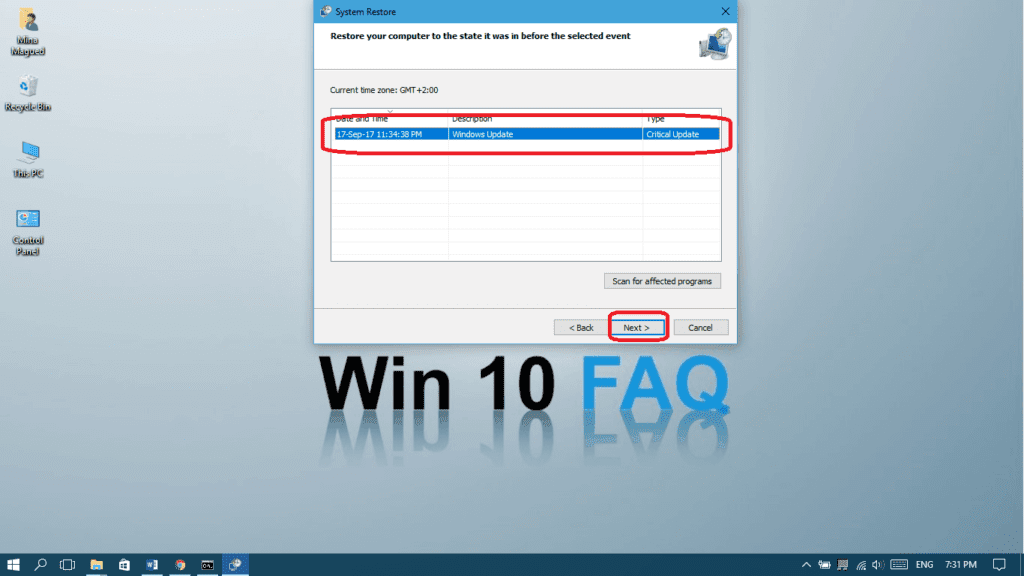
- Click Finish.

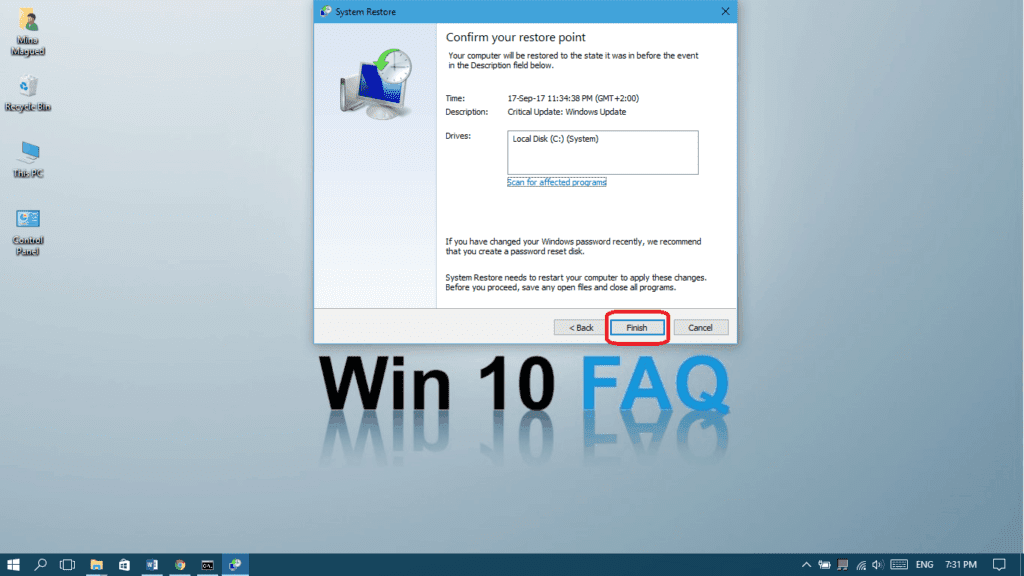
And that’s it!
How do I fix the taskbar in Windows 11?
Rightfully so, many of our readers have asked us how they can get back to a previous version of the famous taskbar because the one found in Windows 11 had a lot of missing features that people actually used.
To do this, there are two methods that have been tested successfully up until the point of writing this section.
Use a registry hack
To switch back to the Windows 10 taskbar instead of the new Windows 11 version, the earliest known hack – and the one that seems to work most of the time – is a mere registry hack.
- Click on the search button and type “regedit.”
- Double-click on the Registry Editor.
- Navigate to the following path: HKEY_CURRENT_USER\Software\Microsoft\Windows\CurrentVersion\Explorer\Advanced
- Then right-click on Advanced and select New → DWORD (32-bit) Value.
- Name the new value Start_ShowClassicMode.windows-11-enable-old-start-menu
- Double-click on Start_ShowClassicMode and set the value data to 1.
- Restart your computer and check if the Start menu is aligned to the left now.
The Alternate Solution
If you’re not so keen on using the registry editor, then there are also a few other solutions that should provide the similar thing that the registry hack already does on its own.
First off, you can move the start button and taskbar buttons to the left by using the default Windows Personalization Settings that you can find in the Settings App. Just click Windows + I to access it directly via the keyboard.
Or, even better, you can use a tool for this exact reason. Our friends at PC Gamer have a detailed article on how to perform multiple hacks for your Windows 11 taskbar.
Final Thoughts
Did these methods solve your Window 10 taskbar not working issue? Did you find another way to fix your taskbar? We’d love to hear from you in the comment section below! Feel free to write anything related to this subject, as your readers’ opinions always share a priority with us. We will answer as soon as possible if you’ve also got other questions regarding this topic.

Wow thank you! It worked. My laptop not even a year old and I thought I was gonna have a panic attack lol
Hey Robert, I’m glad you fixed it! Thanks for your comment.
I’ve tried all the steps as you explained them. But nothing happened. Right now i’m confused.
I tried all the steps but nothing happened.
thanks ! restarted windows explorer works 🙂
My start menu, taskbar, and task manager are all not working. No icons are showing on the desktop or loading in the taskbar. I can hit Alt+Ctrl+Del an fun bring up the screen, but when I click on Task Manager, nothing happens. Can anyone help?
I followed through with a Windows 10 update earlier today and after that, the icons in my taskbar won’t open. I can’t even type in the search field. Therefore, I looked for a solution and found this page. Everything I’ve tried, even another lengthy update, a few minutes ago, isn’t solving the issue. Prior to this mornings update of Windows, everything was working fine.
None of this helped at all ?
1 – just brings back an empty, unresponsive taskbar
2 – does nothing
3 – made no difference
4 – unable to access start menu
5 – unable to access control panel
Any other things to try? I can’t access any of the folders I need.
Thanks
i cant use method 1 because my task manager wont open and thats fine
BUT ANY OF THE OTHER METHODS I CANT USE BECAUSE THEY REQUIRE USING THE TASKBAR, AND THE TASKBAR DOESNT WORK
HOW DO ANY OF THOSE METHODS MAKE SENSE FOR A GUIDE THAT FIXES AN UNRESPONSIVE TASK BAR
Thank you! It really helped me
My computer’s start button can not be accessed… It demands that I activate the windows. How can I bypass the activation and still access my start button and taskbar????
I cannot get my task bar back to where it should be in the left hand corner of the screen