Windows 10 has a feature that allows part of your hard drive to work the same way that RAM(Random Access Memory) does. Known as virtual memory, it is important to system stability and can help improve your computer’s performance when properly configured. You will know how to turn storage into ram with this article.
Before covering how to configure virtual memory, it may be helpful to explain how it works and go over why it’s important. But if you just want to get to the “how to” part you can click here to skip ahead.
How Does Virtual Memory Work?
Virtual memory is stored in a system file known as the pagefile, or paging file. This file is used mainly in 2 situations; when Windows uses up all available physical RAM and when programs are inactive for a while.
The first situation is especially common with older computers that have low RAM. When you have no more physical memory left the data that is being generated and used still has to go somewhere. This is where the paging file comes in and Windows has the program use it as if it were physical memory.
When programs are minimized and not in use their data can also be moved from RAM to virtual memory to make room for other programs and important processes. This helps the whole system run more smoothly.
Importance of Virtual Memory
Some websites recommend that you disable your paging file, especially if you have a large amount of physical memory, but this can be a bad idea. (See also Disable Enable Startup Programs)
If you don’t have virtual memory enabled you can encounter slow downs, errors and even crashes resulting in data loss if your computer’s memory usage gets too high. The same can also happen if your paging file is too small. There are also some programs and functions that need the paging file enabled in order to work properly.
Setting your paging file very large can cause issues as well, the most obvious one being that it could end up using too much space on your hard drive. But setting an oversized paging file can also cause a large amount of data to be loaded into virtual memory when you are running either memory intensive programs or simply a lot of them and can cause those programs to be very slow when switching between them.
Virtual memory is slower than physical memory after all, even when stored on an SSD(Solid State Drive). As fast as SSDs are compared to traditional HDDs(Hard Disk Drives), they can’t beat RAM. If your computer is slow due to low memory the only surefire way to speed it up is to install more or upgrade to a new system with more RAM, but having a good sized paging file will help keep it stable and better performing overall.
Determining How Much Virtual Memory to Set
There is no universally agreed upon “best” amount of virtual memory, so what you set your virtual memory to will depend on your needs. More specifically, based on how much RAM you have and the maximum amount of memory you tend to use, or think you would need.
If you have a good idea of the maximum amount of memory you need, your best option is to set your paging file to be a little over that number, including your RAM. For example, if you have 8GB of RAM and have a maximum memory usage of 12GB, you would want to set your paging file to 5GB. 8GB of RAM + 5GB of virtual memory = 13GB total of memory available to the system.
Even if your maximum memory usage is under your total amount of RAM, you should still set a small paging file. Around 1-2GB should be good.
Task Manager Test
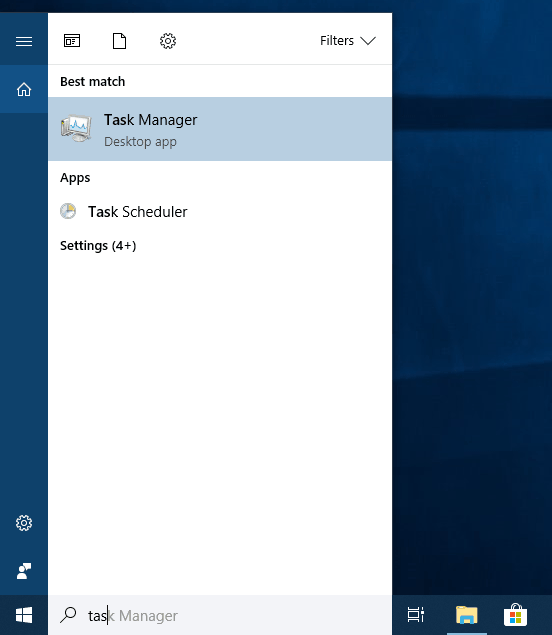
For those that aren’t sure of their memory needs, a way to see if you need more is to check under the Performance tab on Task Manager. While Ctrl + Alt + Del is the most well known way to get to Task Manager, there are quicker methods, such as:
- Windows search.
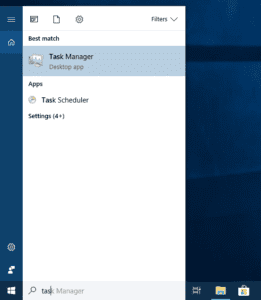
- And the Ctrl + Shift + Esc shortcut.
Once Task Manager is up:
- Click on the “Performance” tab then click on “Memory”
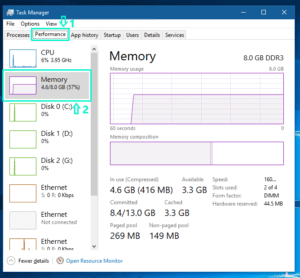
- Open up what you think would be the most programs you would normally have running at the same time. Such as a web browser, music player and word processor. Maybe also a game, or any other demanding program you use on a regular basis. If doing this makes your system slow or unstable, then it’s very likely you need more virtual memory.
- Once you have these running, go back to Task Manager and see what it says under “Committed”. This is roughly your RAM and virtual memory combined, showing what’s in use and what’s available. If the number on the left is very close to the one on the right, you should also increase your virtual memory.
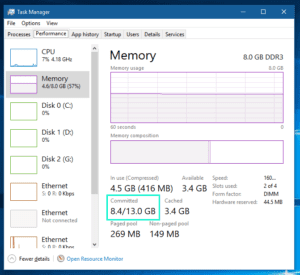


Around 2GB more than what you currently have should be a safe amount to set. If you end up needing more you can always increase it again later.
How To Set Virtual Memory
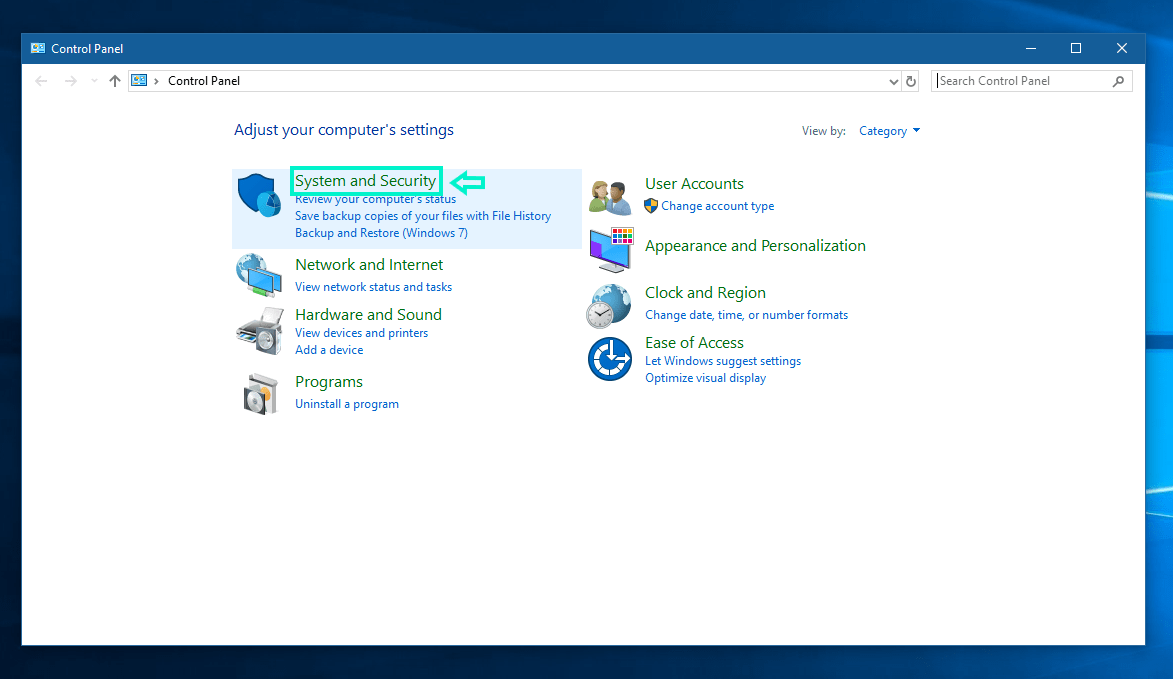
The virtual memory settings can be a bit tedious to get to. The first step is getting to the System section of the Control Panel.
To do so:
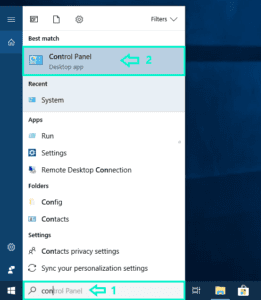
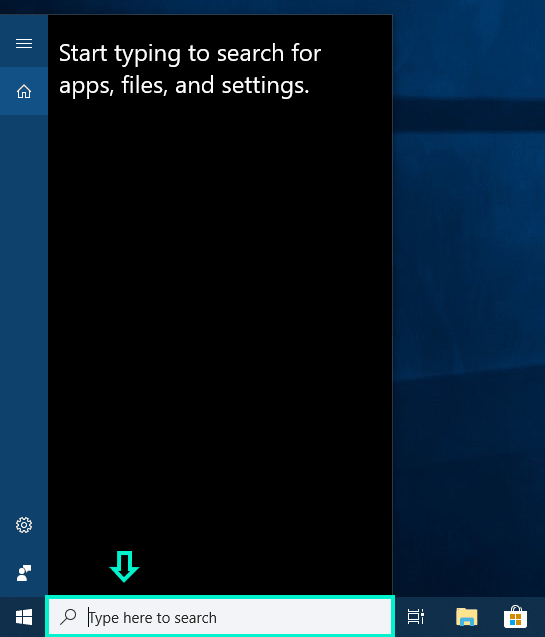
- Open the Search box by clicking on it or pressing Win + S.

- Begin typing “Control Panel” and click on it when it shows up.
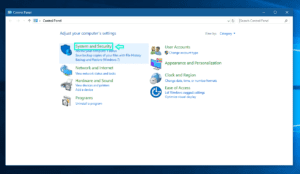
- Click “System and Security”.
- Click “System”.
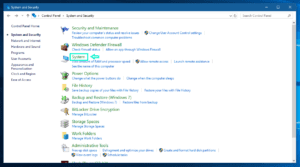

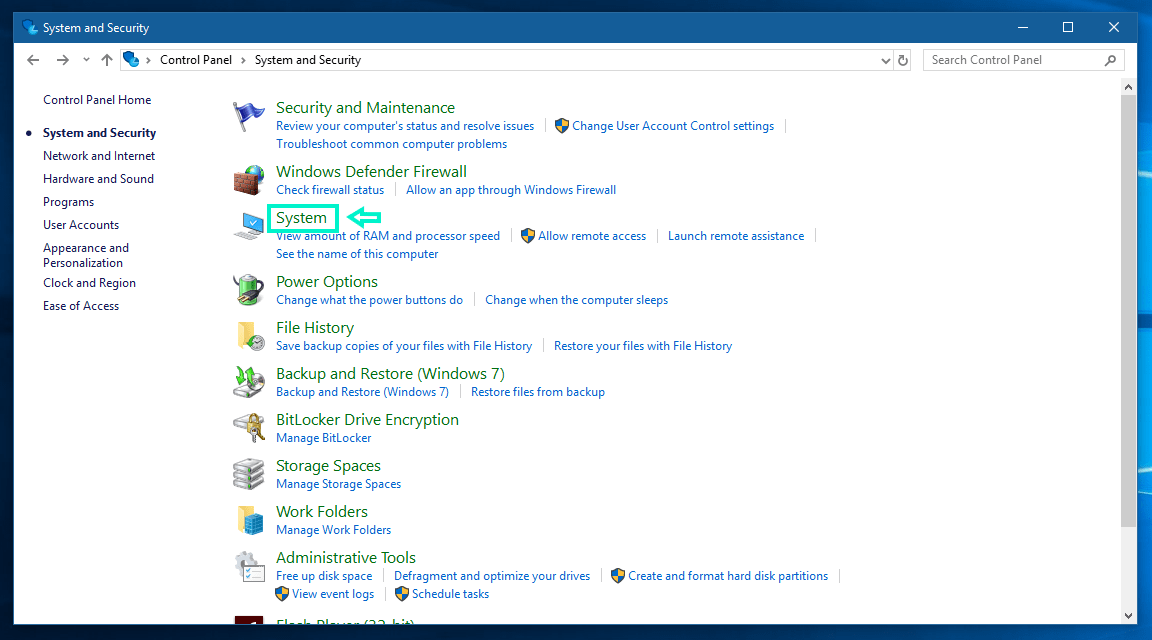
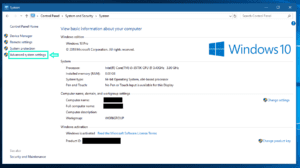
Here you can see basic information about your system, including how much RAM you have. Once you’ve gotten to the System page, do the following:
- Select “Advanced system settings” on the left.
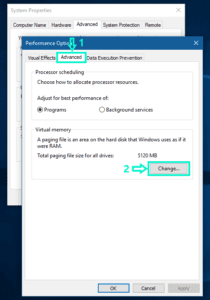
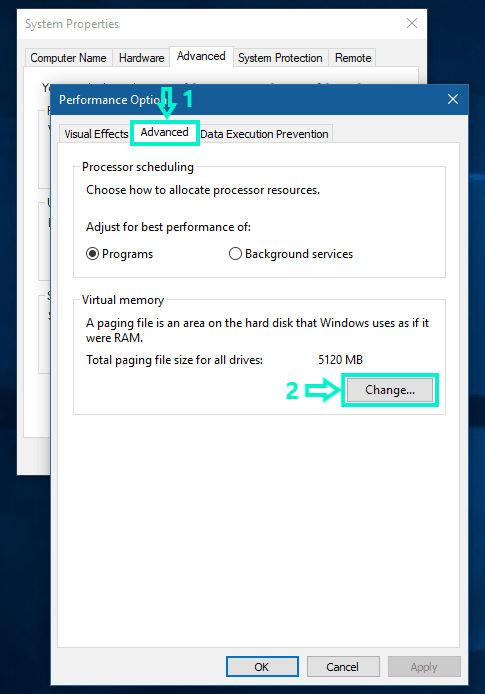
- Navigate to the “Advanced” tab and click “Settings…” under “Performance”.
- Select the “Advanced” tab and then click the “Change…” button under “Virtual memory”.

Once you have gotten this far you can now choose how to set up virtual memory. How you do so will again depend on your memory needs.
In many cases having Windows determine the best size for the paging file itself is actually the best option, especially if you aren’t really sure what your memory needs are and don’t want to deal with determining the right amount manually.
Letting Windows Manage Virtual Memory
If you only have one hard drive, or don’t care which drive(s) the paging file is on, the following steps should give you the best results.
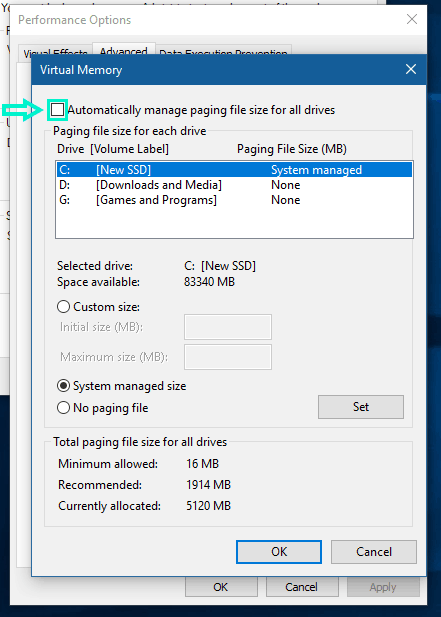
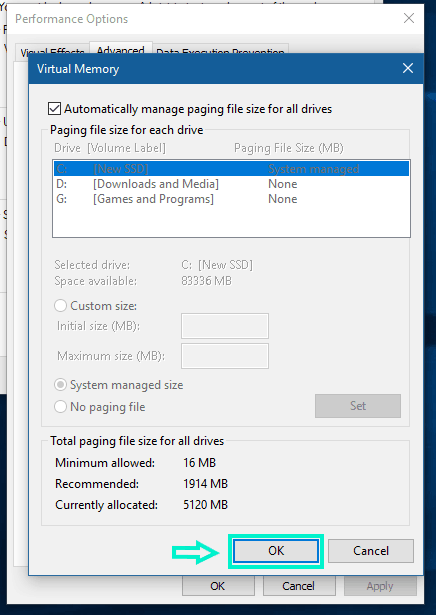
- On the “Virtual Memory” window check the “Automatically manage paging file size for all drives” box.

- Click “OK”.

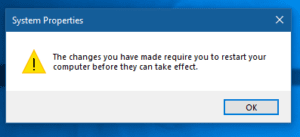
- You should get a prompt saying you need to restart in order for the changes to take effect. Click “OK”.
- Click “OK” on all the remaining open windows.

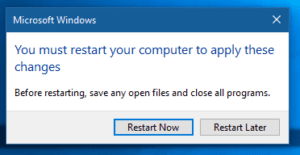
- You should then get a prompt to restart your computer now or later. If you want to restart right away close all open programs and click “Restart now”. If you don’t want to restart yet, click “Restart later” but be sure to remember to restart as soon as you are able to.


Multiple Drives
For those with multiple drives, you can tell Windows to only have the paging file on one of them. If you have an SSD assigning the paging file to it should offer the best performance. For those lucky enough to have multiple SSDs, set it to one that Windows is not on. If you’re concerned about your SSD’s lifespan, then assign it to an HDD. If you only have HDDs, set it to one not running Windows. Check out what’s the difference between SSD and HDD.
Once you’ve decided, do the following:
- If not already on the “Virtual Memory” window, follow the steps here.
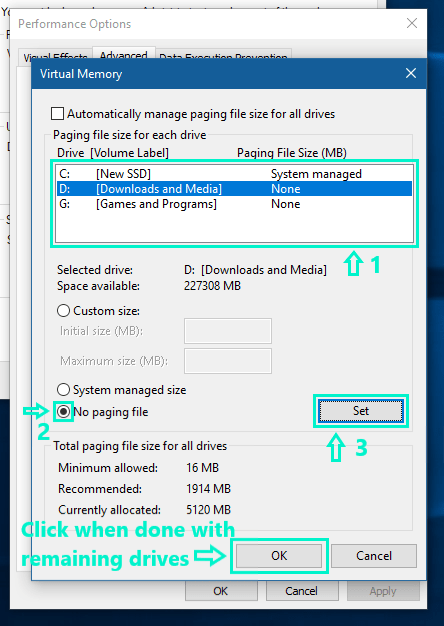
- Make sure “Automatically manage paging file size for all drives” is not selected then click on the drive you wish to put the paging file on.

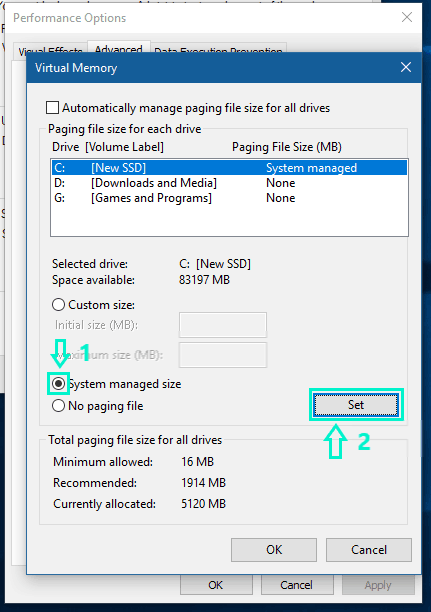
- Click “System managed size” then “Set”.
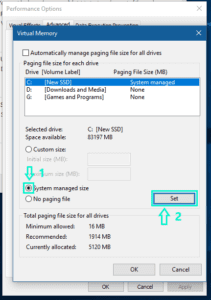
- Select the rest of the drives and click “No paging file” if not already selected, then “Set” for each of them, then click “OK”.

- You should get a prompt letting you know you need to restart. Click “OK”.
- Click “OK” on the rest of the open windows.
- You should then get prompt to restart now or later. If you are ready, close all open programs and click “Restart Now”. If you want to wait, click “Restart Later”.
Setting Virtual Memory to a Fixed Amount
If automatic management ends up not helping, or if it’s what you computer was already set to, setting the size manually may be your best bet. This is where you can put the advice on determining what to set it to into practice.
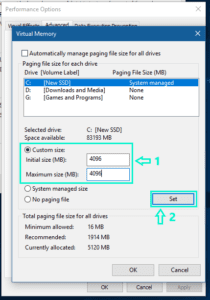
- If not already on the “Virtual Memory” window, follow the steps here.
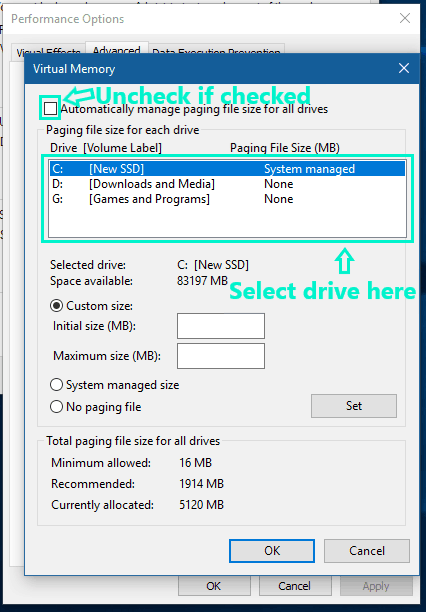
- Make sure the automatic management checkbox is not checked, then select the drive you wish to use. The advice from here on determining which drive applies here as well. You can set the paging file on more than one if you want, but there’s not really an advantage to doing so.
- Click on “Custom Size” and enter the minimum size you want the paging file to be in “Initial size” and the maximum in “Maximum size”. For reference, 1GB is 1024MB for memory. If you don’t want the size to vary and want it at an exact fixed size, enter the same number in both. This is useful if you want to always know how large your paging file is.
- If you have multiple drives select them one at a time and click “No paging file” then “Set” for each of them, then click “OK” when done.
- A prompt letting you know you need to restart should come up. Click “OK”
- Click “OK’ on the remaining windows.
- Another prompt should come up asking you to restart now or later. Close all programs and click “Restart Now” if ready, or click “Restart Later” if you are not. The changes will not take effect until you restart.

Once you’ve set up your virtual memory to what should work best for you and restarted your computer, go ahead and test it out by opening the programs you did during the Task Manager test. If things don’t seem quite right or if your memory needs end up changing, follow this guide again as needed.
Frequently Asked Questions
Can you also use storage as RAM on Android?
Yes, but there’s a catch. You need to root your phone to achieve this. Without a rooted phone, you won’t be able to do so. Let’s say you have an Android device with 4GB of RAM and 64GB of internal storage.
With the Virtual RAM feature, a part of the 64GB storage, consider 2GB for instance, will be specifically allocated to be used as RAM. Now the total effective RAM on your device will be 6GB (4GB + 2GB) with a storage space of 62GB.
Here are some methods for rooted devices using which you can use an external SD card to create a swap file to use it as Virtual RAM. Note that you’ll need a Class 10 memory card or better for using it as Virtual RAM on your Android device:
- ROEHSOFT RAM Expander
- RAM Manager Pro
- Link2SD
Do you really need 16 GB of RAM for gaming?
As of the time of writing this piece, 16 GB of RAM is the sweet spot for gaming. While it’s not mandatory, it will help certain games run smoother, especially if you plan on playing them with the details maxed out at a ridiculously high resolution. Otherwise, 8 GB of RAM is enough for most of the games that have come out so far.
Suggested Read: How To Create A Bootable Pendrive
Final Thoughts
You’ve learned how to use your storage as RAM in Windows 10, Windows 11, and, as a bonus, even on a rooted Android phone. And you’ve also learned why RAM is important in the first place, as it stores essential information that needs to be accessed immediately. Want to learn even more? Feel free to browse the rest of our website for other useful information and articles related to Windows and PCs in general.
Every day, we encounter different problems on our computers and other devices that require immediate response so that our work won’t be put on hold. From typical system errors and installation of various devices to simple information about technical terms, our website offers most of your computer-related questions, especially for Windows 10. Check us out now and you may find helpful tutorials. Or you may directly ask about How To Change Your Windows 10 Username.
Thank you, the instructions were great. it seems to be quicker. Much quicker. If I experience any difficulties I will inform you as to the change. Could I also partition my hard drive and set it up as a virtual drive? My website below is under construction. thanks again.
This is great to know! I’ve been struggling with my computer’s performance lately, and I’m definitely going to try this out. Thanks for sharing!